- PRECAUTION
Refer to PRECAUTION [09/2014 - 01/2023]
NOTE:
After turning the engine switch off, waiting time may be required before disconnecting the cable from the negative (-) battery terminal. Therefore, make sure to read the disconnecting the cable from the negative (-) battery terminal notices before proceeding with work.
Refer to PRECAUTION [11/2017 - ]
- ALIGN FRONT WHEELS FACING STRAIGHT AHEAD
- CHANGE POWER TILT AND POWER TELESCOPIC STEERING COLUMN SYSTEM SETTINGS (for Power Tilt and Power Telescopic Steering Column)
Refer to PROCEDURE - Step 2
- DISCONNECT CABLE FROM NEGATIVE BATTERY TERMINAL
WARNING:
Wait at least 90 seconds after disconnecting the cable from the negative (-) battery terminal to disable the SRS system.
- REMOVE CONSOLE BOX ASSEMBLY
Refer to REMOVAL [03/2019 - ]
- REMOVE FRONT DOOR SCUFF PLATE LH
See step 3
- REMOVE FRONT DOOR OPENING TRIM COVER LH
See step 4
- REMOVE INSTRUMENT SIDE PANEL LH
- Disengage the claw and 4 clips as shown in the illustration.
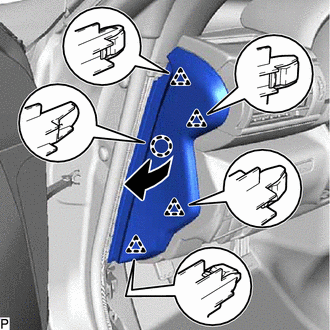 Courtesy of © TOYOTA, LICENSE AGREEMENT TMS1002 Courtesy of © TOYOTA, LICENSE AGREEMENT TMS1002
|
- Disengage the 2 guides to remove the instrument side panel LH as shown in the illustration.
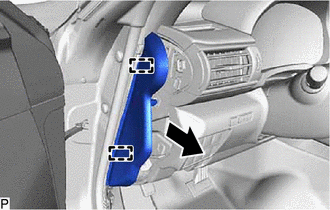 Courtesy of © TOYOTA, LICENSE AGREEMENT TMS1002 Courtesy of © TOYOTA, LICENSE AGREEMENT TMS1002
|
- REMOVE NO. 1 INSTRUMENT PANEL UNDER COVER SUB-ASSEMBLY
- Remove the 2 screws <C>.
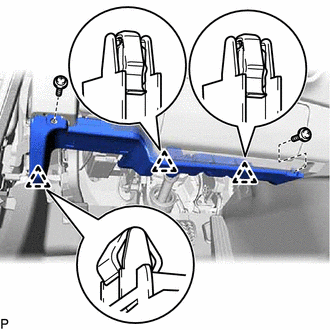 Courtesy of © TOYOTA, LICENSE AGREEMENT TMS1002 Courtesy of © TOYOTA, LICENSE AGREEMENT TMS1002
|
- Disengage the 3 clips.
- Disengage the connector clamp.
- Disconnect each connector to remove the No. 1 instrument panel under cover sub-assembly.
- DISCONNECT HOOD LOCK CONTROL LEVER SUB-ASSEMBLY
- Disengage the claw and 2 guides to disconnect the hood lock control lever sub-assembly.
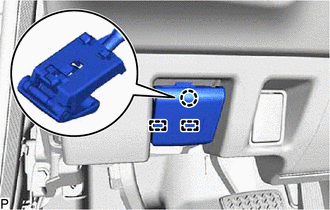 Courtesy of © TOYOTA, LICENSE AGREEMENT TMS1002 Courtesy of © TOYOTA, LICENSE AGREEMENT TMS1002
|
- REMOVE LOWER INSTRUMENT PANEL FINISH PANEL SUB-ASSEMBLY
- Disengage the 5 claws, 7 clips and guide.
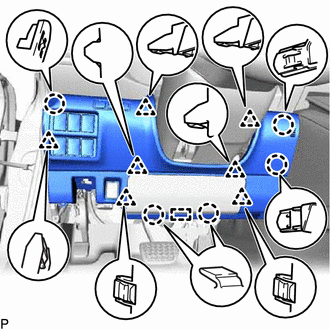 Courtesy of © TOYOTA, LICENSE AGREEMENT TMS1002 Courtesy of © TOYOTA, LICENSE AGREEMENT TMS1002
|
- Disconnect each connector to remove the lower instrument panel finish panel sub-assembly.
- REMOVE SKID CONTROL BUZZER
Refer to PROCEDURE - Step 4
- REMOVE LOWER NO. 1 INSTRUMENT PANEL AIRBAG ASSEMBLY
Refer to PROCEDURE - Step 10
- REMOVE METER HOOD SUB-ASSEMBLY
- Disengage the 4 clips and 2 claws.
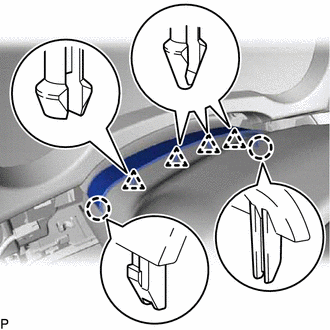 Courtesy of © TOYOTA, LICENSE AGREEMENT TMS1002 Courtesy of © TOYOTA, LICENSE AGREEMENT TMS1002
|
- Disengage the 2 claws as shown in the illustration.
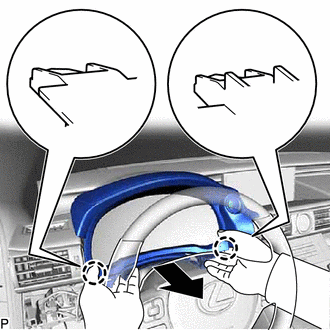 Courtesy of © TOYOTA, LICENSE AGREEMENT TMS1002 Courtesy of © TOYOTA, LICENSE AGREEMENT TMS1002
|
- Disengage the 7 clips and 3 guides as shown in the illustration.
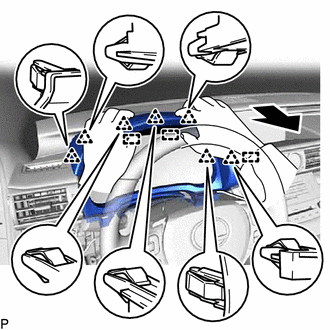 Courtesy of © TOYOTA, LICENSE AGREEMENT TMS1002 Courtesy of © TOYOTA, LICENSE AGREEMENT TMS1002
|
- Disconnect the connector to remove the meter hood sub-assembly.
- REMOVE COMBINATION METER ASSEMBLY
Refer to PROCEDURE - Step 8
- REMOVE DCM (TELEMATICS TRANSCEIVER) WITH BRACKET (w/ Manual (SOS) Switch)
Refer to PROCEDURE - Step 2
- REMOVE NO. 1 INSTRUMENT PANEL REGISTER ASSEMBLY
- Disengage the claw as shown in the illustration.
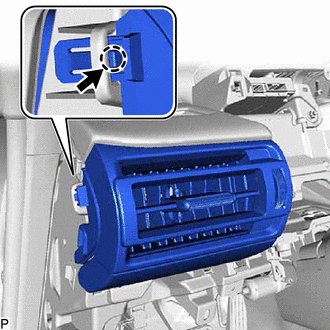 Courtesy of © TOYOTA, LICENSE AGREEMENT TMS1002 Courtesy of © TOYOTA, LICENSE AGREEMENT TMS1002
|
 |
Push |
- Disengage the 3 claws and clip to remove the No. 1 instrument panel register assembly.
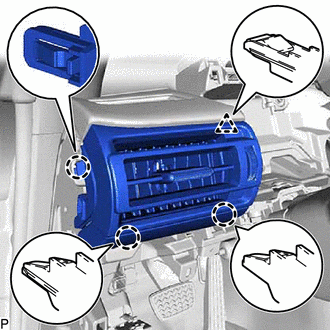 Courtesy of © TOYOTA, LICENSE AGREEMENT TMS1002 Courtesy of © TOYOTA, LICENSE AGREEMENT TMS1002
|
- REMOVE HORN BUTTON ASSEMBLY
Refer to REMOVAL [09/2014 - ]
- REMOVE STEERING WHEEL ASSEMBLY
Refer to PROCEDURE - Step 3
- REMOVE FRONT DOOR SCUFF PLATE RH
HINT:
Use the same procedure as for the LH side.
- REMOVE FRONT DOOR OPENING TRIM COVER RH
HINT:
Use the same procedure as for the LH side.
- REMOVE INSTRUMENT SIDE PANEL RH
- Disengage the claw and 4 clips as shown in the illustration.
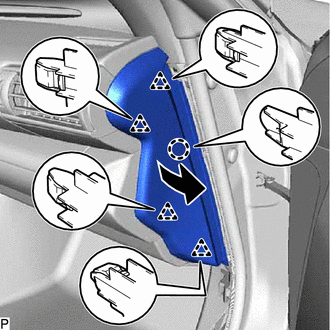 Courtesy of © TOYOTA, LICENSE AGREEMENT TMS1002 Courtesy of © TOYOTA, LICENSE AGREEMENT TMS1002
|
- Disengage the 2 guides to remove the instrument side panel RH as shown in the illustration.
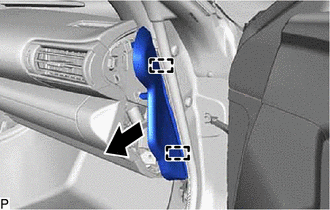 Courtesy of © TOYOTA, LICENSE AGREEMENT TMS1002 Courtesy of © TOYOTA, LICENSE AGREEMENT TMS1002
|
- REMOVE NO. 2 INSTRUMENT PANEL UNDER COVER SUB-ASSEMBLY
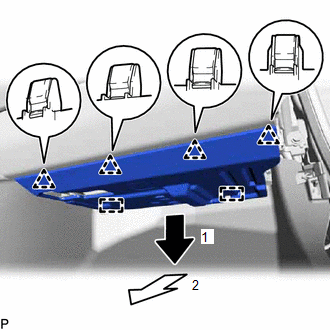
- Disengage the 4 clips and 2 guides as indicated by the arrows, in the order shown in the illustration.
 Courtesy of © TOYOTA, LICENSE AGREEMENT TMS1002 Courtesy of © TOYOTA, LICENSE AGREEMENT TMS1002
|
- Disconnect each connector to remove the No. 2 instrument panel under cover sub-assembly.
- REMOVE LOWER NO. 2 INSTRUMENT PANEL AIRBAG ASSEMBLY
Refer to PROCEDURE - Step 7
- REMOVE GLOVE COMPARTMENT DOOR ASSEMBLY
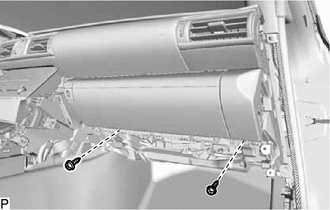
- Remove the 2 screws <C>.
 Courtesy of © TOYOTA, LICENSE AGREEMENT TMS1002 Courtesy of © TOYOTA, LICENSE AGREEMENT TMS1002
|
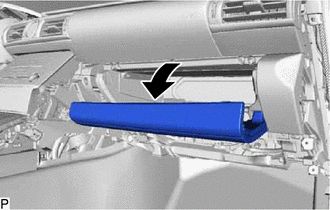
- Open the glove compartment door assembly.
 Courtesy of © TOYOTA, LICENSE AGREEMENT TMS1002 Courtesy of © TOYOTA, LICENSE AGREEMENT TMS1002
|
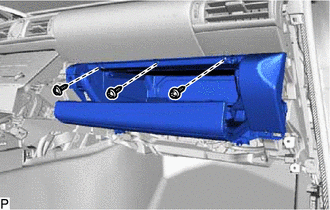
- Remove the 3 screws <C>.
 Courtesy of © TOYOTA, LICENSE AGREEMENT TMS1002 Courtesy of © TOYOTA, LICENSE AGREEMENT TMS1002
|
- Close the glove compartment door assembly.
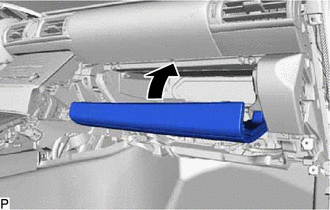 Courtesy of © TOYOTA, LICENSE AGREEMENT TMS1002 Courtesy of © TOYOTA, LICENSE AGREEMENT TMS1002
|
- Disengage the 5 claws.
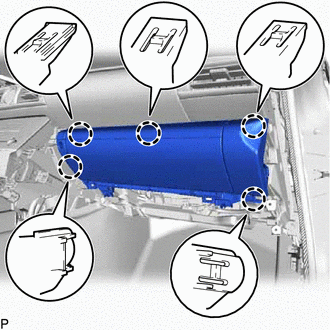 Courtesy of © TOYOTA, LICENSE AGREEMENT TMS1002 Courtesy of © TOYOTA, LICENSE AGREEMENT TMS1002
|
- Disengage the connector clamp.
- Disconnect each connector to remove the glove compartment door assembly.
- REMOVE NO. 2 INSTRUMENT PANEL REGISTER ASSEMBLY
- Disengage the 2 claws as shown in the illustration.
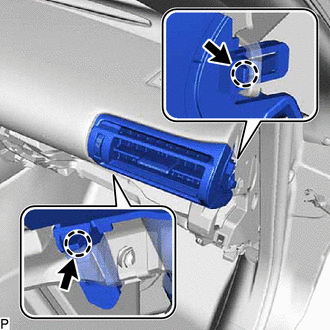 Courtesy of © TOYOTA, LICENSE AGREEMENT TMS1002 Courtesy of © TOYOTA, LICENSE AGREEMENT TMS1002
|
|
Push |
- Disengage the 3 claws and clip to remove the No. 2 instrument panel register assembly as shown in the illustration.
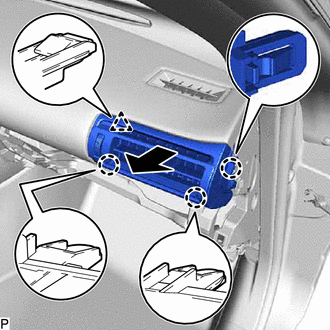 Courtesy of © TOYOTA, LICENSE AGREEMENT TMS1002 Courtesy of © TOYOTA, LICENSE AGREEMENT TMS1002
|
- REMOVE RADIO RECEIVER ASSEMBLY WITH BRACKET
Refer to PROCEDURE - Step 8
- REMOVE AIR CONDITIONING CONTROL ASSEMBLY
Refer to PROCEDURE - Step 2
- REMOVE CENTER INSTRUMENT PANEL REGISTER ASSEMBLY
- Disengage the 4 claws and 4 clips.
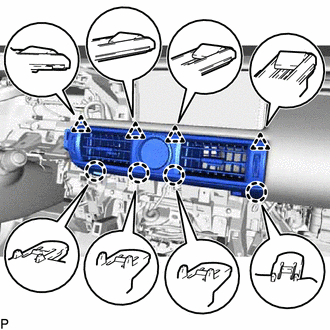 Courtesy of © TOYOTA, LICENSE AGREEMENT TMS1002 Courtesy of © TOYOTA, LICENSE AGREEMENT TMS1002
|
- Disconnect the connector to remove the center instrument panel register assembly.
- REMOVE INSTRUMENT CLUSTER FINISH PANEL SUB-ASSEMBLY
- Apply protective tape to the area shown in the illustration.
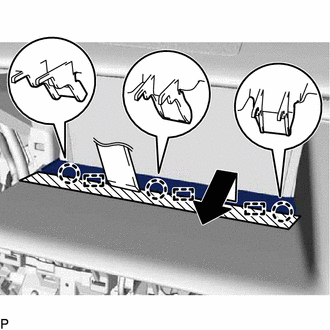 Courtesy of © TOYOTA, LICENSE AGREEMENT TMS1002 Courtesy of © TOYOTA, LICENSE AGREEMENT TMS1002
|
 |
Protective Tape |
- Using a moulding remover, disengage the 3 claws as shown in the illustration.
- Disengage the 3 guides to remove the instrument cluster finish panel sub-assembly as shown in the illustration.
- REMOVE MULTI-DISPLAY ASSEMBLY WITH BRACKET
Refer to PROCEDURE - Step 9
- REMOVE FRONT PILLAR GARNISH LH
See step 5
- REMOVE NO. 1 INSTRUMENT PANEL SPEAKER PANEL SUB-ASSEMBLY
- Disengage the 2 clips and 2 guides to remove the No. 1 instrument panel speaker panel sub-assembly as shown in the illustration.
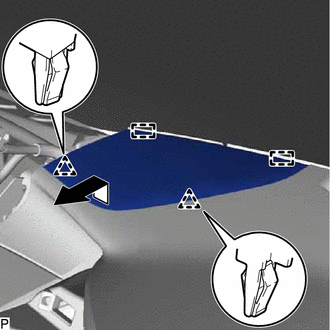 Courtesy of © TOYOTA, LICENSE AGREEMENT TMS1002 Courtesy of © TOYOTA, LICENSE AGREEMENT TMS1002
|
- REMOVE FRONT NO. 2 SPEAKER ASSEMBLY (for LH Side)
Refer to PROCEDURE - Step 5
- REMOVE INSTRUMENT CLUSTER FINISH PANEL ASSEMBLY
- Apply protective tape to the area shown in the illustration.
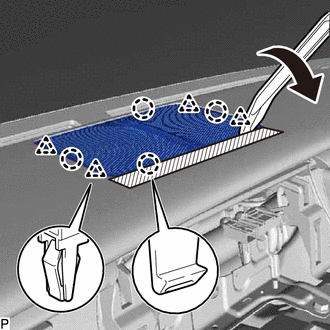 Courtesy of © TOYOTA, LICENSE AGREEMENT TMS1002 Courtesy of © TOYOTA, LICENSE AGREEMENT TMS1002
|
|
Protective Tape |
- Using a moulding remover, disengage the 4 claws and 4 clips to remove the instrument cluster finish panel assembly as shown in the illustration.
- REMOVE FRONT NO. 3 SPEAKER ASSEMBLY
Refer to PROCEDURE - Step 7
- REMOVE FRONT PILLAR GARNISH RH
HINT:
Use the same procedure as for the LH side.
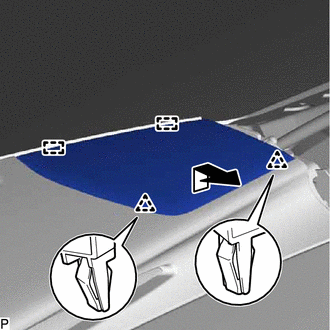
- REMOVE NO. 2 INSTRUMENT PANEL SPEAKER PANEL SUB-ASSEMBLY
- Disengage the 2 clips and 2 guides to remove the No. 2 instrument panel speaker panel sub-assembly as shown in the illustration.
 Courtesy of © TOYOTA, LICENSE AGREEMENT TMS1002 Courtesy of © TOYOTA, LICENSE AGREEMENT TMS1002
|
- REMOVE FRONT NO. 2 SPEAKER ASSEMBLY (for RH Side)
HINT:
Use the same procedure as for the LH side.
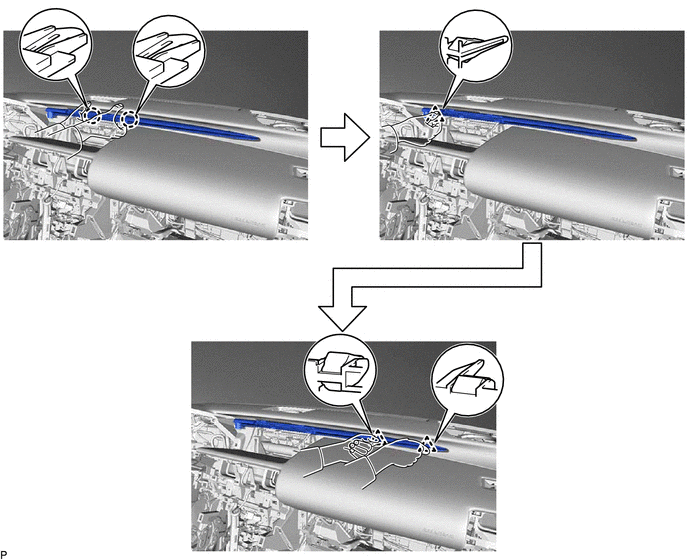
- REMOVE INSTRUMENT CLUSTER FINISH PANEL ORNAMENT
- Disengage the 3 clips and 2 claws to remove the instrument cluster finish panel ornament as shown in the illustration.
 Courtesy of © TOYOTA, LICENSE AGREEMENT TMS1002 Courtesy of © TOYOTA, LICENSE AGREEMENT TMS1002
|
- DISCONNECT NO. 2 INSTRUMENT PANEL WIRE
Refer to PROCEDURE - Step 3
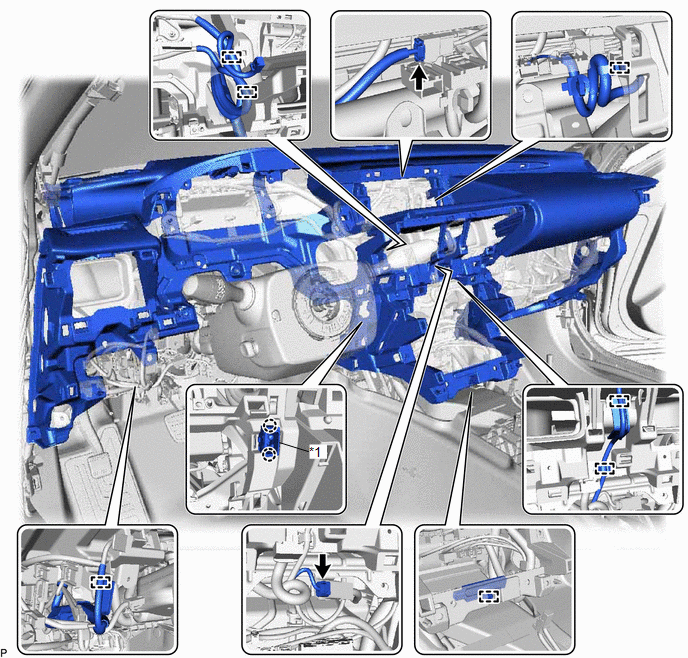
- REMOVE INSTRUMENT PANEL SAFETY PAD SUB-ASSEMBLY
- Disengage the 2 claws to disconnect the room temperature sensor.
 Courtesy of © TOYOTA, LICENSE AGREEMENT TMS1002 Courtesy of © TOYOTA, LICENSE AGREEMENT TMS1002
|
| *1 |
Room Temperature Sensor |
- |
- |
- Disconnect each connector.
- Disengage each clamp.
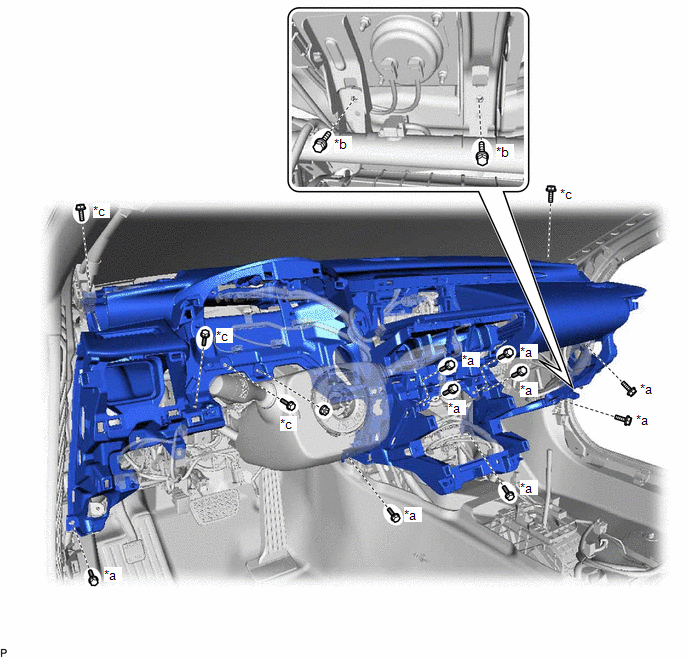
- Remove the 9 bolts <A>, 2 bolts <B>, 4 bolts <F> and nut <E>.
 Courtesy of © TOYOTA, LICENSE AGREEMENT TMS1002 Courtesy of © TOYOTA, LICENSE AGREEMENT TMS1002
|
| *a |
Bolt <A> |
*b |
Bolt <B> |
| *c |
Bolt <F> |
- |
- |
- Disengage the 4 guides and remove the instrument panel safety pad sub-assembly as shown in the illustration.
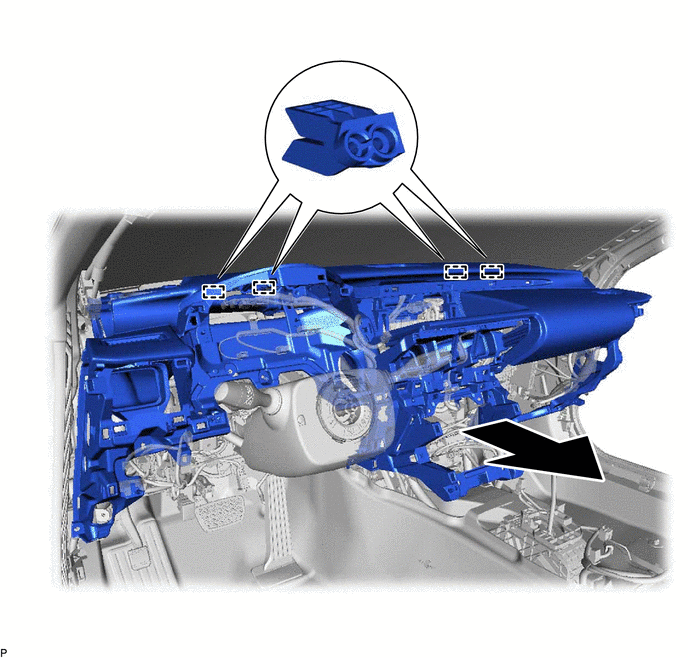 Courtesy of © TOYOTA, LICENSE AGREEMENT TMS1002 Courtesy of © TOYOTA, LICENSE AGREEMENT TMS1002
|
NOTE:
- Do not damage the instrument panel safety pad sub-assembly.
- Do not allow the wire harnesses to interfere with the surrounding parts.