Installing Rear Wire Harness: Notes
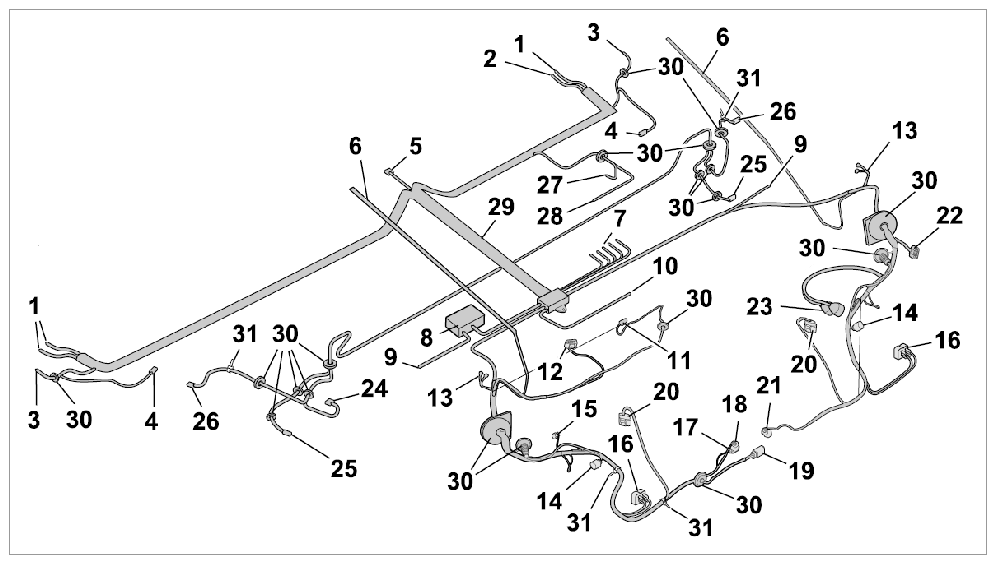 Courtesy of PORSCHE CARS NORTH AMERICA, INC.
- 1
- Plug connection for main wire harness to rear wire harness, left and right
- 2
- Connector for Tiptronic control unit
- 3
- Connector for seat-belt pretensioner, left and right
- 4
- Connector for rear loudspeaker, left and right
- 6
- Plug connection for rear window heating, left and right
- 7
- Connector for DME control unit
- 8
- Rear relay carrier
- 9
- PASM connector, left and right
- 10
- Subwoofer connector
- 11
- Connector for additional brake light
- 12
- Connector for wiper motor for rear window washer
- 13
- Ground point, left and right
- 14
- Connector for rear light, left and right
- 15
- Connector for engine coolant level switch
- 16
- Plug connection for oxygen sensor, left and right
- 17
- Plug connection for rear lock lower part
- 18
- Connector for motor for rear lid release
- 19
- Plug connection for wire harness for number plate light
- 20
- Plug for hot-film mass air flow meter
- 21
- Connector for air cleaner flap
- 22
- Plug connection for rear wire harness to wire harness for rear lid
- 23
- Plug connection for rear wire harness to engine wire harness
- 24
- Connector for angle sensor for range adjustment, rear left
- 25
- Plug connection for rear wheel sensor, left and right
- 26
- Connector for tire pressure monitoring system antenna, rear left and right
- 27
- B+ lead for transmission
- 28
- Connector for reversing light switch
- 29
- Cable duct
- 30
- Rubber sleeves
- 31
- Tie-wrap
- Lay rear wire harness in interior of vehicle and push it into the engine compartment through the opening in the rear wall. Lay rear wire harness in engine compartment.
- Plug in connector on reversing light switch -28-
until it engages correctly. → Installing Switch For Reversing Light
- section on "Installing"
- Screw on B+ lead -27-
on transmission. → Tightening torque: 10 Nm (7.5 ft. lb.)
→ Installing Transmission
- section on "Installing"
- Plug in connector on rear antenna for tire pressure monitoring system -26-
at the left and right. → Installing Antenna For Tire Pressure Monitoring (TPM)
- section on "Installing"
- 4.1. Fit rubber sleeve -30-
.
- 4.2. Plug in connector on rear antenna for tire pressure monitoring system -26-
at the left and right until it engages securely.
- 4.3. Clip tie-wrap -31-
into place.
- Connect plug connection for rear wheel sensor -25-
at the left and right.
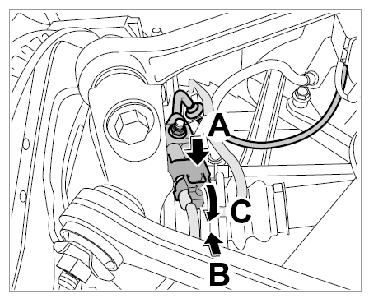 Courtesy of PORSCHE CARS NORTH AMERICA, INC.
- 5.1. Fit rubber sleeve -30-
.
- 5.2. Place socket in installation position -arrow A-
and screw on the fastening nut. → Tightening torque: 10 Nm (7.5 ft. lb.)
- 5.3. Plug in the two connectors -arrow B-
.
- 5.4. Fold back the cable retainer -arrow C-
until it engages correctly at the connectors.
- Connect connector on angle sensor for range adjustment at the rear left -24-
. → Installing Rear Angle Sensor For Headlight Beam Adjustment (HBA)
- section on "Installing"
- 6.1. Fit rubber sleeve -30-
.
- 6.2. Plug in connector on rear left angle sensor for range adjustment -24-
until it engages securely.
- Connect plug connection for rear wire harness to engine wire harness -23-
. → Installing Engine
- section on "Installing"
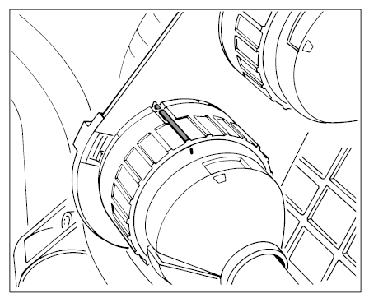 Courtesy of PORSCHE CARS NORTH AMERICA, INC.
- 7.1. Connect rear wire harness at the two plug connections and lock it by turning the bayonet locks clockwise.
- Push plug connection for rear wire harness to wire harness for rear lid together -22-
until it engages securely. → Installing rear lid
- section on "Installing"
- Plug in connector on motor for rear lid release -18-
until it engages securely. → Installing motor for rear lid release
- section on "Installing"
- Push plug connection on rear lock lower part -17-
together until it engages securely. → Installing lower part of lid lock at rear
- section on "Installing"
- Push in plug connection for lambda sensor -16-
at the left and right until it engages securely. → Installing Lambda Sensor Upstream Of Catalytic Converter
- section on "Installing"
- Clip tie-wrap -31-
into place.
- Clip in cable duct -29-
.
- Fasten ground point -13-
at the left and right.
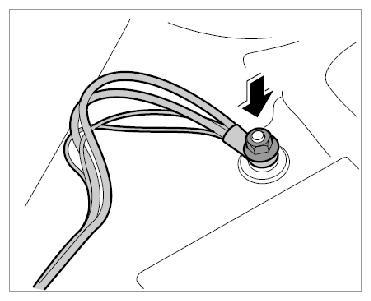 Courtesy of PORSCHE CARS NORTH AMERICA, INC.
- 14.1. Connect ground straps and screw down fastening nut. → Tightening torque: 9 Nm (6.5 ft. lb.)
- Plug in connector on wiper motor for rear window washer -12-
until it engages correctly. → Installing wiper motor for rear window washer
- section on "Installing"
- Plug in connector on subwoofer -10-
until it engages securely. → Installing Subwoofer
- section on "Installing"
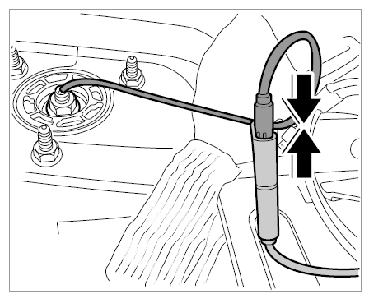
- Connect PASM plug connection -9-
at the left and right.
 Courtesy of PORSCHE CARS NORTH AMERICA, INC.
- 17.1. Connect PASM plug connection -9-
until it engages securely.
- Plug in connector on DME control unit -7-
until it engages securely. → Installing DME (DFI) Control Unit
- section on "Installing"
- Push in plug connection for rear window heating -6-
at the left and right until it engages securely. → Installing Rear Window
- section on "Installing"
- Plug in connector on seat-belt pretensioner -3-
at the left and right. → Installing Front Three-Point Belt
- section on "Installing"
- 20.1. Fit rubber sleeve -30-
.
- 20.2. Plug in connector on seat-belt pretensioner -3-
at the left and right until it engages securely.
- Push on connector for Tiptronic control unit -2-
until it engages securely, and lock it. → Installing Tiptronic Control Unit
- section on "Installing"
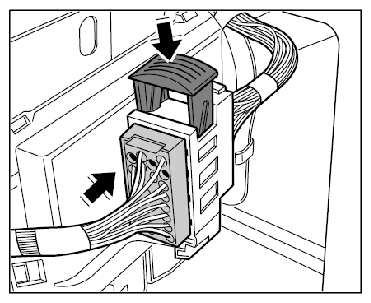
- Push plug connection for main wire harness to rear wire harness -1-
together at the left and right.
 Courtesy of PORSCHE CARS NORTH AMERICA, INC.
- 22.1. Connect plug connection for main wire harness to rear wire harness -1-
and lock it.