- REMOVE HEADLIGHT WASHER ACTUATOR SUB-ASSEMBLY LH (w/ Headlight Cleaner System)
Refer to PROCEDURE - Step 3
- REMOVE HEADLIGHT WASHER ACTUATOR SUB-ASSEMBLY RH (w/ Headlight Cleaner System)
HINT:
Use the same procedure for the LH side.
- REMOVE HEADLIGHT CLEANER HOSE (w/ Headlight Cleaner System)
- Remove the hose clamp.
HINT:
Use the same procedure for the RH side and LH side.
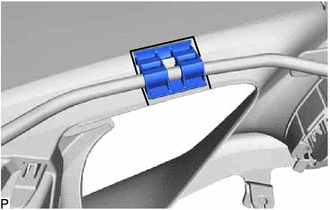 Courtesy of © TOYOTA, LICENSE AGREEMENT TMS1002 Courtesy of © TOYOTA, LICENSE AGREEMENT TMS1002
|
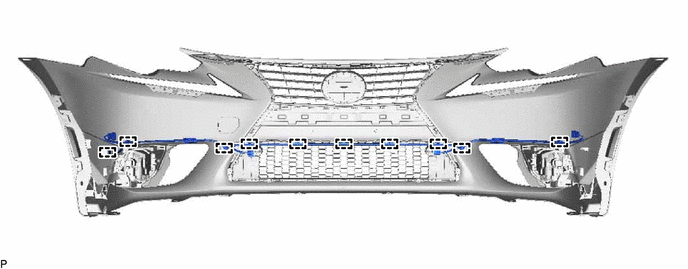
- Disengage the 7 clamps to remove the headlight cleaner hose.
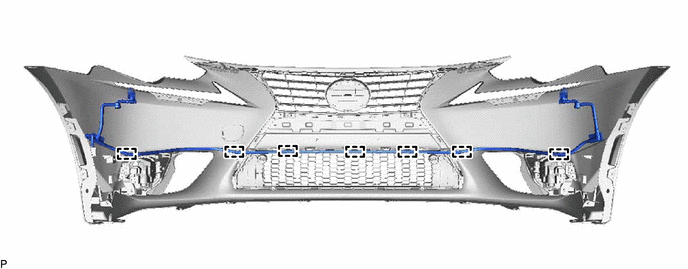 Courtesy of © TOYOTA, LICENSE AGREEMENT TMS1002 Courtesy of © TOYOTA, LICENSE AGREEMENT TMS1002
|
- REMOVE RADIATOR GRILLE CENTER MOULDING LH (w/o Intuitive Parking Assist System)
- Disengage the 2 claws to remove the radiator grille center moulding LH.
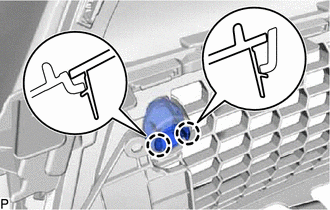 Courtesy of © TOYOTA, LICENSE AGREEMENT TMS1002 Courtesy of © TOYOTA, LICENSE AGREEMENT TMS1002
|
- REMOVE RADIATOR GRILLE CENTER MOULDING RH (w/o Intuitive Parking Assist System)
HINT:
Use the same procedure for the LH side.
- REMOVE NO. 1 ULTRASONIC SENSOR (w/ Intuitive Parking Assist System)
Refer to PROCEDURE - Step 2
- REMOVE NO. 1 ULTRASONIC SENSOR RETAINER (w/ Intuitive Parking Assist System)
Refer to PROCEDURE - Step 3
- REMOVE NO. 2 ULTRASONIC SENSOR (w/ Intuitive Parking Assist System)
Refer to PROCEDURE - Step 4
- REMOVE NO. 2 ULTRASONIC SENSOR RETAINER (w/ Intuitive Parking Assist System)
Refer to PROCEDURE - Step 5
- REMOVE LOWER SIDE RADIATOR GRILLE LH
- Remove the 3 screws.
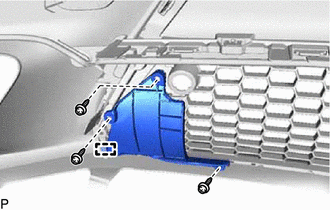 Courtesy of © TOYOTA, LICENSE AGREEMENT TMS1002 Courtesy of © TOYOTA, LICENSE AGREEMENT TMS1002
|
- Disengage the guide to remove the lower side radiator grille LH.
- REMOVE LOWER SIDE RADIATOR GRILLE RH
HINT:
Use the same procedure as for the LH side.
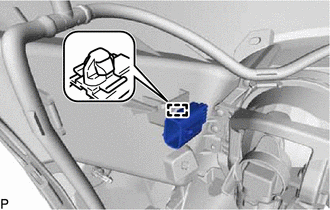
- REMOVE CONNECTOR COVER (w/o Intuitive Parking Assist System)
- Disengage the clamp to remove the connector cover.
 Courtesy of © TOYOTA, LICENSE AGREEMENT TMS1002 Courtesy of © TOYOTA, LICENSE AGREEMENT TMS1002
|
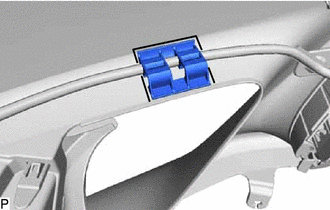
- REMOVE NO. 4 ENGINE ROOM WIRE (w/ Intuitive Parking Assist System)
- w/o Headlight Cleaner System:
 Courtesy of © TOYOTA, LICENSE AGREEMENT TMS1002 Courtesy of © TOYOTA, LICENSE AGREEMENT TMS1002
|
- Remove the hose clamp.
HINT:
Use the same procedure for the RH side and LH side.
- Disengage the 10 clamps to remove the No. 4 engine room wire.
 Courtesy of © TOYOTA, LICENSE AGREEMENT TMS1002 Courtesy of © TOYOTA, LICENSE AGREEMENT TMS1002
|
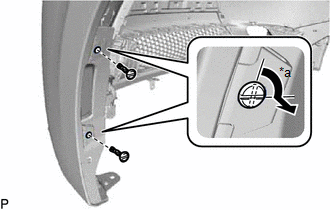
- REMOVE AIR INTAKE DUCT LH
- Using a screwdriver, turn the pin 90 degrees and remove the 2 pin hold clips.
 Courtesy of © TOYOTA, LICENSE AGREEMENT TMS1002 Courtesy of © TOYOTA, LICENSE AGREEMENT TMS1002
|
- Remove the 2 screws.
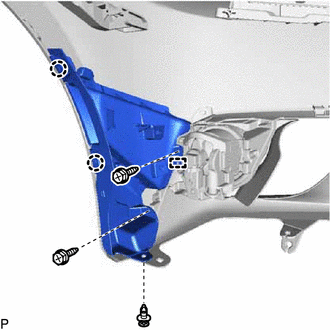 Courtesy of © TOYOTA, LICENSE AGREEMENT TMS1002 Courtesy of © TOYOTA, LICENSE AGREEMENT TMS1002
|
- Remove the clip.
- Disengage the 2 claws and guide, to remove the intake air duct LH.
- REMOVE AIR INTAKE DUCT RH
HINT:
Use the same procedure as for the LH side.
- REMOVE FOG LIGHT ASSEMBLY LH
Refer to PROCEDURE - Step 3 [04/2013 - 06/2014]
, or refer to PROCEDURE - Step 3 [06/2014 - 10/2016]
- REMOVE FOG LIGHT ASSEMBLY RH
HINT:
Use the same procedure as for the LH side.
- REMOVE FOG LIGHT MOUNTING BRACKET LH
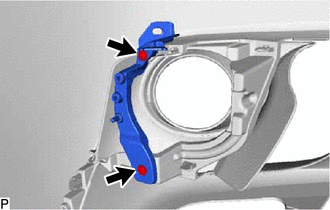 Courtesy of © TOYOTA, LICENSE AGREEMENT TMS1002 Courtesy of © TOYOTA, LICENSE AGREEMENT TMS1002
|
- Remove the 2 screws and fog light mounting bracket LH.
- REMOVE FOG LIGHT MOUNTING BRACKET RH
HINT:
Use the same procedure as for the LH side.
- REMOVE FOG LIGHT COVER LH
- Disengage the 6 claws to remove the fog light cover LH.
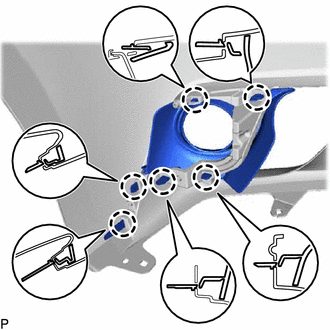 Courtesy of © TOYOTA, LICENSE AGREEMENT TMS1002 Courtesy of © TOYOTA, LICENSE AGREEMENT TMS1002
|
- REMOVE FOG LIGHT COVER RH
HINT:
Use the same procedure for the RH side and LH side.
- REMOVE FRONT BUMPER EXTENTION MOUNTING BRACKET
- Remove the 2 screws.
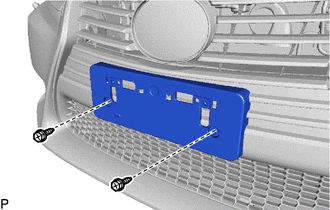 Courtesy of © TOYOTA, LICENSE AGREEMENT TMS1002 Courtesy of © TOYOTA, LICENSE AGREEMENT TMS1002
|
- Disengage the 4 claws to remove the front bumper extension mounting bracket.
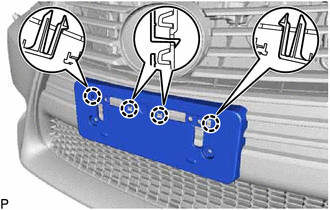 Courtesy of © TOYOTA, LICENSE AGREEMENT TMS1002 Courtesy of © TOYOTA, LICENSE AGREEMENT TMS1002
|
- REMOVE FRONT FENDER LINER RETAINER
- Disengage the claw to remove the front fender liner retainer.
HINT:
Use the same procedure for the RH side and LH side.
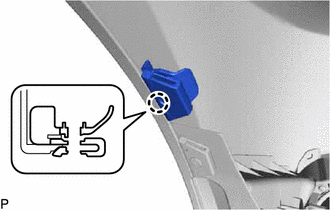 Courtesy of © TOYOTA, LICENSE AGREEMENT TMS1002 Courtesy of © TOYOTA, LICENSE AGREEMENT TMS1002
|
- REMOVE LOWER FRONT BUMPER COVER
- Disengage the 2 claws and guide.
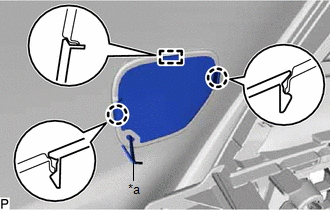 Courtesy of © TOYOTA, LICENSE AGREEMENT TMS1002 Courtesy of © TOYOTA, LICENSE AGREEMENT TMS1002
|
- Disengage the hook to remove the lower front bumper cover.
- REMOVE CLEARANCE LIGHT ASSEMBLY LH
Refer to PROCEDURE - Step 2
- REMOVE CLEARANCE LIGHT ASSEMBLY RH
HINT:
Use the same procedure as for the LH side.
- REMOVE NO. 2 FRONT BUMPER RETAINER BRACKET
- Remove the 2 screws.
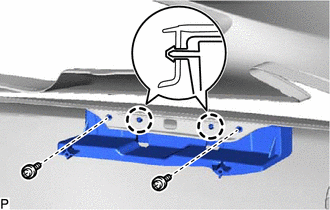 Courtesy of © TOYOTA, LICENSE AGREEMENT TMS1002 Courtesy of © TOYOTA, LICENSE AGREEMENT TMS1002
|
- Disengage the 2 claws to remove the No. 2 front bumper retainer bracket.
- REMOVE NO. 1 FRONT BUMPER RETAINER BRACKET
HINT:
Use the same procedure as for the No. 2 front bumper retainer bracket.
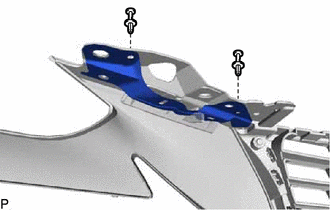
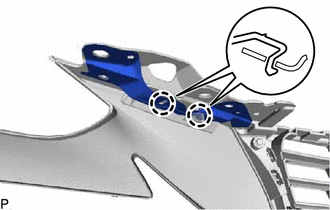
- REMOVE NO. 1 FRONT BUMPER BRACKET LH
- Remove the 2 clips.
 Courtesy of © TOYOTA, LICENSE AGREEMENT TMS1002 Courtesy of © TOYOTA, LICENSE AGREEMENT TMS1002
|
- Disengage the 2 claws to remove the No. 1 front bumper bracket LH.
 Courtesy of © TOYOTA, LICENSE AGREEMENT TMS1002 Courtesy of © TOYOTA, LICENSE AGREEMENT TMS1002
|
- REMOVE NO. 1 FRONT BUMPER BRACKET RH
HINT:
Use the same procedure as for the LH side.
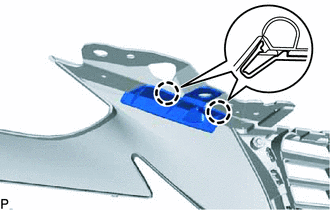
- REMOVE FRONT BUMPER BRACKET LH
- Disengage the 2 claws to remove the front bumper bracket LH.
 Courtesy of © TOYOTA, LICENSE AGREEMENT TMS1002 Courtesy of © TOYOTA, LICENSE AGREEMENT TMS1002
|
- REMOVE FRONT BUMPER BRACKET RH
HINT:
Use the same procedure as for the LH side.
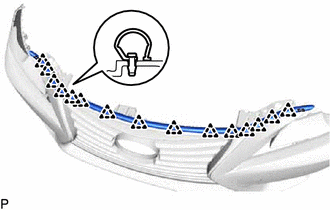
- REMOVE RADIATOR GRILLE PROTECTOR
- Disengage the 15 clips and remove the radiator grille protector.
 Courtesy of © TOYOTA, LICENSE AGREEMENT TMS1002 Courtesy of © TOYOTA, LICENSE AGREEMENT TMS1002
|
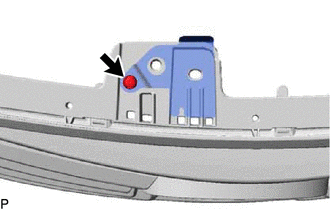
- REMOVE RADIATOR GRILLE BRACKET
- Remove the clip and radiator grille bracket.
 Courtesy of © TOYOTA, LICENSE AGREEMENT TMS1002 Courtesy of © TOYOTA, LICENSE AGREEMENT TMS1002
|
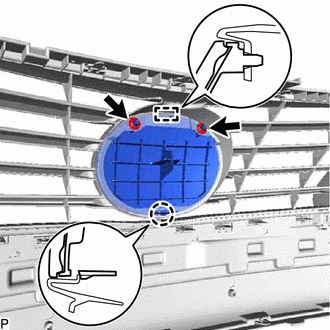
- REMOVE SYMBOL EMBLEM (w/o Dynamic Radar Cruise Control System)
- Remove the 2 spring nuts.
 Courtesy of © TOYOTA, LICENSE AGREEMENT TMS1002 Courtesy of © TOYOTA, LICENSE AGREEMENT TMS1002
|
- Disengage the claw and guide to remove the symbol emblem.
- REMOVE RADIATOR GRILLE (OR FRONT PANEL) EMBLEM (w/ Dynamic Radar Cruise Control System)
HINT:
Use the same procedure as for the symbol emblem.
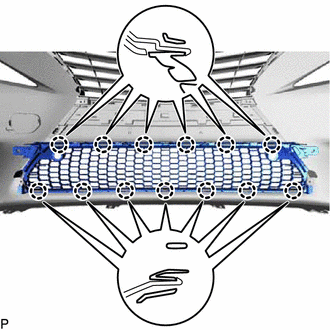
- REMOVE LOWER NO. 2 RADIATOR GRILLE
- Disengage the 13 claws and remove the lower No. 2 radiator grille.
 Courtesy of © TOYOTA, LICENSE AGREEMENT TMS1002 Courtesy of © TOYOTA, LICENSE AGREEMENT TMS1002
|
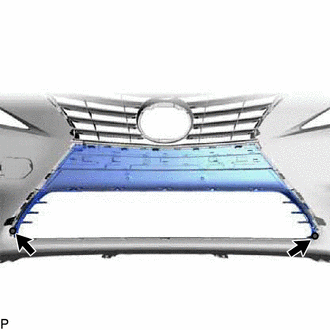
- REMOVE FRONT BUMPER EXTENSION SUB-ASSEMBLY
- Remove the 2 screws.
 Courtesy of © TOYOTA, LICENSE AGREEMENT TMS1002 Courtesy of © TOYOTA, LICENSE AGREEMENT TMS1002
|
- Disengage the 12 claws and remove the front bumper extension sub-assembly.
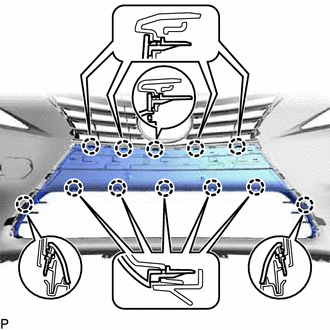 Courtesy of © TOYOTA, LICENSE AGREEMENT TMS1002 Courtesy of © TOYOTA, LICENSE AGREEMENT TMS1002
|
- REMOVE RADIATOR GRILLE MOULDING
- Remove the 4 screws.
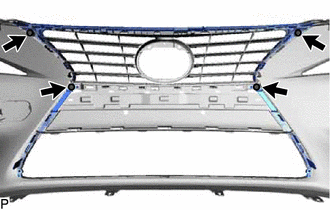 Courtesy of © TOYOTA, LICENSE AGREEMENT TMS1002 Courtesy of © TOYOTA, LICENSE AGREEMENT TMS1002
|
- Disengage the 13 claws and 4 guides, and remove the radiator grille moulding.
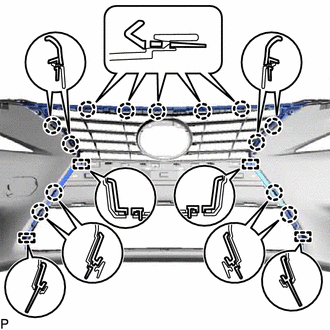 Courtesy of © TOYOTA, LICENSE AGREEMENT TMS1002 Courtesy of © TOYOTA, LICENSE AGREEMENT TMS1002
|
- REMOVE INSIDE RADIATOR GRILLE
- Disengage the 6 claws and 2 guides, and remove the inside radiator grille.
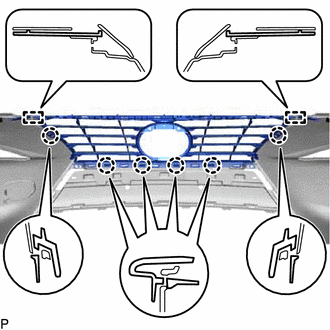 Courtesy of © TOYOTA, LICENSE AGREEMENT TMS1002 Courtesy of © TOYOTA, LICENSE AGREEMENT TMS1002
|
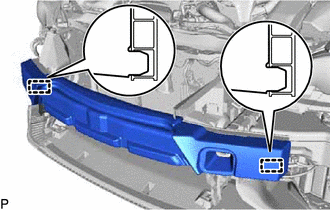
- REMOVE FRONT BUMPER ENERGY ABSORBER
 Courtesy of © TOYOTA, LICENSE AGREEMENT TMS1002 Courtesy of © TOYOTA, LICENSE AGREEMENT TMS1002
|
- Disengage the 2 guides to remove the front bumper energy absorber.
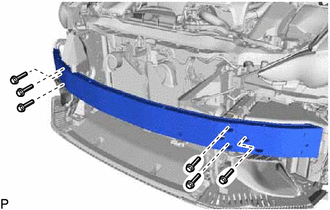
- REMOVE FRONT BUMPER REINFORCEMENT
- Remove the 6 bolts and front bumper reinforcement.
 Courtesy of © TOYOTA, LICENSE AGREEMENT TMS1002 Courtesy of © TOYOTA, LICENSE AGREEMENT TMS1002
|
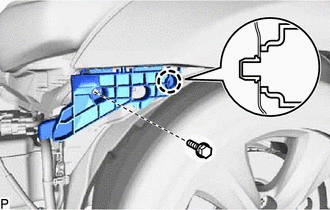
- REMOVE FRONT BUMPER SIDE RETAINER LH
- Remove the bolt.
 Courtesy of © TOYOTA, LICENSE AGREEMENT TMS1002 Courtesy of © TOYOTA, LICENSE AGREEMENT TMS1002
|
- Disengage the claw to remove the front bumper side retainer LH.
- REMOVE FRONT BUMPER SIDE RETAINER RH
HINT:
Use the same procedure as for the LH side.