Removal [08/2021 - 09/2022]: Procedure
WARNING: This page does not describe the selected car, but rather 6 other vehicles, including the 2024 Lexus ES 300h, 2023 Lexus ES 300h, 2022 Lexus ES 300h, 2021 Lexus ES 300h, and 2020 Lexus ES 300h. However, it is still accessible from the selected car via links, so may be relevant.
- REMOVE DRIVE SHAFT BEARING BRACKET
- Remove the 3 bolts and drive shaft bearing bracket.
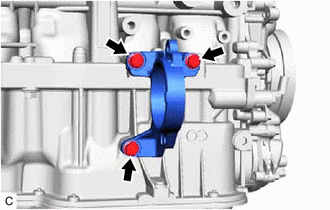 Courtesy of © TOYOTA, LICENSE AGREEMENT TMS1002 Courtesy of © TOYOTA, LICENSE AGREEMENT TMS1002
|
- REMOVE COMPRESSOR WITH MOTOR ASSEMBLY
- Remove the bolt and 2 nuts.
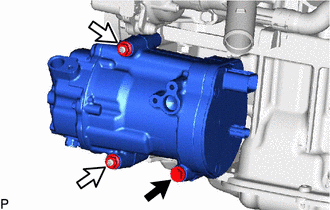 Courtesy of © TOYOTA, LICENSE AGREEMENT TMS1002 Courtesy of © TOYOTA, LICENSE AGREEMENT TMS1002
|
 |
Bolt |
 |
Nut |
- Using an E8 "TORX" socket wrench, remove the 2 stud bolts and compressor with motor assembly.
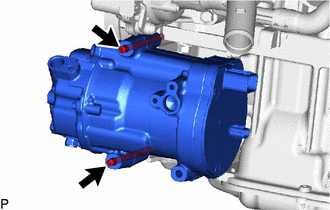 Courtesy of © TOYOTA, LICENSE AGREEMENT TMS1002 Courtesy of © TOYOTA, LICENSE AGREEMENT TMS1002
|
- REMOVE NO. 2 WATER BY-PASS PIPE SUB-ASSEMBLY
- Slide the clip and disconnect the No. 2 water by-pass pipe sub-assembly from the outlet water by-pass sub-assembly.
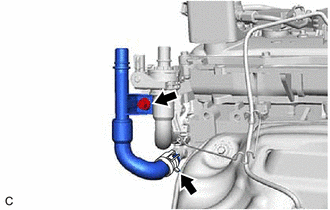 Courtesy of © TOYOTA, LICENSE AGREEMENT TMS1002 Courtesy of © TOYOTA, LICENSE AGREEMENT TMS1002
|
- Remove the bolt and the No. 2 water by-pass pipe sub-assembly.
- REMOVE FLOW SHUTTING VALVE (WATER BY-PASS HOSE ASSEMBLY)
- Remove the bolt.
 Courtesy of © TOYOTA, LICENSE AGREEMENT TMS1002 Courtesy of © TOYOTA, LICENSE AGREEMENT TMS1002
|
- Slide the clip and remove the flow shutting valve (water by-pass hose assembly) from the water by-pass outlet sub-assembly.
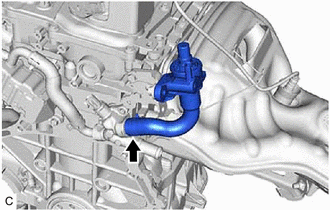 Courtesy of © TOYOTA, LICENSE AGREEMENT TMS1002 Courtesy of © TOYOTA, LICENSE AGREEMENT TMS1002
|
- Remove the 2 bolts and water hose clamp bracket.
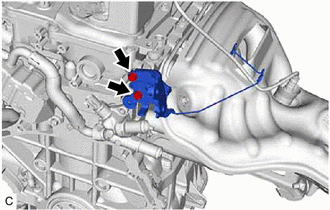 Courtesy of © TOYOTA, LICENSE AGREEMENT TMS1002 Courtesy of © TOYOTA, LICENSE AGREEMENT TMS1002
|
- REMOVE NO. 1 EXHAUST MANIFOLD HEAT INSULATOR
- Type A:
- Remove the 5 bolts and No. 1 exhaust manifold heat insulator from the exhaust manifold (TWC: Front Catalyst).
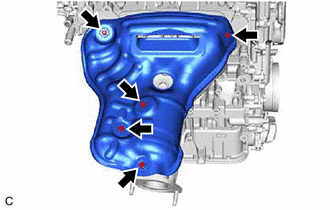 Courtesy of © TOYOTA, LICENSE AGREEMENT TMS1002 Courtesy of © TOYOTA, LICENSE AGREEMENT TMS1002
|
- Type B:
- Remove the 3 bolts and No. 1 exhaust manifold heat insulator from the exhaust manifold (TWC: Front Catalyst).
 Courtesy of © TOYOTA, LICENSE AGREEMENT TMS1002 Courtesy of © TOYOTA, LICENSE AGREEMENT TMS1002
|
- REMOVE MANIFOLD STAY
Refer to PROCEDURE - Step 17
- REMOVE EXHAUST MANIFOLD (TWC: Front Catalyst)
- Type A:
- Using a 12 mm deep socket wrench, remove the 7 nuts and exhaust manifold (TWC: Front Catalyst) from the cylinder head sub-assembly.
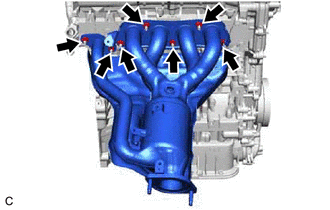 Courtesy of © TOYOTA, LICENSE AGREEMENT TMS1002 Courtesy of © TOYOTA, LICENSE AGREEMENT TMS1002
|
- Type B:
- Using a 12 mm deep socket wrench, remove the 7 nuts and exhaust manifold (TWC: Front Catalyst) from the cylinder head sub-assembly.
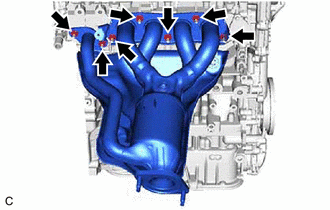 Courtesy of © TOYOTA, LICENSE AGREEMENT TMS1002 Courtesy of © TOYOTA, LICENSE AGREEMENT TMS1002
|
- Remove the exhaust manifold to head gasket from the cylinder head sub-assembly.
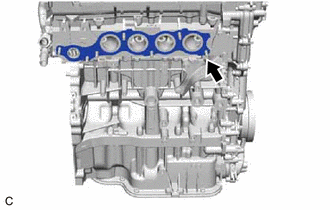 Courtesy of © TOYOTA, LICENSE AGREEMENT TMS1002 Courtesy of © TOYOTA, LICENSE AGREEMENT TMS1002
|
- REMOVE THROTTLE BODY WITH MOTOR ASSEMBLY
Refer to PROCEDURE - Step 6
- REMOVE THROTTLE BODY GASKET
Refer to PROCEDURE - Step 7
- REMOVE EGR COOLER ASSEMBLY
Refer to PROCEDURE - Step 3
- REMOVE NO. 1 EGR PIPE SUB-ASSEMBLY
Refer to PROCEDURE - Step 3
- REMOVE EGR VALVE ASSEMBLY
Refer to PROCEDURE - Step 4
- REMOVE NO. 3 WATER BY-PASS PIPE
- Using an 8 mm socket wrench, remove the bolt and No. 3 water by-pass pipe from the intake manifold.
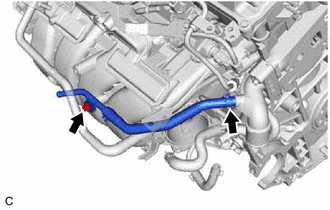 Courtesy of © TOYOTA, LICENSE AGREEMENT TMS1002 Courtesy of © TOYOTA, LICENSE AGREEMENT TMS1002
|
- Slide the clip and disconnect the No. 3 water by-pass pipe from the water outlet.
- REMOVE NO. 2 WATER BY-PASS PIPE
- Remove the bolt (A).
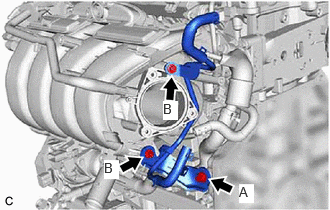 Courtesy of © TOYOTA, LICENSE AGREEMENT TMS1002 Courtesy of © TOYOTA, LICENSE AGREEMENT TMS1002
|
- Using an 8 mm socket wrench, remove the 2 bolts (B) and No. 2 water by-pass pipe.
- REMOVE INTAKE MANIFOLD
Refer to PROCEDURE - Step 10
- REMOVE NO. 1 INTAKE MANIFOLD TO HEAD GASKET
Refer to PROCEDURE - Step 11
- DISCONNECT FUEL TUBE SUB-ASSEMBLY
Refer to PROCEDURE - Step 5
- REMOVE NO. 1 FUEL PIPE SUB-ASSEMBLY
- Using an 8 mm socket wrench, remove the bolt.
 Courtesy of © TOYOTA, LICENSE AGREEMENT TMS1002 Courtesy of © TOYOTA, LICENSE AGREEMENT TMS1002
|
- Using a 17 mm union nut wrench, loosen the 2 union nuts of the No. 1 fuel pipe sub-assembly.
- REMOVE FUEL (ENGINE ROOM SIDE) PUMP ASSEMBLY (for High Pressure)
Refer to PROCEDURE - Step 8
- REMOVE NO. 7 WATER BY-PASS HOSE
- Slide the 2 clips and remove the No. 7 water by-pass hose.
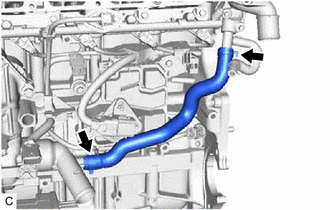 Courtesy of © TOYOTA, LICENSE AGREEMENT TMS1002 Courtesy of © TOYOTA, LICENSE AGREEMENT TMS1002
|
- REMOVE SENSOR WIRE
- Disconnect the 3 connectors.
 Courtesy of © TOYOTA, LICENSE AGREEMENT TMS1002 Courtesy of © TOYOTA, LICENSE AGREEMENT TMS1002
|
- Disengage the 3 clamps.
- Using an 8 mm socket wrench, remove the bolt and sensor wire from the water inlet with thermostat sub-assembly.
- REMOVE NO. 6 ENGINE WIRE
- Disconnect the 4 connectors.
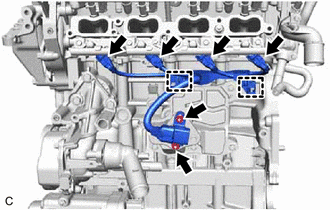 Courtesy of © TOYOTA, LICENSE AGREEMENT TMS1002 Courtesy of © TOYOTA, LICENSE AGREEMENT TMS1002
|
- Disengage the 2 clamps.
- Remove the 2 nuts and No. 6 engine wire from the wire harness clamp bracket.
- REMOVE WIRE HARNESS CLAMP BRACKET
- Using an 8 mm socket wrench, remove the 2 bolts and wire harness clamp bracket from the No. 1 ventilation case.
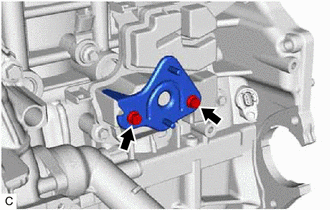 Courtesy of © TOYOTA, LICENSE AGREEMENT TMS1002 Courtesy of © TOYOTA, LICENSE AGREEMENT TMS1002
|
- REMOVE FUEL DELIVERY PIPE SUB-ASSEMBLY
Refer to PROCEDURE - Step 10
- REMOVE NO. 1 DELIVERY PIPE SPACER
Refer to PROCEDURE - Step 11
- REMOVE INJECTOR VIBRATION INSULATOR
Refer to PROCEDURE - Step 12
- REMOVE NO. 5 ENGINE WIRE
Refer to PROCEDURE - Step 13
- REMOVE PORT FUEL INJECTOR ASSEMBLY
Refer to PROCEDURE - Step 14
- REMOVE FUEL DELIVERY PIPE
Refer to PROCEDURE - Step 8
- REMOVE DIRECT FUEL INJECTOR ASSEMBLY
Refer to PROCEDURE - Step 9
- REMOVE IGNITION COIL ASSEMBLY
Refer to PROCEDURE - Step 2
- REMOVE ENGINE OIL LEVEL DIPSTICK GUIDE
- Remove the engine oil level dipstick.
- Using an 8 mm socket wrench, remove the bolt and engine oil level dipstick guide from the camshaft housing sub-assembly.
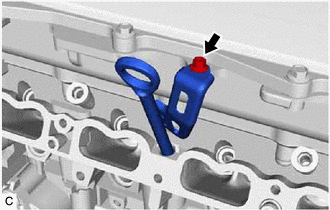 Courtesy of © TOYOTA, LICENSE AGREEMENT TMS1002 Courtesy of © TOYOTA, LICENSE AGREEMENT TMS1002
|
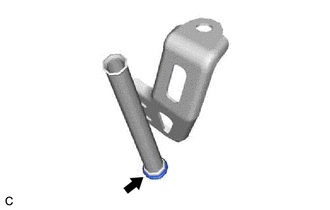
- Remove the O-ring from the engine oil level dipstick guide.
 Courtesy of © TOYOTA, LICENSE AGREEMENT TMS1002 Courtesy of © TOYOTA, LICENSE AGREEMENT TMS1002
|
- REMOVE NO. 3 EXHAUST MANIFOLD HEAT INSULATOR
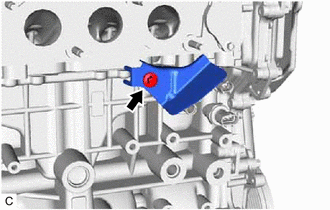
- Type A:
- Remove the bolt and No. 3 exhaust manifold heat insulator from the cylinder block sub-assembly.
 Courtesy of © TOYOTA, LICENSE AGREEMENT TMS1002 Courtesy of © TOYOTA, LICENSE AGREEMENT TMS1002
|
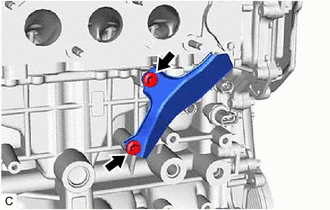
- Type B:
- Remove the 2 bolts and No. 3 exhaust manifold heat insulator from the cylinder block sub-assembly.
 Courtesy of © TOYOTA, LICENSE AGREEMENT TMS1002 Courtesy of © TOYOTA, LICENSE AGREEMENT TMS1002
|