Removal [12/2015 - 08/2016]: Procedure
WARNING: This page is about a different car, the 2016 Toyota Sienna. However, it is still accessible from the selected car via links, so may be relevant.
- REMOVE ENGINE ASSEMBLY WITH TRANSAXLE
(Refer to REMOVAL [12/2015 - 08/2016]
)
- REMOVE STARTER ASSEMBLY
Refer to PROCEDURE - Step 5
- REMOVE MANIFOLD STAY
Refer to PROCEDURE - Step 9
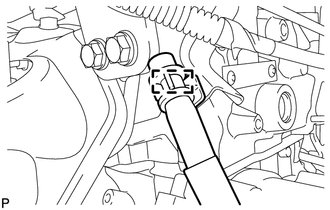
- SEPARATE BREATHER PLUG HOSE
- Disengage the clamp to separate the breather plug hose from the hose clamp.
 Courtesy of © TOYOTA, LICENSE AGREEMENT TMS1002 Courtesy of © TOYOTA, LICENSE AGREEMENT TMS1002
|
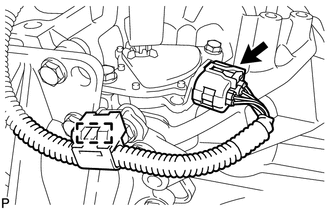
- DISCONNECT ENGINE WIRE
- Disconnect the park/neutral position switch connector.
 Courtesy of © TOYOTA, LICENSE AGREEMENT TMS1002 Courtesy of © TOYOTA, LICENSE AGREEMENT TMS1002
|
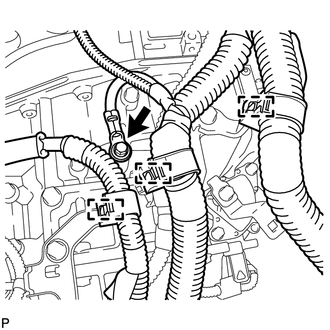
- Disengage the clamp to separate the engine wire from the automatic transaxle assembly.
- Remove the bolt to separate the ground wire from the automatic transaxle assembly.
 Courtesy of © TOYOTA, LICENSE AGREEMENT TMS1002 Courtesy of © TOYOTA, LICENSE AGREEMENT TMS1002
|
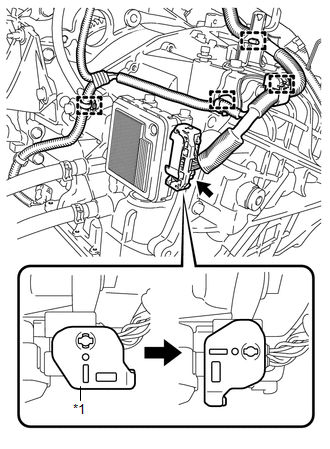
- Disengage the 3 clamps to separate the engine wire from the automatic transaxle assembly.
- Turn the lock lever and disconnect the connector from the TCM.
 Courtesy of © TOYOTA, LICENSE AGREEMENT TMS1002 Courtesy of © TOYOTA, LICENSE AGREEMENT TMS1002
|
TEXT IN ILLUSTRATION
- Disengage the 4 clamps to separate the engine wire from the automatic transaxle assembly.
- REMOVE TRANSFER STIFFENER PLATE RH
Refer to PROCEDURE - Step 6
- REMOVE AUTOMATIC TRANSAXLE ASSEMBLY
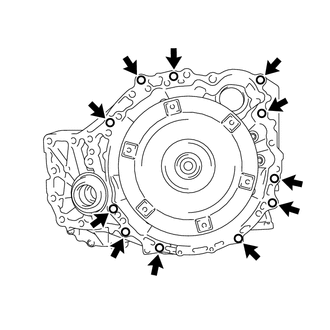
- Remove the 11 bolts and automatic transaxle assembly from the engine assembly.
 Courtesy of © TOYOTA, LICENSE AGREEMENT TMS1002 Courtesy of © TOYOTA, LICENSE AGREEMENT TMS1002
|
NOTE:
To prevent damage to the knock pins, do not pry between the automatic transaxle assembly and engine assembly.
- REMOVE TORQUE CONVERTER ASSEMBLY
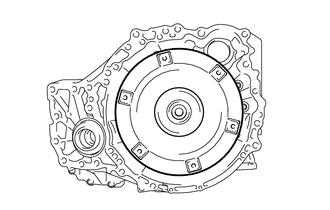
- Remove the torque converter assembly from the automatic transaxle assembly.
 Courtesy of © TOYOTA, LICENSE AGREEMENT TMS1002 Courtesy of © TOYOTA, LICENSE AGREEMENT TMS1002
|
NOTE:
Remove the torque converter assembly from the input shaft horizontally.
- REMOVE TRANSFER ASSEMBLY
Refer to PROCEDURE - Step 9
- REMOVE FRONT ENGINE MOUNTING BRACKET
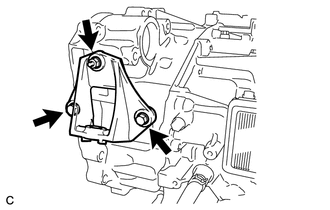
- Remove the 2 bolts, nut and front engine mounting bracket from the automatic transaxle assembly.
 Courtesy of © TOYOTA, LICENSE AGREEMENT TMS1002 Courtesy of © TOYOTA, LICENSE AGREEMENT TMS1002
|
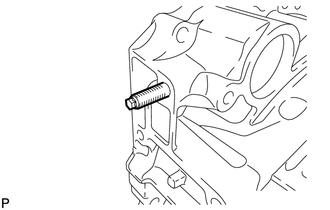
- Using an E8 "TORX" socket wrench, remove the stud bolt from the automatic transaxle assembly.
 Courtesy of © TOYOTA, LICENSE AGREEMENT TMS1002 Courtesy of © TOYOTA, LICENSE AGREEMENT TMS1002
|
- REMOVE TCM
- Remove the 2 bolts and TCM from the automatic transaxle assembly.
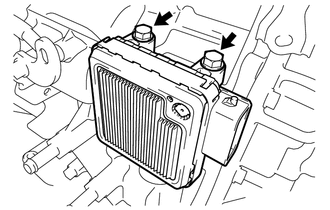 Courtesy of © TOYOTA, LICENSE AGREEMENT TMS1002 Courtesy of © TOYOTA, LICENSE AGREEMENT TMS1002
|
- REMOVE OIL COOLER TUBE CLAMP
- Disengage the 2 clamps to remove the oil cooler tube clamp from the No. 1 oil cooler inlet hose and No. 1 oil cooler outlet hose.
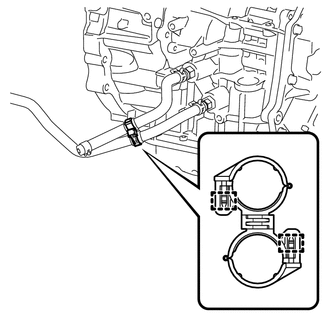 Courtesy of © TOYOTA, LICENSE AGREEMENT TMS1002 Courtesy of © TOYOTA, LICENSE AGREEMENT TMS1002
|
- REMOVE NO. 1 OIL COOLER OUTLET HOSE
- Loosen the hose clip and remove the No. 1 oil cooler outlet hose from the automatic transaxle assembly.
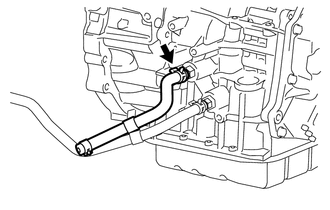 Courtesy of © TOYOTA, LICENSE AGREEMENT TMS1002 Courtesy of © TOYOTA, LICENSE AGREEMENT TMS1002
|
- REMOVE NO. 1 OIL COOLER INLET HOSE
- Loosen the hose clip and remove the No. 1 oil cooler inlet hose from the automatic transaxle assembly.
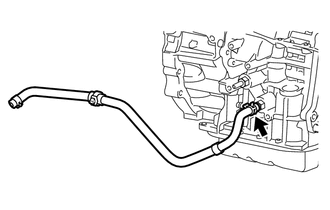 Courtesy of © TOYOTA, LICENSE AGREEMENT TMS1002 Courtesy of © TOYOTA, LICENSE AGREEMENT TMS1002
|
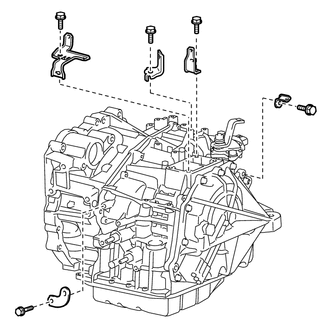
- REMOVE WIRE HARNESS CLAMP BRACKET
- Remove the 5 bolts and 5 wire harness clamp brackets from the automatic transaxle assembly.
 Courtesy of © TOYOTA, LICENSE AGREEMENT TMS1002 Courtesy of © TOYOTA, LICENSE AGREEMENT TMS1002
|
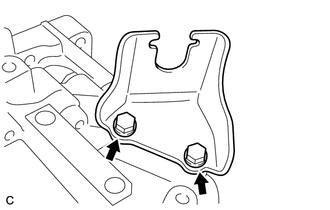
- REMOVE NO. 1 TRANSMISSION CONTROL CABLE BRACKET
- Remove the 2 bolts and No. 1 transmission control cable bracket from the automatic transaxle assembly.
 Courtesy of © TOYOTA, LICENSE AGREEMENT TMS1002 Courtesy of © TOYOTA, LICENSE AGREEMENT TMS1002
|
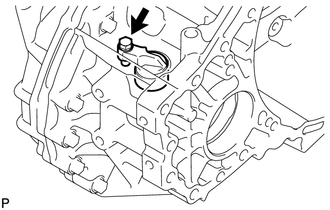
- REMOVE SPEEDOMETER DRIVEN HOLE COVER SUB-ASSEMBLY
- Remove the bolt and speedometer driven hole cover sub-assembly from the automatic transaxle assembly.
 Courtesy of © TOYOTA, LICENSE AGREEMENT TMS1002 Courtesy of © TOYOTA, LICENSE AGREEMENT TMS1002
|
- Remove the O-ring from the speedometer driven hole cover sub-assembly.
- INSPECT TORQUE CONVERTER ASSEMBLY
Refer to PROCEDURE - Step 1