- REMOVE NO. 2 LUGGAGE COMPARTMENT DOOR NAME PLATE
Refer to PROCEDURE - Step 2
- REMOVE NO. 3 LUGGAGE COMPARTMENT DOOR PLATE
Refer to PROCEDURE - Step 3
- REMOVE LUGGAGE COMPARTMENT DOOR ASSIST GRIP
- Using a screwdriver with its tip wrapped with protective tape, disengage the claws and guide to open the cover as shown in the illustration.
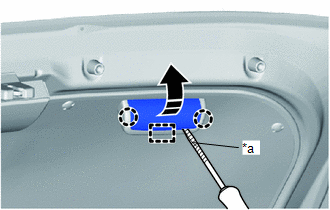 Courtesy of © TOYOTA, LICENSE AGREEMENT TMS1002 Courtesy of © TOYOTA, LICENSE AGREEMENT TMS1002
|
| *a |
Protective Tape |
 |
Remove in this Direction |
- Remove the 2 screws and luggage compartment door assist grip.
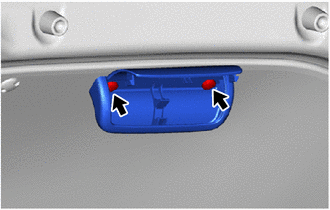 Courtesy of © TOYOTA, LICENSE AGREEMENT TMS1002 Courtesy of © TOYOTA, LICENSE AGREEMENT TMS1002
|
- REMOVE LUGGAGE COMPARTMENT DOOR COVER
- Using a clip remover, remove the clips and luggage compartment door cover.
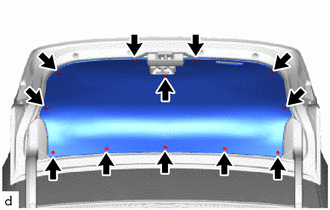 Courtesy of © TOYOTA, LICENSE AGREEMENT TMS1002 Courtesy of © TOYOTA, LICENSE AGREEMENT TMS1002
|
- REMOVE LUGGAGE COMPARTMENT DOOR HINGE COVER RH
- Using a clip remover, remove the clips and luggage compartment door hinge cover RH.
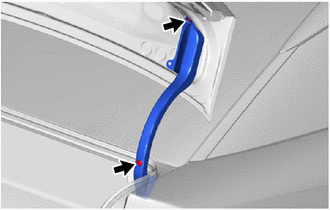 Courtesy of © TOYOTA, LICENSE AGREEMENT TMS1002 Courtesy of © TOYOTA, LICENSE AGREEMENT TMS1002
|
- REMOVE LUGGAGE COMPARTMENT DOOR HINGE COVER LH
HINT:
Use the same procedure described for the RH side.
- REMOVE LUGGAGE COMPARTMENT DOOR CUSHION
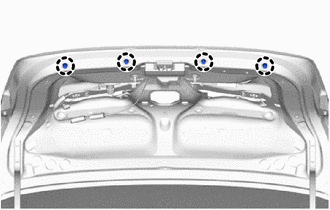 Courtesy of © TOYOTA, LICENSE AGREEMENT TMS1002 Courtesy of © TOYOTA, LICENSE AGREEMENT TMS1002
|
Disengage the claws to remove the 4 luggage compartment door cushions.
- REMOVE LUGGAGE COMPARTMENT DOOR LOCK CYLINDER ASSEMBLY
- Disconnect the connector.
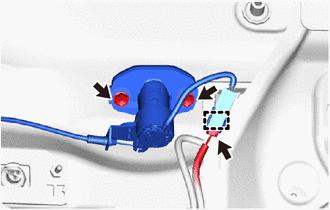 Courtesy of © TOYOTA, LICENSE AGREEMENT TMS1002 Courtesy of © TOYOTA, LICENSE AGREEMENT TMS1002
|
- Disengage the clamp.
- Remove the 2 bolts to separate the luggage compartment door lock cylinder assembly.
- Disengage the guide to separate the luggage door lock control cable sub-assembly.
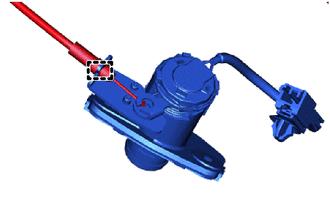 Courtesy of © TOYOTA, LICENSE AGREEMENT TMS1002 Courtesy of © TOYOTA, LICENSE AGREEMENT TMS1002
|
- Remove the luggage compartment door lock cylinder assembly.
- REMOVE DOOR UNLOCK SWITCH SUB-ASSEMBLY
- Using a screwdriver with its tip wrapped with protective tape, remove the C-ring.
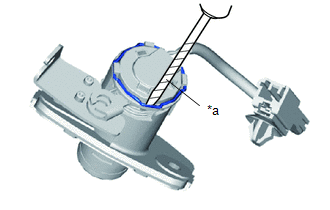 Courtesy of © TOYOTA, LICENSE AGREEMENT TMS1002 Courtesy of © TOYOTA, LICENSE AGREEMENT TMS1002
|
- Disengage the guides to remove the door unlock switch sub-assembly from the luggage compartment door lock cylinder assembly.
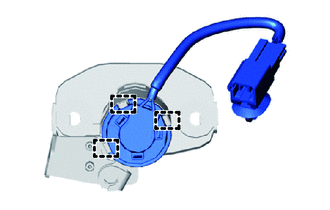 Courtesy of © TOYOTA, LICENSE AGREEMENT TMS1002 Courtesy of © TOYOTA, LICENSE AGREEMENT TMS1002
|
- REMOVE LUGGAGE COMPARTMENT DOOR LOCK ASSEMBLY
Refer to PROCEDURE - Step 3
- REMOVE LUGGAGE COMPARTMENT DOOR OUTSIDE GARNISH SUB-ASSEMBLY
Refer to PROCEDURE - Step 3
- REMOVE REAR LIGHT ASSEMBLY LH
Refer to PROCEDURE - Step 4
- REMOVE REAR LIGHT ASSEMBLY RH
HINT:
Use the same procedure described for the LH side.
- REMOVE LUGGAGE COMPARTMENT DOOR OUTSIDE GARNISH
Refer to PROCEDURE - Step 4
- REMOVE LUGGAGE COMPARTMENT DOOR OPENING SWITCH ASSEMBLY
See step 2
- REMOVE REAR TELEVISION CAMERA ASSEMBLY
Refer to PROCEDURE - Step 2
- REMOVE LICENSE PLATE LIGHT ASSEMBLY
Refer to PROCEDURE - Step 2