- REMOVE V-BANK COVER SUB-ASSEMBLY
Refer to PROCEDURE - Step 8 [01/2017 - 06/2019]
, or refer to PROCEDURE - Step 8 [06/2019 - 05/2023]
, or refer to PROCEDURE - Step 8 [05/2023 - ]
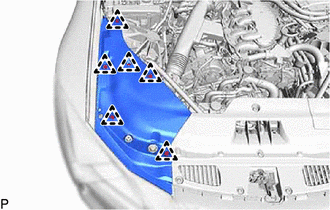
- REMOVE RADIATOR SUPPORT TO FRAME SEAL RH
- Detach the 6 clips to remove the radiator support to frame seal RH.
 Courtesy of © TOYOTA, LICENSE AGREEMENT TMS1002 Courtesy of © TOYOTA, LICENSE AGREEMENT TMS1002
|
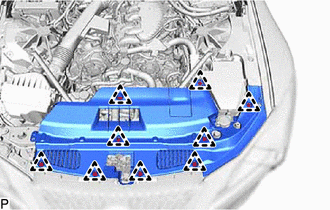
- REMOVE LOWER RADIATOR AIR DEFLECTOR
- Detach the 9 clips to remove the lower radiator air deflector.
 Courtesy of © TOYOTA, LICENSE AGREEMENT TMS1002 Courtesy of © TOYOTA, LICENSE AGREEMENT TMS1002
|
- REMOVE RADIATOR SUPPORT TO CROSS MEMBER BRACE SUB-ASSEMBLY RH
Refer to PROCEDURE - Step 16 [01/2017 - 06/2019]
, or refer to PROCEDURE - Step 16 [06/2019 - 05/2023]
, or refer to PROCEDURE - Step 16 [05/2023 - ]
- REMOVE NO. 1 AIR CLEANER INLET
Refer to PROCEDURE - Step 7
- REMOVE AIR CLEANER WITH AIR CLEANER HOSE
Refer to PROCEDURE - Step 8
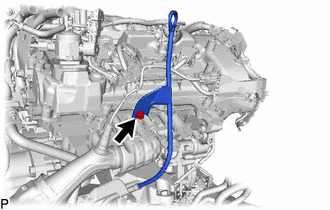
- REMOVE NO. 2 ENGINE OIL LEVEL DIPSTICK GUIDE
- Remove the engine oil level dipstick from the No. 2 engine oil level dipstick guide.
- Remove the bolt and No. 2 engine oil level dipstick guide.
 Courtesy of © TOYOTA, LICENSE AGREEMENT TMS1002 Courtesy of © TOYOTA, LICENSE AGREEMENT TMS1002
|
- Remove the O-ring from the No. 2 engine oil level dipstick guide.
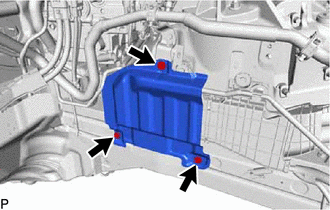
- REMOVE FRONT FENDER APRON INSULATOR LH
- Remove the 3 bolts and front fender apron insulator LH.
 Courtesy of © TOYOTA, LICENSE AGREEMENT TMS1002 Courtesy of © TOYOTA, LICENSE AGREEMENT TMS1002
|
- REMOVE NO. 2 ENGINE UNDER COVER ASSEMBLY
Refer to PROCEDURE - Step 15 [01/2017 - 06/2019]
, or refer to PROCEDURE - Step 15 [06/2019 - 05/2023]
, or refer to PROCEDURE - Step 15 [05/2023 - ]
- REMOVE REAR FLOOR SIDE MEMBER COVER LH
See step 1[01/2017 - 04/2020], or see step 1[04/2020 - ]
- REMOVE REAR FLOOR SIDE MEMBER COVER RH
See step 2[01/2017 - 04/2020], or see step 2[04/2020 - ]
- REMOVE FRONT FENDER SEAL LH
See step 3[01/2017 - 04/2020], or see step 3[04/2020 - ]
- REMOVE FRONT FENDER SEAL RH
See step 4[01/2017 - 04/2020], or see step 4[04/2020 - ]
- REMOVE FRONT FLOOR COVER LH
See step 5[01/2017 - 04/2020], or see step 5[04/2020 - ]
- REMOVE FRONT FLOOR COVER RH
See step 6[01/2017 - 04/2020], or see step 6[04/2020 - ]
- REMOVE FRONT CENTER FLOOR BRACE SUB-ASSEMBLY
See step 7[01/2017 - 04/2020], or see step 7[04/2020 - ]
- REMOVE FRONT EXHAUST PIPE ASSEMBLY
See step 12[01/2017 - 04/2020], or see step 12[04/2020 - ]
- REMOVE NO. 1 EXHAUST PIPE SUPPORT BRACKET SUB-ASSEMBLY
- Remove the 2 bolts and No. 1 exhaust pipe support bracket sub-assembly.
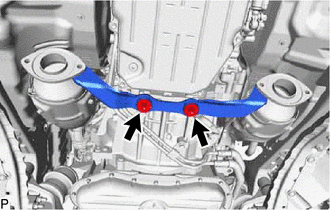 Courtesy of © TOYOTA, LICENSE AGREEMENT TMS1002 Courtesy of © TOYOTA, LICENSE AGREEMENT TMS1002
|
- REMOVE ENGINE SIDE COVER RH
- Detach the clamp, 4 clips and remove the engine side cover RH.
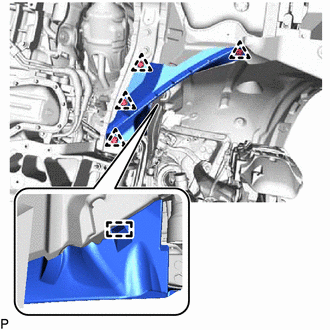 Courtesy of © TOYOTA, LICENSE AGREEMENT TMS1002 Courtesy of © TOYOTA, LICENSE AGREEMENT TMS1002
|
- REMOVE REAR LOWER ARM MOUNTING REINFORCEMENT SUB-ASSEMBLY RH
- Remove the 4 bolts and rear lower arm mounting reinforcement sub-assembly RH.
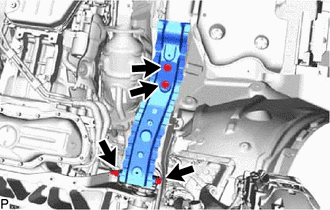 Courtesy of © TOYOTA, LICENSE AGREEMENT TMS1002 Courtesy of © TOYOTA, LICENSE AGREEMENT TMS1002
|
- DISCONNECT GENERATOR CABLE AND MOTOR CABLE
Refer to REMOVAL [01/2017 - 05/2023]
, or refer to REMOVAL [05/2023 - ]
- REMOVE INVERTER MOTOR CABLE BRACKET ASSEMBLY
Refer to PROCEDURE - Step 20 [01/2017 - 05/2023]
, or refer to PROCEDURE - Step 20 [05/2023 - ]
- REMOVE FENDER APRON BRACE SUB-ASSEMBLY RH
Refer to PROCEDURE - Step 13 [01/2017 - 05/2023]
, or refer to PROCEDURE - Step 13 [05/2023 - ]
- REMOVE NO. 1 EGR PIPE
Refer to PROCEDURE - Step 16 [01/2017 - 05/2023]
, or refer to PROCEDURE - Step 16 [05/2023 - ]
- DISCONNECT AIR FUEL RATIO SENSOR
WARNING:
To prevent burns, do not touch the engine, exhaust pipe or other high temperature components while the engine is hot.
- For Bank 1 Sensor 1:
- Disconnect the connector.
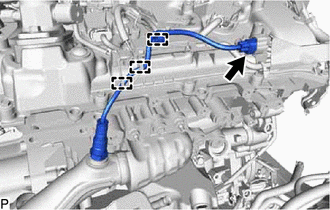 Courtesy of © TOYOTA, LICENSE AGREEMENT TMS1002 Courtesy of © TOYOTA, LICENSE AGREEMENT TMS1002
|
- Detach the 3 wire harness clamps.
- For Bank 1 Sensor 2:
- Disconnect the connector.
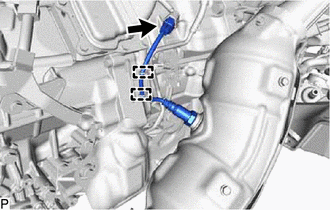 Courtesy of © TOYOTA, LICENSE AGREEMENT TMS1002 Courtesy of © TOYOTA, LICENSE AGREEMENT TMS1002
|
- Detach the 2 wire harness clamps.
- For Bank 2 Sensor 1:
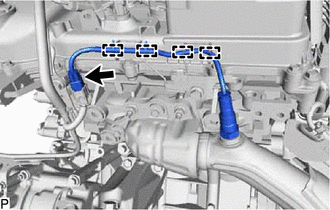 Courtesy of © TOYOTA, LICENSE AGREEMENT TMS1002 Courtesy of © TOYOTA, LICENSE AGREEMENT TMS1002
|
Disconnect the connector.
- Detach the 4 wire harness clamps.
- For Bank 2 Sensor 2:
- Disconnect the connector.
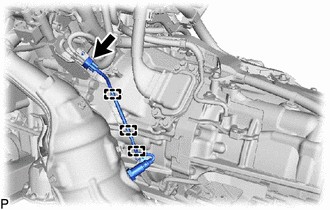 Courtesy of © TOYOTA, LICENSE AGREEMENT TMS1002 Courtesy of © TOYOTA, LICENSE AGREEMENT TMS1002
|
- Detach the 3 wire harness clamps.
- REMOVE EXHAUST MANIFOLD ASSEMBLY LH
WARNING:
To prevent burns, do not touch the engine, exhaust pipe or other high temperature components while the engine is hot.
- Remove the 4 nuts, exhaust manifold assembly LH and gasket.
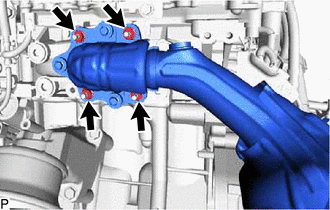 Courtesy of © TOYOTA, LICENSE AGREEMENT TMS1002 Courtesy of © TOYOTA, LICENSE AGREEMENT TMS1002
|
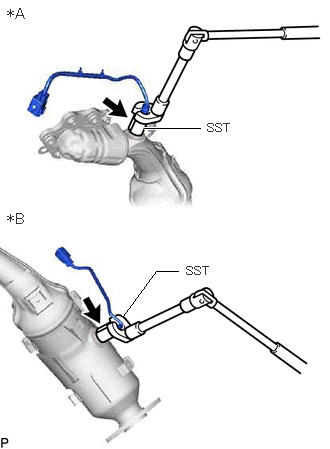
- Using SST, remove the 2 air fuel ratio sensors from the exhaust manifold assembly LH.
 Courtesy of © TOYOTA, LICENSE AGREEMENT TMS1002 Courtesy of © TOYOTA, LICENSE AGREEMENT TMS1002
|
| *A |
Bank 2 Sensor 1 Side |
| *B |
Bank 2 Sensor 2 Side |
- REMOVE EXHAUST MANIFOLD ASSEMBLY RH
WARNING:
To prevent burns, do not touch the engine, exhaust pipe or other high temperature components while the engine is hot.
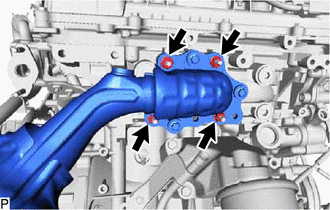
- Remove the 4 nuts, exhaust manifold assembly RH and gasket.
 Courtesy of © TOYOTA, LICENSE AGREEMENT TMS1002 Courtesy of © TOYOTA, LICENSE AGREEMENT TMS1002
|
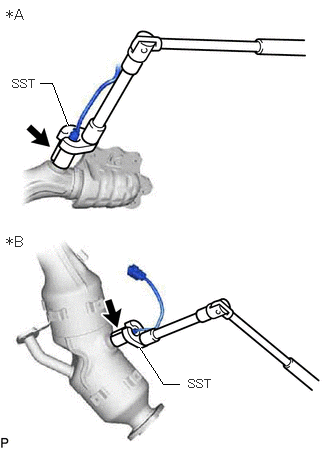
- Using SST, remove the 2 air fuel ratio sensors from the exhaust manifold assembly RH.
 Courtesy of © TOYOTA, LICENSE AGREEMENT TMS1002 Courtesy of © TOYOTA, LICENSE AGREEMENT TMS1002
|
| *A |
Bank 1 Sensor 1 Side |
| *B |
Bank 1 Sensor 2 Side |
- REMOVE NO. 1 EXHAUST MANIFOLD HEAT INSULATOR
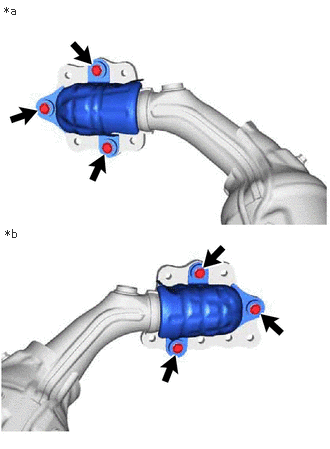
- Remove the 6 bolts and 2 No. 1 exhaust manifold heat insulators from the exhaust manifold assembly.
 Courtesy of © TOYOTA, LICENSE AGREEMENT TMS1002 Courtesy of © TOYOTA, LICENSE AGREEMENT TMS1002
|
| *a |
Exhaust Manifold Assembly LH Side |
| *b |
Exhaust Manifold Assembly RH Side |
- REMOVE NO. 1 MANIFOLD CONVERTER INSULATOR
- Remove the 8 bolts and 2 No. 1 manifold converter insulators from the exhaust manifold assembly.
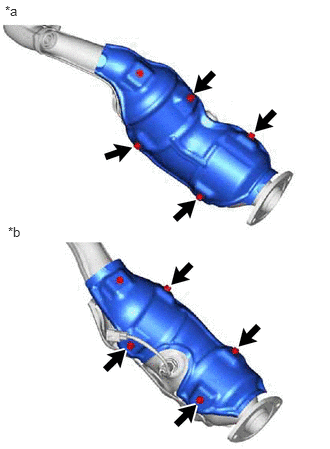 Courtesy of © TOYOTA, LICENSE AGREEMENT TMS1002 Courtesy of © TOYOTA, LICENSE AGREEMENT TMS1002
|
| *a |
Exhaust Manifold Assembly LH Side |
| *b |
Exhaust Manifold Assembly RH Side |
- REMOVE NO. 2 MANIFOLD CONVERTER INSULATOR
- Remove the 8 bolts and 2 No. 2 manifold converter insulators from the exhaust manifold assembly.
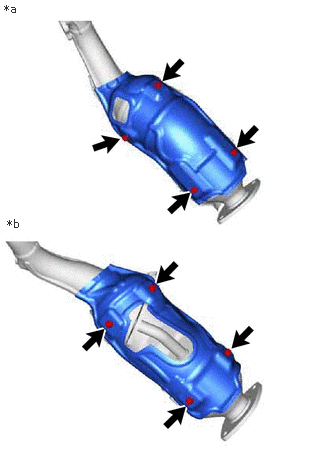 Courtesy of © TOYOTA, LICENSE AGREEMENT TMS1002 Courtesy of © TOYOTA, LICENSE AGREEMENT TMS1002
|
| *a |
Exhaust Manifold Assembly LH Side |
| *b |
Exhaust Manifold Assembly RH Side |