- REMOVE BACK WINDOW UPPER PANEL TRIM (w/o Rear No. 2 Seat)
- Disengage the 4 claws, 5 clips and 4 guides to remove the back window upper panel trim as shown in the illustration.
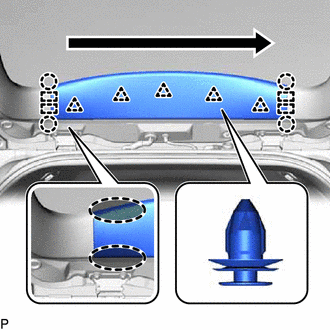 Courtesy of © TOYOTA, LICENSE AGREEMENT TMS1002 Courtesy of © TOYOTA, LICENSE AGREEMENT TMS1002
|
 |
Place Hand Here |
 |
Order of Removal |
- REMOVE BACK WINDOW UPPER PANEL TRIM (w/ Rear No. 2 Seat)
- Disengage the 4 claws, 6 clips and 4 guides to remove the back window upper panel trim as shown in the illustration.
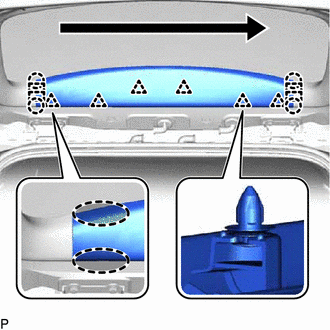 Courtesy of © TOYOTA, LICENSE AGREEMENT TMS1002 Courtesy of © TOYOTA, LICENSE AGREEMENT TMS1002
|
|
Place Hand Here |
|
Order of Removal |
- REMOVE BACK DOOR TRIM COVER LH (w/o Rear No. 2 Seat)
- Disengage the 2 clips, 2 claws and 2 guides to remove the back door trim cover LH as shown in the illustration.
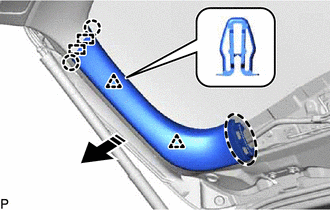 Courtesy of © TOYOTA, LICENSE AGREEMENT TMS1002 Courtesy of © TOYOTA, LICENSE AGREEMENT TMS1002
|
|
Place Hand Here |
 |
Remove in this Direction |
- REMOVE BACK DOOR TRIM COVER LH (w/ Rear No. 2 Seat)
- Disengage the 2 clips, 2 claws and 2 guides to remove the back door trim cover LH as shown in the illustration.
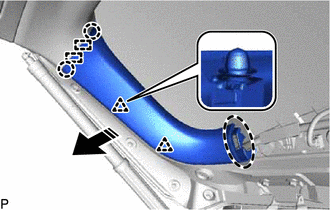 Courtesy of © TOYOTA, LICENSE AGREEMENT TMS1002 Courtesy of © TOYOTA, LICENSE AGREEMENT TMS1002
|
|
Place Hand Here |
|
Remove in this Direction |
- REMOVE BACK DOOR TRIM COVER RH
HINT:
Use the same procedure as for the LH side.
- REMOVE BACK DOOR LOCK COVER (w/o Rear No. 2 Seat)
- Disengage the 4 claws to remove the back door lock cover.
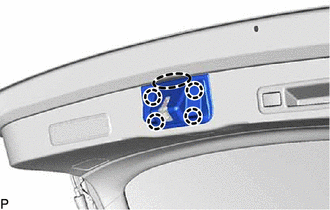 Courtesy of © TOYOTA, LICENSE AGREEMENT TMS1002 Courtesy of © TOYOTA, LICENSE AGREEMENT TMS1002
|
|
Place Hand Here |
- REMOVE BACK DOOR LOCK COVER (w/ Rear No. 2 Seat)
- Disengage the 4 claws to remove the back door lock cover.
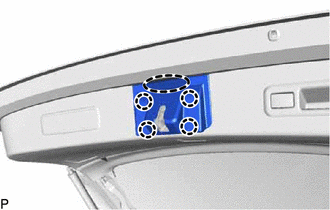 Courtesy of © TOYOTA, LICENSE AGREEMENT TMS1002 Courtesy of © TOYOTA, LICENSE AGREEMENT TMS1002
|
|
Place Hand Here |
- REMOVE BACK DOOR TRIM BASE
- Using a moulding remover, disengage the 4 claws to remove the back door trim base.
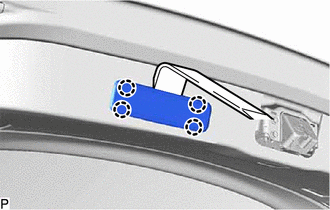 Courtesy of © TOYOTA, LICENSE AGREEMENT TMS1002 Courtesy of © TOYOTA, LICENSE AGREEMENT TMS1002
|
- REMOVE DOOR PULL HANDLE
- Using a moulding remover, disengage the 6 claws.
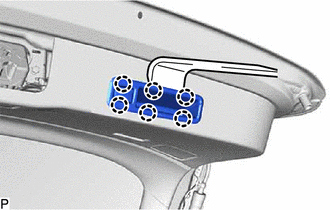 Courtesy of © TOYOTA, LICENSE AGREEMENT TMS1002 Courtesy of © TOYOTA, LICENSE AGREEMENT TMS1002
|
- Disconnect the connector to remove the door pull handle.
- REMOVE NO. 1 LUGGAGE COMPARTMENT LIGHT ASSEMBLY
Refer to PROCEDURE - Step 3
- REMOVE BACK DOOR TRIM PANEL ASSEMBLY (w/o Rear No. 2 Seat)
- Disengage the 16 clips to remove the back door trim panel assembly as shown in the illustration.
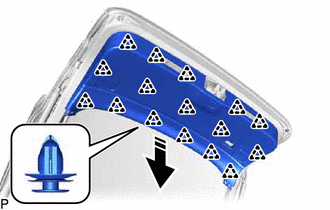 Courtesy of © TOYOTA, LICENSE AGREEMENT TMS1002 Courtesy of © TOYOTA, LICENSE AGREEMENT TMS1002
|
|
Remove in this Direction |
- REMOVE BACK DOOR TRIM PANEL ASSEMBLY (w/ Rear No. 2 Seat)
- Disengage the 17 clips to remove the back door trim panel assembly as shown in the illustration.
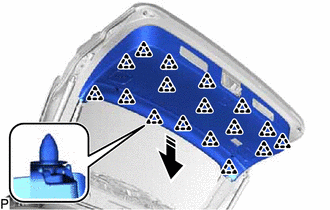 Courtesy of © TOYOTA, LICENSE AGREEMENT TMS1002 Courtesy of © TOYOTA, LICENSE AGREEMENT TMS1002
|
|
Remove in this Direction |
- REMOVE BACK DOOR LOCK ASSEMBLY
Refer to PROCEDURE - Step 13
- REMOVE BACK DOOR LOWER STAY REINFORCEMENT LH
- Remove the 2 bolts.
 Courtesy of © TOYOTA, LICENSE AGREEMENT TMS1002 Courtesy of © TOYOTA, LICENSE AGREEMENT TMS1002
|
- Disengage the 2 guides to remove the back door lower stay reinforcement LH.
- REMOVE BACK DOOR LOWER STAY REINFORCEMENT RH
HINT:
Use the same procedure as for the LH side.
- REMOVE BACK DOOR STAY REINFORCEMENT LH (w/ Rear No. 2 Seat)
- Remove the bolt.
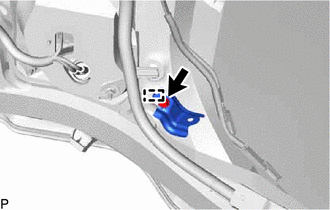 Courtesy of © TOYOTA, LICENSE AGREEMENT TMS1002 Courtesy of © TOYOTA, LICENSE AGREEMENT TMS1002
|
- Disengage the guide to remove the back door stay reinforcement LH.
- REMOVE BACK DOOR STAY REINFORCEMENT RH (w/ Rear No. 2 Seat)
HINT:
Use the same procedure as for the LH side.
- REMOVE BACK DOOR LOWER STOPPER
- Remove the bolt.
 Courtesy of © TOYOTA, LICENSE AGREEMENT TMS1002 Courtesy of © TOYOTA, LICENSE AGREEMENT TMS1002
|
- Disengage the guide to remove the back door lower stopper.
HINT:
Use the same procedure for the RH side and LH side.
- REMOVE POWER BACK DOOR SENSOR ASSEMBLY LH (w/o Rear No. 2 Seat)
See step 13
- REMOVE POWER BACK DOOR SENSOR ASSEMBLY LH (w/ Rear No. 2 Seat)
See step 14
- REMOVE POWER BACK DOOR SENSOR ASSEMBLY RH
HINT:
Use the same procedure as for the LH side.
- REMOVE SIDE REAR SPOILER PROTECTOR SUB-ASSEMBLY LH
Refer to PROCEDURE - Step 5
- REMOVE SIDE REAR SPOILER PROTECTOR SUB-ASSEMBLY RH
HINT:
Use the same procedure as for the LH side.
- REMOVE REAR WIPER MOTOR AND BRACKET ASSEMBLY
Refer to REMOVAL [12/2017 - ]
- REMOVE BACK DOOR OUTSIDE GARNISH SUB-ASSEMBLY
Refer to REMOVAL [12/2017 - 08/2019]
- REMOVE BACK DOOR OPENER SWITCH ASSEMBLY
See step 2
- REMOVE LICENSE PLATE LIGHT ASSEMBLY LH
Refer to PROCEDURE - Step 2
- REMOVE LICENSE PLATE LIGHT ASSEMBLY RH
HINT:
Use the same procedure as for the LH side.
- REMOVE MULTIPLEX NETWORK DOOR ECU
See step 13
- REMOVE POWER BACK DOOR WARNING BUZZER
See step 13
- REMOVE REAR LIGHT ASSEMBLY LH
Refer to PROCEDURE - Step 2
- REMOVE REAR LIGHT ASSEMBLY RH
HINT:
Use the same procedure as for the LH side.
- REMOVE REAR TELEVISION CAMERA ASSEMBLY
Refer to PROCEDURE - Step 3
- REMOVE BACK DOOR LOWER STOPPER CUSHION
- Disengage the 2 claws to remove the back door lower stopper cushion.
 Courtesy of © TOYOTA, LICENSE AGREEMENT TMS1002 Courtesy of © TOYOTA, LICENSE AGREEMENT TMS1002
|
HINT:
Use the same procedure for the RH side and LH side.
- REMOVE BACK DOOR DUST PROOF SEAL
- Disengage the 2 claws and guide to remove the back door dust proof seal.
HINT:
Use the same procedure for the RH side and LH side.
 Courtesy of © TOYOTA, LICENSE AGREEMENT TMS1002 Courtesy of © TOYOTA, LICENSE AGREEMENT TMS1002
|
- REMOVE POWER BACK DOOR UNIT SET ASSEMBLY LH
NOTE:
Do not apply any horizontal load to the power back door unit set assembly in order to prevent the piston rod from deforming.
- Disconnect the connector.
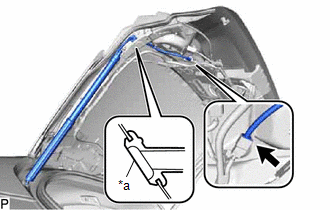 Courtesy of © TOYOTA, LICENSE AGREEMENT TMS1002 Courtesy of © TOYOTA, LICENSE AGREEMENT TMS1002
|
- Disengage the grommet.
- Remove the 4 bolts and power back door unit set assembly.
 Courtesy of © TOYOTA, LICENSE AGREEMENT TMS1002 Courtesy of © TOYOTA, LICENSE AGREEMENT TMS1002
|
NOTE:
Remove the power back door unit set assembly while supporting the back door by hand.
- REMOVE POWER BACK DOOR UNIT SET ASSEMBLY RH
HINT:
Use the same procedure as for the LH side.