VTC Actuator Inspection
- Remove the cam chain (see CAM CHAIN REMOVAL
).
- Loosen the rocker arm adjusting screws (see step 2 on ROCKER ARM ASSEMBLY REMOVAL
).
- Remove the camshaft holder (see step 3 on ROCKER ARM ASSEMBLY REMOVAL
).
- Remove the intake camshaft.
- Check that the variable valve timing control (VTC) actuator is locked by turning the VTC actuator counterclockwise. If not locked, turn the VTC actuator clockwise until it stops, then recheck it. If it is still not locked, replace the VTC actuator.
- Seal the advance holes (A) and retard holes (B) in the No. 1 camshaft journal with tape.
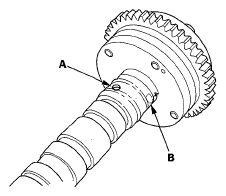 Courtesy of AMERICAN HONDA MOTOR CO., INC.
- Punch a hole in the tape over one of the advance holes.
- Apply air to the advance hole to release the lock.
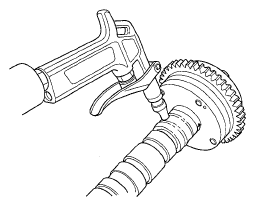 Courtesy of AMERICAN HONDA MOTOR CO., INC.
- Check that the VTC actuator moves smoothly. If the VTC actuator does not move smoothly, replace the VTC actuator.
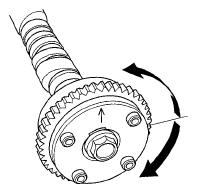 Courtesy of AMERICAN HONDA MOTOR CO., INC.
- Remove the tape and adhesive residue from the No. 1 camshaft journal.
- Make sure the punch marks on the VTC actuator and exhaust camshaft sprocket are facing up, then set the camshafts in the rocker shaft holder (see step 6 on ROCKER ARM ASSEMBLY INSTALLATION
).
- Set the camshaft holders and chain guide B in place (see step 7 on ROCKER ARM ASSEMBLY INSTALLATION
).
- Tighten the camshaft holder bolts to the specified torque (see step 8 on ROCKER ARM ASSEMBLY INSTALLATION
).
- Hold the camshaft, and turn the VTC actuator clockwise until you hear it click. Make sure to lock the VTC actuator by turning it.
- Install the cam chain (see CAM CHAIN INSTALLATION
).
- Adjust the valve clearance (see VALVE CLEARANCE ADJUSTMENT
).