Removal [09/2024 - ]: Procedure
WARNING: This page is about a different car, the 2025 Toyota GR Corolla, 2024 Toyota GR Corolla, and 2023 Toyota GR Corolla. However, it is still accessible from the selected car via links, so may be relevant.
- REMOVE COMPRESSOR ASSEMBLY WITH PULLEY
Refer to PROCEDURE - Step 18
- REMOVE FUEL TUBE SUB-ASSEMBLY
- Disengage the clamp.
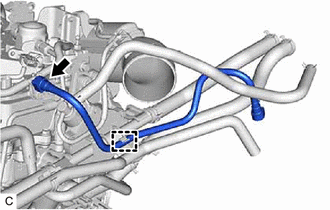 Courtesy of © TOYOTA, LICENSE AGREEMENT TMS1002 Courtesy of © TOYOTA, LICENSE AGREEMENT TMS1002
|
- Remove the fuel tube sub-assembly from the fuel pipe sub-assembly.
Refer to PRECAUTION [11/2022 - ]
- REMOVE NO. 2 AIR HOSE
- Loosen the hose clamp and remove the No. 2 air hose from the turbocharger sub-assembly.
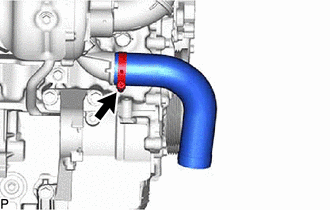 Courtesy of © TOYOTA, LICENSE AGREEMENT TMS1002 Courtesy of © TOYOTA, LICENSE AGREEMENT TMS1002
|
- REMOVE NO. 6 WATER BY-PASS HOSE
- Slide the 2 clips and separate the No. 6 water by-pass hose.
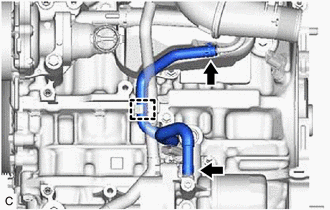 Courtesy of © TOYOTA, LICENSE AGREEMENT TMS1002 Courtesy of © TOYOTA, LICENSE AGREEMENT TMS1002
|
- Disengage the clamp and remove the No. 6 water by-pass hose from the No. 1 water hose clamp bracket.
- REMOVE NO. 5 WATER BY-PASS HOSE
- Slide the 2 clips and separate the No. 5 water by-pass hose.
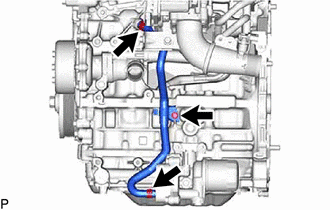 Courtesy of © TOYOTA, LICENSE AGREEMENT TMS1002 Courtesy of © TOYOTA, LICENSE AGREEMENT TMS1002
|
- Remove the bolt and No. 5 water by-pass hose from the crankshaft bearing cap.
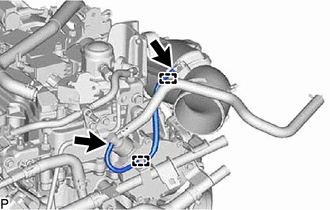
- REMOVE NO. 3 VACUUM TRANSMITTING HOSE
- Disengage the 2 clamp and remove the No. 3 vacuum transmitting hose.
 Courtesy of © TOYOTA, LICENSE AGREEMENT TMS1002 Courtesy of © TOYOTA, LICENSE AGREEMENT TMS1002
|
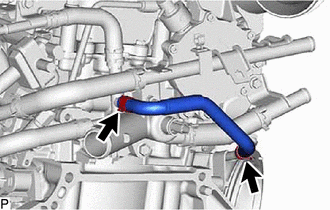
- REMOVE NO. 1 TURBO WATER HOSE
- Slide the 2 clips and remove the No. 1 turbo water hose.
 Courtesy of © TOYOTA, LICENSE AGREEMENT TMS1002 Courtesy of © TOYOTA, LICENSE AGREEMENT TMS1002
|
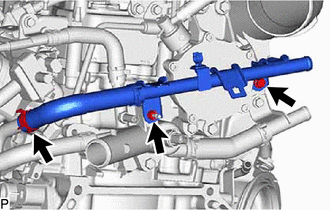
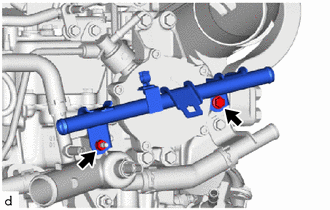
- REMOVE NO. 1 WATER BY-PASS PIPE
- for Manual Transaxle:
- Slide the clip and separate the water by-pass hose.
 Courtesy of © TOYOTA, LICENSE AGREEMENT TMS1002 Courtesy of © TOYOTA, LICENSE AGREEMENT TMS1002
|
- Remove the bolt, nut and No. 1 water by-pass pipe.
- for Automatic Transaxle:
- Remove the bolt, nut and No. 1 water by-pass pipe.
 Courtesy of © TOYOTA, LICENSE AGREEMENT TMS1002 Courtesy of © TOYOTA, LICENSE AGREEMENT TMS1002
|
- REMOVE NO. 3 WATER BY-PASS PIPE
- Remove the bolt and separate the No. 3 water by-pass pipe.
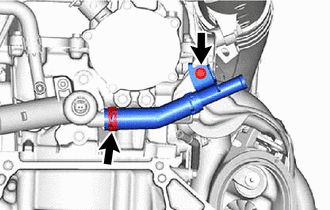 Courtesy of © TOYOTA, LICENSE AGREEMENT TMS1002 Courtesy of © TOYOTA, LICENSE AGREEMENT TMS1002
|
- Slide the clip and remove the No. 3 water by-pass pipe.
- REMOVE NO. 4 WATER BY-PASS PIPE
- Remove the 3 bolts and separate the No. 4 water by-pass pipe.
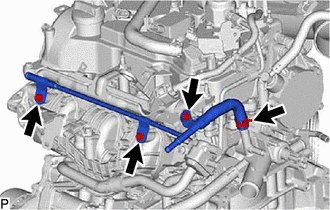 Courtesy of © TOYOTA, LICENSE AGREEMENT TMS1002 Courtesy of © TOYOTA, LICENSE AGREEMENT TMS1002
|
- Slide the clip and remove the No. 4 water by-pass pipe.
- REMOVE WATER BY-PASS HOSE ASSEMBLY
- Disengage the clamp.
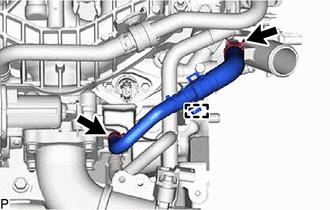 Courtesy of © TOYOTA, LICENSE AGREEMENT TMS1002 Courtesy of © TOYOTA, LICENSE AGREEMENT TMS1002
|
- Slide the 2 clips and remove the water by-pass hose assembly.
- REMOVE E.F.I. VACUUM SENSOR ASSEMBLY (MANIFOLD ABSOLUTE PRESSURE SENSOR)
Refer to PROCEDURE - Step 2
- REMOVE VACUUM SENSOR ASSEMBLY
Refer to PROCEDURE - Step 3
- REMOVE INTAKE AIR PIPE
- Separate the No. 1 vacuum transmitting hose.
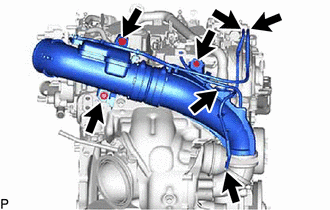 Courtesy of © TOYOTA, LICENSE AGREEMENT TMS1002 Courtesy of © TOYOTA, LICENSE AGREEMENT TMS1002
|
- Separate the No. 2 vacuum transmitting hose.
- Separate the 2 ventilation hoses.
- Remove the 3 bolts.
- Loosen the hose clamp and remove the intake air pipe from the.
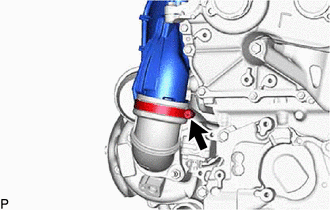 Courtesy of © TOYOTA, LICENSE AGREEMENT TMS1002 Courtesy of © TOYOTA, LICENSE AGREEMENT TMS1002
|
- REMOVE ENGINE HANGER BRACKET
- Remove the 2 bolts and engine hanger bracket from the cylinder head sub-assembly.
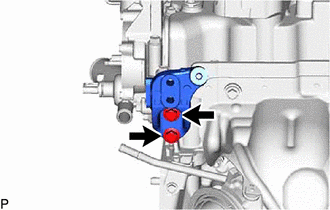 Courtesy of © TOYOTA, LICENSE AGREEMENT TMS1002 Courtesy of © TOYOTA, LICENSE AGREEMENT TMS1002
|
- REMOVE DRIVE SHAFT BEARING BRACKET
- Remove the 3 bolts and drive shaft bearing bracket from the cylinder block sub-assembly.
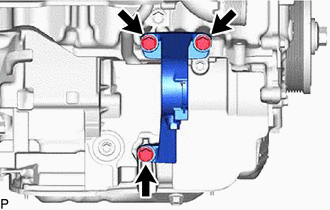 Courtesy of © TOYOTA, LICENSE AGREEMENT TMS1002 Courtesy of © TOYOTA, LICENSE AGREEMENT TMS1002
|
- REMOVE NO. 4 CYLINDER BLOCK INSULATOR
- Remove the 2 bolts and No. 4 cylinder block insulator.
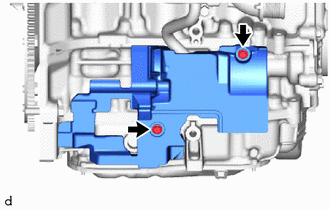 Courtesy of © TOYOTA, LICENSE AGREEMENT TMS1002 Courtesy of © TOYOTA, LICENSE AGREEMENT TMS1002
|
- REMOVE NO. 1 TURBO INSULATOR
Refer to PROCEDURE - Step 4
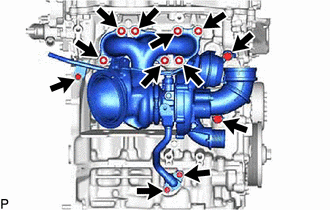
- REMOVE TURBOCHARGER SUB-ASSEMBLY
 Courtesy of © TOYOTA, LICENSE AGREEMENT TMS1002 Courtesy of © TOYOTA, LICENSE AGREEMENT TMS1002
|
Remove the 2 bolts and separate the outlet turbo oil pipe.
- Remove the inlet turbo oil pipe union bolt.
- Remove the 2 bolts and separate the No. 1 turbo water pipe sub-assembly.
- Remove the 7 nuts, collar and turbocharger sub-assembly from the cylinder head sub-assembly.
- REMOVE EXHAUST MANIFOLD TO HEAD GASKET
Refer to PROCEDURE - Step 12
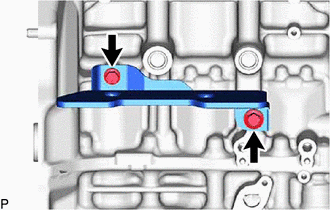
- REMOVE NO. 2 TURBO INSULATOR
- Remove the 2 bolts and No. 2 turbo insulator from the cylinder brock sub-assembly.
 Courtesy of © TOYOTA, LICENSE AGREEMENT TMS1002 Courtesy of © TOYOTA, LICENSE AGREEMENT TMS1002
|
- REMOVE PURGE VALVE (PURGE VSV)
Refer to PROCEDURE - Step 4
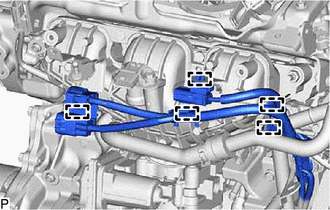
- SEPARATE NO. 6 ENGINE WIRE
- Disengage the 5 clamps and separate the No. 6 engine wire.
 Courtesy of © TOYOTA, LICENSE AGREEMENT TMS1002 Courtesy of © TOYOTA, LICENSE AGREEMENT TMS1002
|
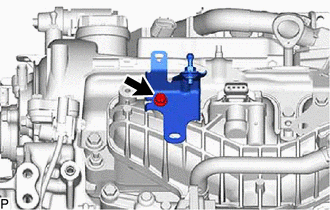
- REMOVE NO. 2 ENGINE COVER BRACKET
- Remove the bolt and No. 2 engine cover bracket from the intake manifold.
 Courtesy of © TOYOTA, LICENSE AGREEMENT TMS1002 Courtesy of © TOYOTA, LICENSE AGREEMENT TMS1002
|
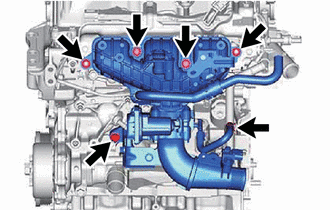
- REMOVE INTAKE MANIFOLD
- Remove the 3 bolts and 2 nuts and intake manifold from the cylinder head sub-assembly.
 Courtesy of © TOYOTA, LICENSE AGREEMENT TMS1002 Courtesy of © TOYOTA, LICENSE AGREEMENT TMS1002
|
- Slide the clip and disconnect the No. 2 water by-pass hose to from the water by-pass connector.
- REMOVE NO. 1 VENTILATION FLANGE SEPARATOR
Refer to PROCEDURE - Step 17
- REMOVE NO. 1 INTAKE MANIFOLD TO HEAD GASKET
Refer to PROCEDURE - Step 18
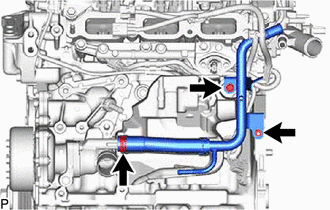
- REMOVE WATER BY-PASS PIPE
- Remove the bolt and nut.
 Courtesy of © TOYOTA, LICENSE AGREEMENT TMS1002 Courtesy of © TOYOTA, LICENSE AGREEMENT TMS1002
|
- Slide the clip and remove the water by-pass pipe from the water inlet with thermostat sub-assembly.
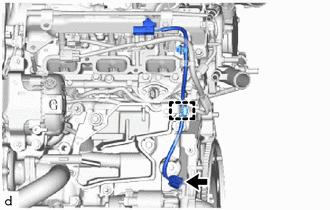
- REMOVE NO. 7 ENGINE WIRE
- Disengage the clamp.
 Courtesy of © TOYOTA, LICENSE AGREEMENT TMS1002 Courtesy of © TOYOTA, LICENSE AGREEMENT TMS1002
|
- Disconnect the connector and remove the No. 7 engine wire.
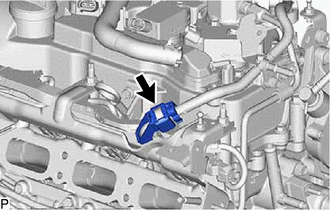
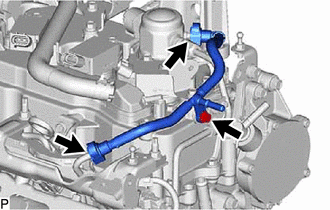
- REMOVE FUEL TUBE SUB-ASSEMBLY
- Remove the fuel pipe clamp from the fuel tube connector.
 Courtesy of © TOYOTA, LICENSE AGREEMENT TMS1002 Courtesy of © TOYOTA, LICENSE AGREEMENT TMS1002
|
- Remove the bolt.
 Courtesy of © TOYOTA, LICENSE AGREEMENT TMS1002 Courtesy of © TOYOTA, LICENSE AGREEMENT TMS1002
|
- Remove the fuel tube sub-assembly.
Refer to PRECAUTION [11/2022 - ]
- REMOVE OIL LEVEL GAUGE SUB-ASSEMBLY
Refer to PROCEDURE - Step 12
- REMOVE OIL LEVEL GAUGE GUIDE
Refer to PROCEDURE - Step 13
- REMOVE FUEL DELIVERY GUARD
Refer to PROCEDURE - Step 14
- REMOVE NO. 1 DELIVERY PIPE SPACER
- Remove the 2 No. 1 delivery pipe spacers.
- REMOVE FUEL DELIVERY PIPE
Refer to PROCEDURE - Step 15
- REMOVE FUEL DELIVERY SPACER
Refer to PROCEDURE - Step 16
- REMOVE INJECTOR VIBRATION INSULATOR
Refer to PROCEDURE - Step 17
- REMOVE NO. 1 FUEL PIPE SUB-ASSEMBLY
Refer to PROCEDURE - Step 18
- REMOVE FUEL PUMP ASSEMBLY
Refer to PROCEDURE - Step 21
- REMOVE FUEL DELIVERY PIPE SUB-ASSEMBLY
Refer to PROCEDURE - Step 9
- REMOVE NO. 6 ENGINE WIRE
Refer to PROCEDURE - Step 10
- REMOVE DIRECT FUEL INJECTOR ASSEMBLY
Refer to PROCEDURE - Step 11
- REMOVE FUEL INJECTOR SEAL
Refer to PROCEDURE - Step 12
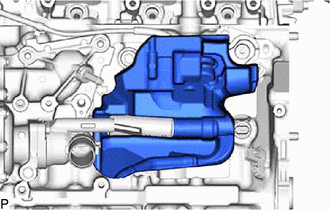
- REMOVE NO. 2 CYLINDER BLOCK INSULATOR
- Remove the No. 2 cylinder block insulator from the cylinder block sub-assembly.
 Courtesy of © TOYOTA, LICENSE AGREEMENT TMS1002 Courtesy of © TOYOTA, LICENSE AGREEMENT TMS1002
|
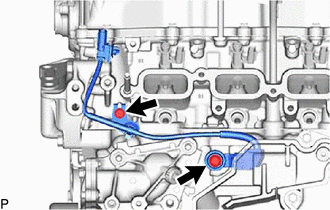
- REMOVE SENSOR WIRE
- Remove the 2 bolts and remove the sensor wire from the cylinder block sub-assembly.
 Courtesy of © TOYOTA, LICENSE AGREEMENT TMS1002 Courtesy of © TOYOTA, LICENSE AGREEMENT TMS1002
|
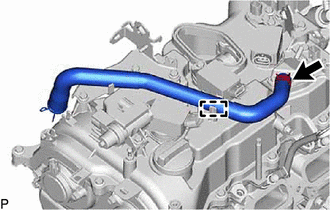
- REMOVE VENTILATION HOSE
- Disengage the clamp.
 Courtesy of © TOYOTA, LICENSE AGREEMENT TMS1002 Courtesy of © TOYOTA, LICENSE AGREEMENT TMS1002
|
- Slide the clip and remove the ventilation hose from the cylinder head cover sub-assembly.
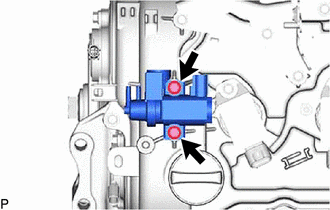
- REMOVE VACUUM REGULATING VALVE ASSEMBLY
- Remove the 2 bolts and vacuum regulating valve assembly from the cylinder head cover sub-assembly.
 Courtesy of © TOYOTA, LICENSE AGREEMENT TMS1002 Courtesy of © TOYOTA, LICENSE AGREEMENT TMS1002
|
- REMOVE IGNITION COIL ASSEMBLY
Refer to PROCEDURE - Step 2
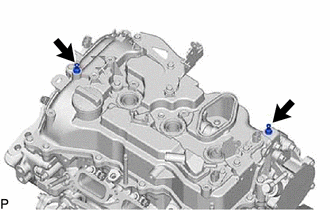
- REMOVE ENGINE COVER JOINT
- Remove the 2 engine cover joints from the cylinder head cover sub-assembly.
 Courtesy of © TOYOTA, LICENSE AGREEMENT TMS1002 Courtesy of © TOYOTA, LICENSE AGREEMENT TMS1002
|
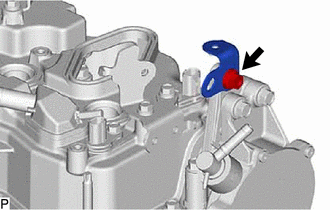
- REMOVE ENGINE COVER BRACKET
- Remove the bolt and engine cover bracket from the No. 1 vacuum pump bracket.
 Courtesy of © TOYOTA, LICENSE AGREEMENT TMS1002 Courtesy of © TOYOTA, LICENSE AGREEMENT TMS1002
|
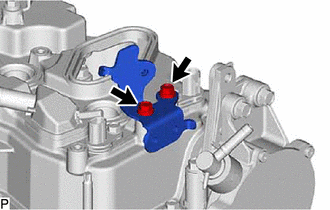
- REMOVE FUEL HOSE BRACKET
- Remove the 2 bolts and fuel hose bracket form the cylinder head cover sub-assembly.
 Courtesy of © TOYOTA, LICENSE AGREEMENT TMS1002 Courtesy of © TOYOTA, LICENSE AGREEMENT TMS1002
|
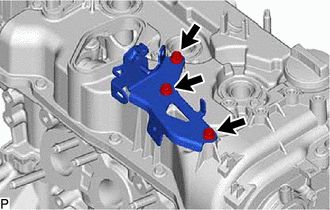
- REMOVE INTAKE PIPE OR HOSE STAY
- Remove the 3 bolts and intake pipe or hose stay from the cylinder head cover sub-assembly.
 Courtesy of © TOYOTA, LICENSE AGREEMENT TMS1002 Courtesy of © TOYOTA, LICENSE AGREEMENT TMS1002
|
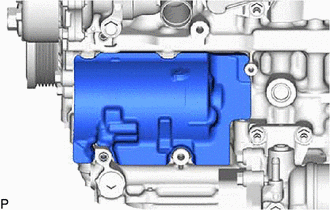
- REMOVE NO. 3 CYLINDER BLOCK INSULATOR
- Remove the No. 3 cylinder block insulator from the cylinder block sub-assembly.
 Courtesy of © TOYOTA, LICENSE AGREEMENT TMS1002 Courtesy of © TOYOTA, LICENSE AGREEMENT TMS1002
|