- REMOVE INSTRUMENT PANEL PASSENGER AIRBAG ASSEMBLY
Refer to PROCEDURE - Step 5
- REMOVE NO. 1 SIDE DEFROSTER NOZZLE DUCT
- Remove the screw <C> or <D>.
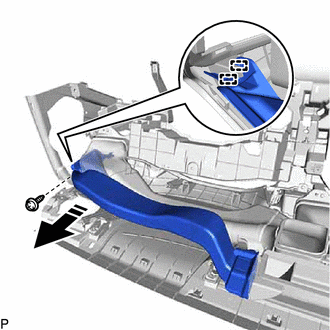 Courtesy of © TOYOTA, LICENSE AGREEMENT TMS1002 Courtesy of © TOYOTA, LICENSE AGREEMENT TMS1002
|
 |
Remove in this Direction |
- Disengage the 2 guides as shown in the illustration.
- Disengage the claw to remove the No. 1 side defroster nozzle duct as shown in the illustration.
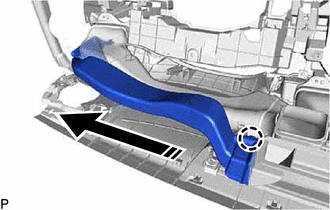 Courtesy of © TOYOTA, LICENSE AGREEMENT TMS1002 Courtesy of © TOYOTA, LICENSE AGREEMENT TMS1002
|
|
Remove in this Direction |
- REMOVE NO. 2 SIDE DEFROSTER NOZZLE DUCT
- Remove the 2 screws <C> or <D>.
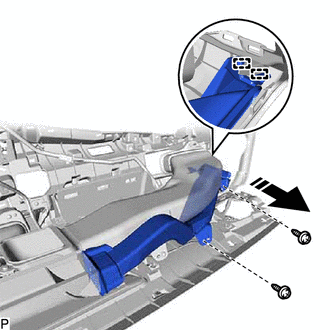 Courtesy of © TOYOTA, LICENSE AGREEMENT TMS1002 Courtesy of © TOYOTA, LICENSE AGREEMENT TMS1002
|
|
Remove in this Direction |
- Disengage the 2 guides as shown in the illustration.
- Disengage the claw to remove the No. 2 side defroster nozzle duct as shown in the illustration.
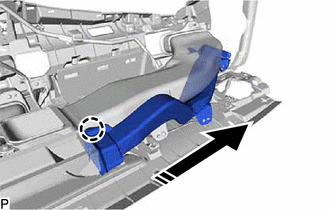 Courtesy of © TOYOTA, LICENSE AGREEMENT TMS1002 Courtesy of © TOYOTA, LICENSE AGREEMENT TMS1002
|
|
Remove in this Direction |
- REMOVE DEFROSTER NOZZLE ASSEMBLY
- Remove the 3 screws <C> or <D> and defroster nozzle assembly.
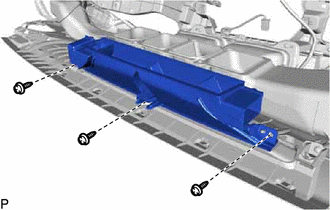 Courtesy of © TOYOTA, LICENSE AGREEMENT TMS1002 Courtesy of © TOYOTA, LICENSE AGREEMENT TMS1002
|
- REMOVE METER MIRROR SUB-ASSEMBLY (w/ Headup Display)
Refer to PROCEDURE - Step 5
- REMOVE NO. 1 HEATER TO REGISTER DUCT SUB-ASSEMBLY
- Remove the 3 screws <C> or <D> and No. 1 heater to register duct sub-assembly.
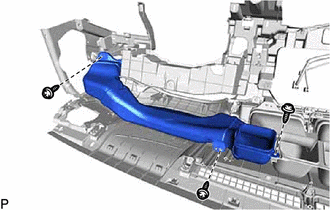 Courtesy of © TOYOTA, LICENSE AGREEMENT TMS1002 Courtesy of © TOYOTA, LICENSE AGREEMENT TMS1002
|
- REMOVE NO. 3 HEATER TO REGISTER DUCT SUB-ASSEMBLY
- Remove the 3 screws <C> or <D> and No. 3 heater to register duct sub-assembly.
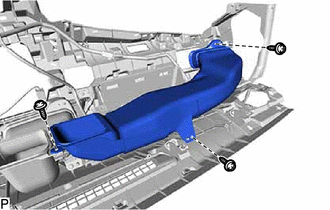 Courtesy of © TOYOTA, LICENSE AGREEMENT TMS1002 Courtesy of © TOYOTA, LICENSE AGREEMENT TMS1002
|
- REMOVE TELEPHONE AND GPS ANTENNA CORD (w/ Manual (SOS) Switch)
Refer to PROCEDURE - Step 3
- REMOVE TELEPHONE AND GPS ANTENNA ASSEMBLY WITH BRACKET (w/ Manual (SOS) Switch)
Refer to PROCEDURE - Step 3 [06/2017 - 09/2019]
, or refer to PROCEDURE - Step 3 [09/2019 - 10/2020]
- REMOVE ANTENNA CORD SUB-ASSEMBLY (w/ Navigation System)
Refer to PROCEDURE - Step 3
- REMOVE NAVIGATION ANTENNA ASSEMBLY WITH BRACKET (w/ Navigation System)
Refer to PROCEDURE - Step 3 [06/2017 - 09/2019]
, or refer to PROCEDURE - Step 3 [09/2019 - 10/2020]
- REMOVE NO. 2 HEATER TO REGISTER DUCT SUB-ASSEMBLY
- Remove the 2 screws <C> or <D> and No. 2 heater to register duct sub-assembly.
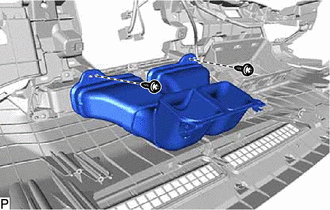 Courtesy of © TOYOTA, LICENSE AGREEMENT TMS1002 Courtesy of © TOYOTA, LICENSE AGREEMENT TMS1002
|
- REMOVE AUTOMATIC LIGHT CONTROL SENSOR
Refer to PROCEDURE - Step 5
- REMOVE NO. 2 INSTRUMENT PANEL REGISTER ASSEMBLY
- Disconnect the connector.
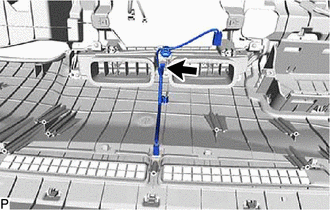 Courtesy of © TOYOTA, LICENSE AGREEMENT TMS1002 Courtesy of © TOYOTA, LICENSE AGREEMENT TMS1002
|
- Remove the 6 screws <C> or <D> and No. 2 instrument panel register assembly.
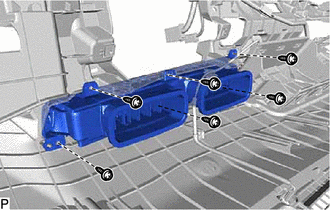 Courtesy of © TOYOTA, LICENSE AGREEMENT TMS1002 Courtesy of © TOYOTA, LICENSE AGREEMENT TMS1002
|
- REMOVE NO. 3 INSTRUMENT PANEL WIRE
- Disengage the clamp to remove the No. 3 instrument panel wire.
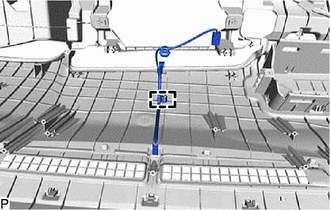 Courtesy of © TOYOTA, LICENSE AGREEMENT TMS1002 Courtesy of © TOYOTA, LICENSE AGREEMENT TMS1002
|
- REMOVE NO. 1 METER BRACKET SUB-ASSEMBLY
- Remove the screw <C> or <D> and No. 1 meter bracket sub-assembly.
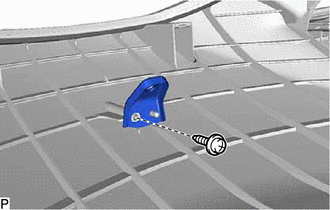 Courtesy of © TOYOTA, LICENSE AGREEMENT TMS1002 Courtesy of © TOYOTA, LICENSE AGREEMENT TMS1002
|
- REMOVE NO. 2 METER BRACKET SUB-ASSEMBLY (w/ Headup Display)
- Remove the screw <C> and No. 2 meter bracket sub-assembly.
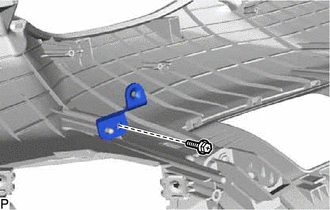 Courtesy of © TOYOTA, LICENSE AGREEMENT TMS1002 Courtesy of © TOYOTA, LICENSE AGREEMENT TMS1002
|
- REMOVE NO. 1 DEFROSTER NOZZLE GARNISH
- Disengage the 4 clips.
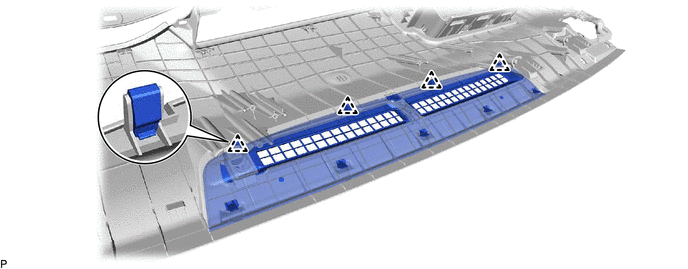 Courtesy of © TOYOTA, LICENSE AGREEMENT TMS1002 Courtesy of © TOYOTA, LICENSE AGREEMENT TMS1002
|
- Disengage the 5 guides to remove the No. 1 defroster nozzle garnish.
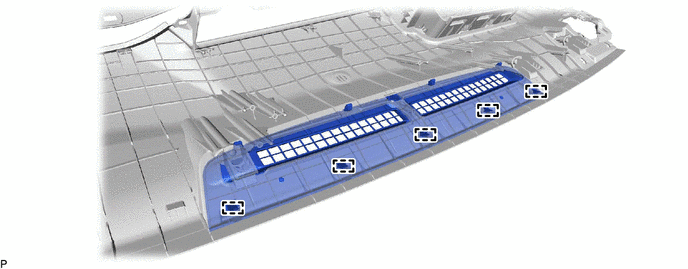 Courtesy of © TOYOTA, LICENSE AGREEMENT TMS1002 Courtesy of © TOYOTA, LICENSE AGREEMENT TMS1002
|
- REMOVE INSTRUMENT PANEL HOLE COVER (w/ Headup Display)
- Disengage the 5 claws.
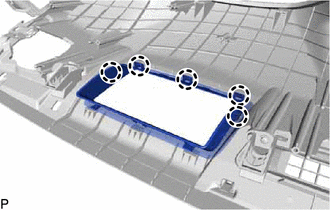 Courtesy of © TOYOTA, LICENSE AGREEMENT TMS1002 Courtesy of © TOYOTA, LICENSE AGREEMENT TMS1002
|
- Disengage the 3 guides to remove the instrument panel hole cover.
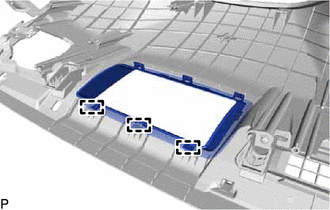 Courtesy of © TOYOTA, LICENSE AGREEMENT TMS1002 Courtesy of © TOYOTA, LICENSE AGREEMENT TMS1002
|
- REMOVE NO. 1 INSTRUMENT PANEL PIN
- Remove the 4 screws <C> or <D> and 4 No. 1 instrument panel pins.
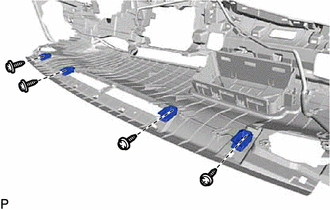 Courtesy of © TOYOTA, LICENSE AGREEMENT TMS1002 Courtesy of © TOYOTA, LICENSE AGREEMENT TMS1002
|
- REMOVE ANTENNA CORD SUB-ASSEMBLY
Refer to PROCEDURE - Step 4
- REMOVE INSTRUMENT PANEL CUSHION
- Remove the instrument panel cushion.
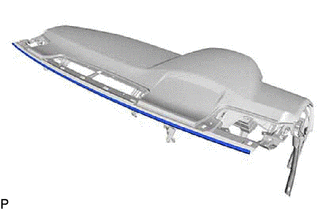 Courtesy of © TOYOTA, LICENSE AGREEMENT TMS1002 Courtesy of © TOYOTA, LICENSE AGREEMENT TMS1002
|
- REMOVE GLOVE COMPARTMENT DOOR LOCK CYLINDER ASSEMBLY
- Move the glove compartment door lever as shown in the illustration.
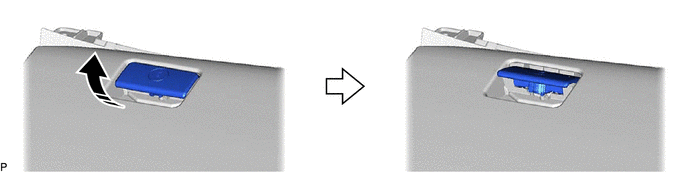 Courtesy of © TOYOTA, LICENSE AGREEMENT TMS1002 Courtesy of © TOYOTA, LICENSE AGREEMENT TMS1002
|
|
Move in this Direction |
- |
- |
- Using a screwdriver, press the cylinder lock plate to release it and pull out the glove compartment door lock cylinder assembly from the glove compartment door lever to remove it as shown in the illustration.
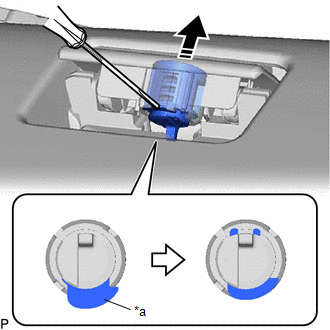 Courtesy of © TOYOTA, LICENSE AGREEMENT TMS1002 Courtesy of © TOYOTA, LICENSE AGREEMENT TMS1002
|
| *a |
Cylinder Lock Plate |
|
Remove in this Direction |