- REMOVE NO. 1 METER HOOD CLUSTER
- Apply protective tape to the area shown in the illustration.
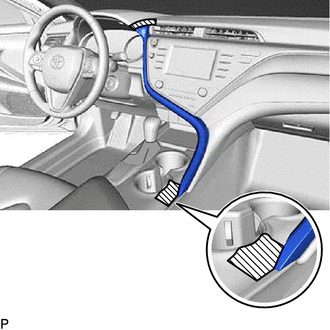 Courtesy of © TOYOTA, LICENSE AGREEMENT TMS1002 Courtesy of © TOYOTA, LICENSE AGREEMENT TMS1002
|
 |
Protective Tape |
- Disengage the 3 clips in the order shown in the illustration.
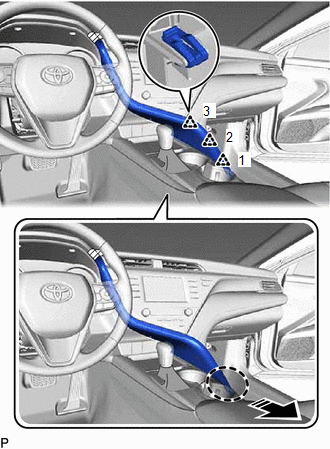 Courtesy of © TOYOTA, LICENSE AGREEMENT TMS1002 Courtesy of © TOYOTA, LICENSE AGREEMENT TMS1002
|
 |
Place Hand Here |
 |
Remove in this Direction |
- Disengage the 4 clips and 3 guides in the order shown in the illustration.
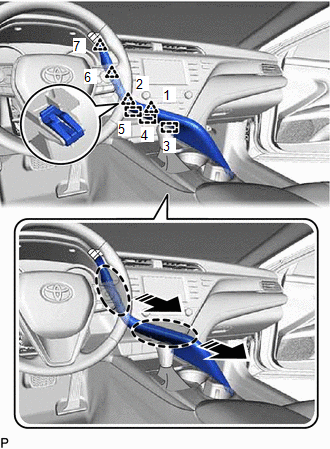 Courtesy of © TOYOTA, LICENSE AGREEMENT TMS1002 Courtesy of © TOYOTA, LICENSE AGREEMENT TMS1002
|
|
Place Hand Here |
|
Remove in this Direction |
- Disconnect the connector to remove the No. 1 meter hood cluster.
- REMOVE NO. 2 INSTRUMENT PANEL GARNISH SUB-ASSEMBLY
- Disengage the 5 clips in the order shown in the illustration.
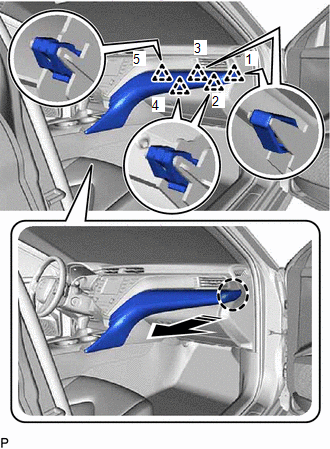 Courtesy of © TOYOTA, LICENSE AGREEMENT TMS1002 Courtesy of © TOYOTA, LICENSE AGREEMENT TMS1002
|
|
Place Hand Here |
|
Remove in this Direction |
- Disengage the 6 clips in the order shown in the illustration to remove the No. 2 instrument panel garnish sub-assembly.
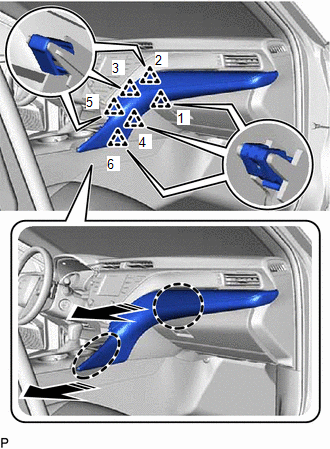 Courtesy of © TOYOTA, LICENSE AGREEMENT TMS1002 Courtesy of © TOYOTA, LICENSE AGREEMENT TMS1002
|
|
Place Hand Here |
|
Remove in this Direction |
- REMOVE INSTRUMENT PANEL FINISH PLATE GARNISH
- Disengage the clip, claw and 2 guides to remove the instrument panel finish plate garnish as shown in the illustration.
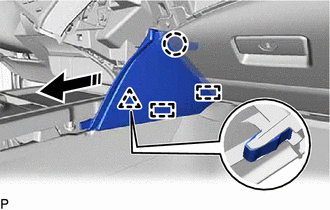 Courtesy of © TOYOTA, LICENSE AGREEMENT TMS1002 Courtesy of © TOYOTA, LICENSE AGREEMENT TMS1002
|
|
Remove in this Direction |
- REMOVE LOWER CENTER INSTRUMENT PANEL FINISH PANEL
- Disengage the 2 clips as shown in the illustration.
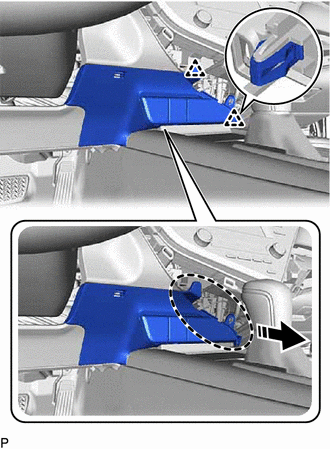 Courtesy of © TOYOTA, LICENSE AGREEMENT TMS1002 Courtesy of © TOYOTA, LICENSE AGREEMENT TMS1002
|
|
Place Hand Here |
|
Remove in this Direction |
- Disengage the 5 clips as shown in the illustration.
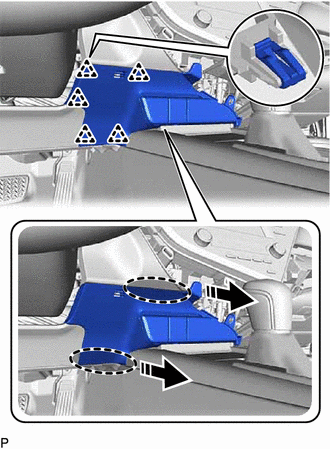 Courtesy of © TOYOTA, LICENSE AGREEMENT TMS1002 Courtesy of © TOYOTA, LICENSE AGREEMENT TMS1002
|
|
Place Hand Here |
|
Remove in this Direction |
- Disengage the clamp.
- Disconnect each connector to remove the lower center instrument panel finish panel.
- REMOVE SHIFT LOCK RELEASE BUTTON COVER
for UB80E:
Refer to PROCEDURE - Step 2
for UA80E:
Refer to PROCEDURE - Step 2
- REMOVE SHIFT LEVER KNOB SUB-ASSEMBLY
for UB80E:
Refer to PROCEDURE - Step 1
for UA80E:
Refer to PROCEDURE - Step 1
- REMOVE REAR UPPER CONSOLE PANEL SUB-ASSEMBLY
- Move the shift lever to N.
- Using a moulding remover, disengage the 2 claws and 2 clips as shown in the illustration.
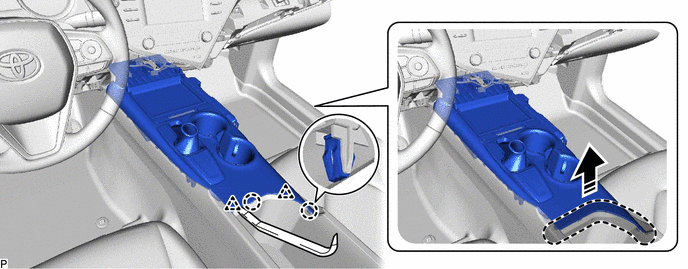 Courtesy of © TOYOTA, LICENSE AGREEMENT TMS1002 Courtesy of © TOYOTA, LICENSE AGREEMENT TMS1002
|
|
Insert Moulding Remover Here |
|
Remove in this Direction |
- Disengage the 5 claws and 4 clips as shown in the illustration.
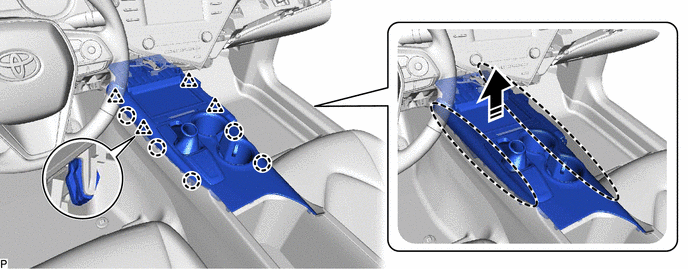 Courtesy of © TOYOTA, LICENSE AGREEMENT TMS1002 Courtesy of © TOYOTA, LICENSE AGREEMENT TMS1002
|
|
Place Hand Here |
|
Remove in this Direction |
- Disengage the clamp.
- Disconnect each connector to remove the rear upper console panel sub-assembly.
- REMOVE SHIFT POSITION INDICATOR
for UB80E:
Refer to PROCEDURE - Step 1
for UA80E:
Refer to PROCEDURE - Step 1
- REMOVE FRONT CONSOLE BOX INSERT SUB-ASSEMBLY
- Remove the 5 screws and front console box insert sub-assembly.
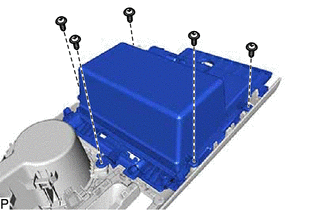 Courtesy of © TOYOTA, LICENSE AGREEMENT TMS1002 Courtesy of © TOYOTA, LICENSE AGREEMENT TMS1002
|
- REMOVE INSTRUMENT PANEL CUP HOLDER
- Remove the 3 screws.
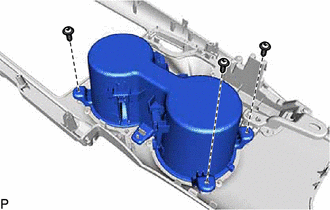 Courtesy of © TOYOTA, LICENSE AGREEMENT TMS1002 Courtesy of © TOYOTA, LICENSE AGREEMENT TMS1002
|
- Disengage the 2 claws to remove the instrument panel cup holder.
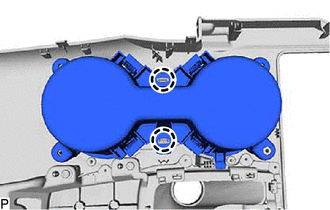 Courtesy of © TOYOTA, LICENSE AGREEMENT TMS1002 Courtesy of © TOYOTA, LICENSE AGREEMENT TMS1002
|
- REMOVE CONSOLE REAR END PANEL SUB-ASSEMBLY (for TMC Made)
- Disengage the 4 clips as shown in the illustration.
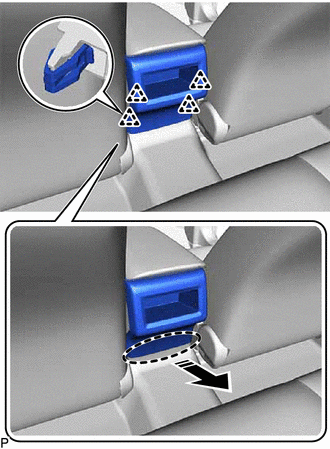 Courtesy of © TOYOTA, LICENSE AGREEMENT TMS1002 Courtesy of © TOYOTA, LICENSE AGREEMENT TMS1002
|
|
Place Hand Here |
|
Remove in this Direction |
- Disengage the 6 claws to remove the console rear end panel sub-assembly as shown in the illustration.
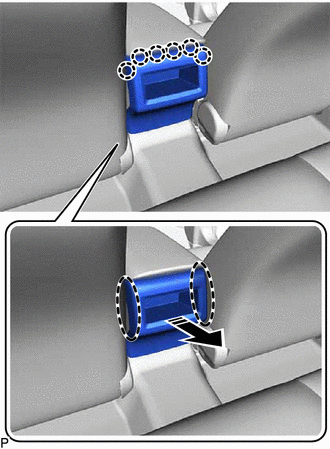 Courtesy of © TOYOTA, LICENSE AGREEMENT TMS1002 Courtesy of © TOYOTA, LICENSE AGREEMENT TMS1002
|
|
Place Hand Here |
|
Remove in this Direction |
- REMOVE CONSOLE BOX CARPET
- Remove the console box carpet as shown in the illustration.
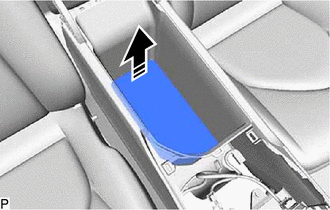 Courtesy of © TOYOTA, LICENSE AGREEMENT TMS1002 Courtesy of © TOYOTA, LICENSE AGREEMENT TMS1002
|
|
Remove in this Direction |
- REMOVE CONSOLE BOX ASSEMBLY
- for TMC Made:
- Remove the 4 bolts, 2 screws and console box assembly.
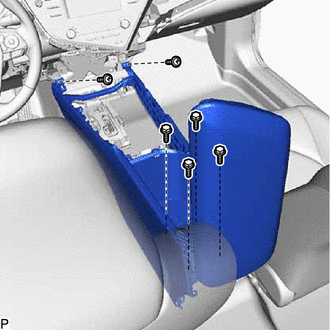 Courtesy of © TOYOTA, LICENSE AGREEMENT TMS1002 Courtesy of © TOYOTA, LICENSE AGREEMENT TMS1002
|
- for TMMK Made:
- Remove the 4 bolts, 2 screws and console box assembly.
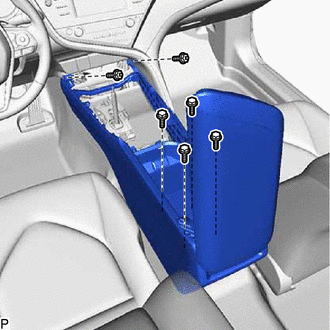 Courtesy of © TOYOTA, LICENSE AGREEMENT TMS1002 Courtesy of © TOYOTA, LICENSE AGREEMENT TMS1002
|