- REMOVE NO. 1 POWER OUTLET SOCKET ASSEMBLY
Refer to PROCEDURE - Step 10
- REMOVE NO. 1 POWER OUTLET SOCKET COVER
Refer to PROCEDURE - Step 11
- REMOVE REAR CONSOLE END PANEL
- Detach the 4 clips and 3 claws to remove the rear console end panel.
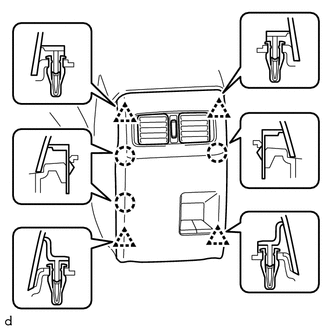 Courtesy of © TOYOTA, LICENSE AGREEMENT TMS1002 Courtesy of © TOYOTA, LICENSE AGREEMENT TMS1002
|
- Disconnect the connector.
- REMOVE USB CHARGER SOCKET
Refer to PROCEDURE - Step 13
- REMOVE CONSOLE BOX REGISTER ASSEMBLY
- Detach the 4 claws to remove the console box register assembly.
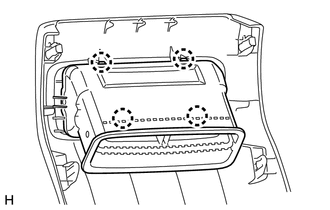 Courtesy of © TOYOTA, LICENSE AGREEMENT TMS1002 Courtesy of © TOYOTA, LICENSE AGREEMENT TMS1002
|
- REMOVE CONSOLE COMPARTMENT DOOR SUB-ASSEMBLY
- Remove the 6 screws and console compartment door sub-assembly.
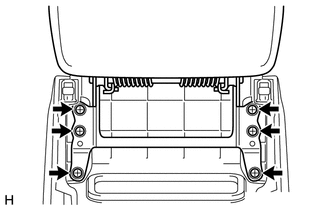 Courtesy of © TOYOTA, LICENSE AGREEMENT TMS1002 Courtesy of © TOYOTA, LICENSE AGREEMENT TMS1002
|
- REMOVE CONSOLE COMPARTMENT DOOR LOCK SUB-ASSEMBLY
- Remove the 2 screws and console compartment door lock sub-assembly.
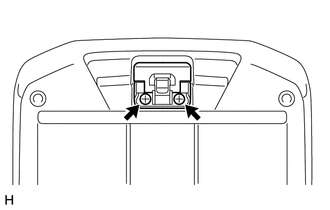 Courtesy of © TOYOTA, LICENSE AGREEMENT TMS1002 Courtesy of © TOYOTA, LICENSE AGREEMENT TMS1002
|
- REMOVE CONSOLE COMPARTMENT DOOR HINGE SUB-ASSEMBLY
- Remove the 4 screws.
 Courtesy of © TOYOTA, LICENSE AGREEMENT TMS1002 Courtesy of © TOYOTA, LICENSE AGREEMENT TMS1002
|
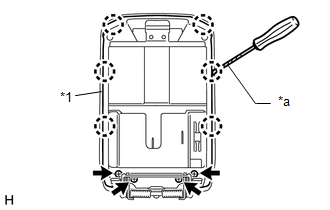
- Using a screwdriver, detach the 6 claws to remove the console compartment inner door.
TEXT IN ILLUSTRATION
| *a |
Protective Tape |
| *1 |
Console Compartment Inner Door |
HINT:
Tape the screwdriver tip before use.
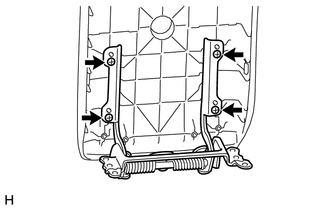
- Remove the 4 screws and console compartment door hinge sub-assembly.
 Courtesy of © TOYOTA, LICENSE AGREEMENT TMS1002 Courtesy of © TOYOTA, LICENSE AGREEMENT TMS1002
|
- REMOVE CONSOLE CUP HOLDER BOX
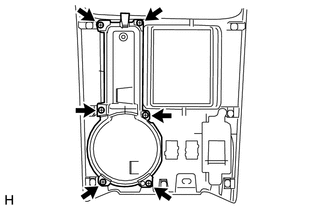
- Remove the 6 screws and console cup holder box.
 Courtesy of © TOYOTA, LICENSE AGREEMENT TMS1002 Courtesy of © TOYOTA, LICENSE AGREEMENT TMS1002
|
- REMOVE BACK DOOR POWER WINDOW REGULATOR SWITCH ASSEMBLY
Refer to PROCEDURE - Step 4
- REMOVE SEAT HEATER SWITCH (w/ Seat Heater System)
Refer to PROCEDURE - Step 4
- REMOVE SWITCH BASE
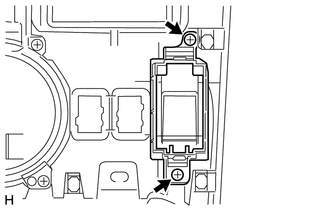
- Remove the 2 screws and switch base.
 Courtesy of © TOYOTA, LICENSE AGREEMENT TMS1002 Courtesy of © TOYOTA, LICENSE AGREEMENT TMS1002
|
- REMOVE SHIFTING HOLE COVER SUB-ASSEMBLY (for VF2A)
- Detach the 6 claws to remove the shifting hole cover sub-assembly.
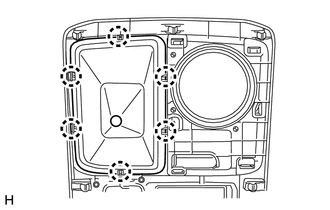 Courtesy of © TOYOTA, LICENSE AGREEMENT TMS1002 Courtesy of © TOYOTA, LICENSE AGREEMENT TMS1002
|
- REMOVE FRONT UPPER CONSOLE PANEL GARNISH
- for VF2A:
- Detach the 6 claws to remove the front upper console panel garnish.
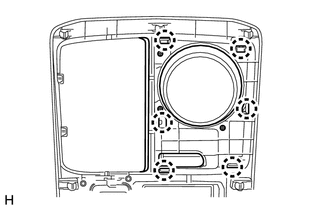 Courtesy of © TOYOTA, LICENSE AGREEMENT TMS1002 Courtesy of © TOYOTA, LICENSE AGREEMENT TMS1002
|
- for 2WD, for VF2CM, VF4BM:
- Detach the 10 claws to remove the front upper console panel garnish.
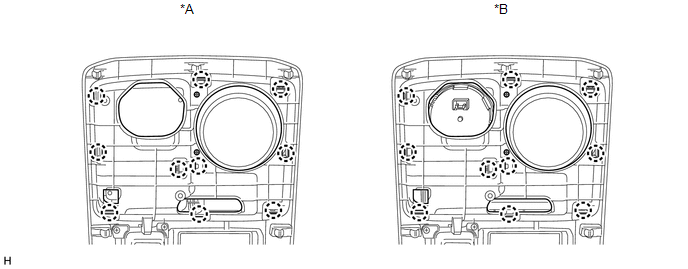 Courtesy of © TOYOTA, LICENSE AGREEMENT TMS1002 Courtesy of © TOYOTA, LICENSE AGREEMENT TMS1002
|
TEXT IN ILLUSTRATION
| *A |
for 2WD |
*B |
for VF2CM, VF4BM |
- REMOVE NO. 2 BOX BOTTOM MAT (for 2WD)
- Detach the 4 claws to remove the No. 2 box bottom mat.
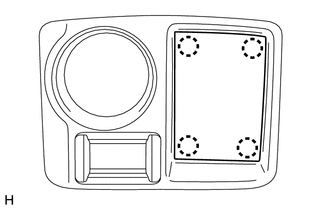 Courtesy of © TOYOTA, LICENSE AGREEMENT TMS1002 Courtesy of © TOYOTA, LICENSE AGREEMENT TMS1002
|
- REMOVE TRANSFER POSITION SWITCH (for VF2CM)
Refer to PROCEDURE - Step 3
- REMOVE TRANSFER POSITION SWITCH (for VF4BM)
Refer to PROCEDURE - Step 3