- DISCONNECT CABLE FROM NEGATIVE BATTERY TERMINAL
WARNING:
Wait at least 90 seconds after disconnecting the cable from the negative (-) battery terminal to disable the SRS system.
- REMOVE TELEVISION DISPLAY ASSEMBLY (w/ Rear Seat Entertainment System)
(Refer to REMOVAL [12/2015 - ]
)
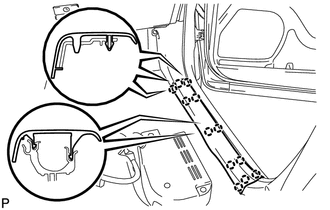
- REMOVE DOOR SCUFF PLATE ASSEMBLY RH
- Disengage the 12 claws to remove the door scuff plate assembly RH.
 Courtesy of © TOYOTA, LICENSE AGREEMENT TMS1002 Courtesy of © TOYOTA, LICENSE AGREEMENT TMS1002
|
- REMOVE DOOR SCUFF PLATE ASSEMBLY LH
HINT:
Use the same procedure as for the RH side.
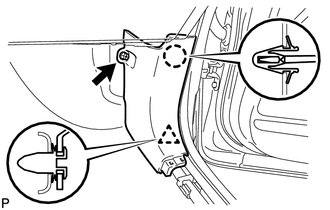
- REMOVE COWL SIDE TRIM BOARD RH
- Remove the clip.
 Courtesy of © TOYOTA, LICENSE AGREEMENT TMS1002 Courtesy of © TOYOTA, LICENSE AGREEMENT TMS1002
|
- Disengage the claw and clip to remove the cowl side trim board RH.
- REMOVE COWL SIDE TRIM BOARD LH
HINT:
Use the same procedure as for the RH side.
- SEPARATE FRONT DOOR OPENING TRIM WEATHERSTRIP RH
- SEPARATE FRONT DOOR OPENING TRIM WEATHERSTRIP LH
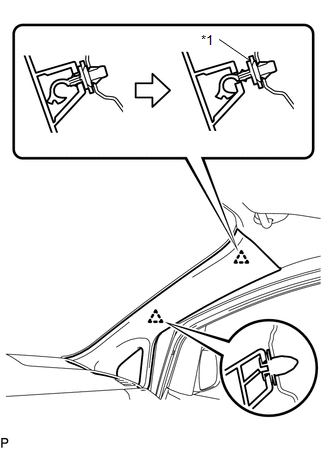
- REMOVE FRONT PILLAR GARNISH RH
- Separate the front pillar garnish clip from the front pillar garnish RH.
 Courtesy of © TOYOTA, LICENSE AGREEMENT TMS1002 Courtesy of © TOYOTA, LICENSE AGREEMENT TMS1002
|
TEXT IN ILLUSTRATION
| *1 |
Front Pillar Garnish Clip |
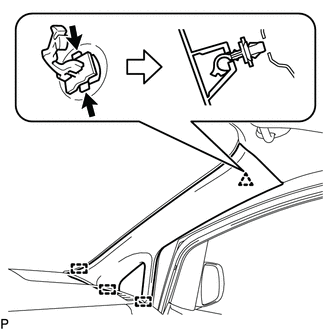
- Disengage the clip.
- Press the 2 areas indicated by the arrows in the illustration.
 Courtesy of © TOYOTA, LICENSE AGREEMENT TMS1002 Courtesy of © TOYOTA, LICENSE AGREEMENT TMS1002
|
- Disengage the front pillar garnish clip and 3 guides to remove the front pillar garnish RH.
- Remove the front pillar garnish clip from the front pillar garnish RH.
- Protect the curtain shield airbag assembly.
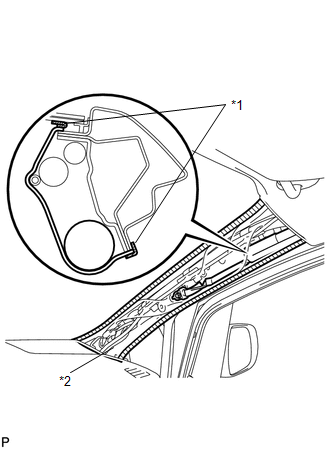 Courtesy of © TOYOTA, LICENSE AGREEMENT TMS1002 Courtesy of © TOYOTA, LICENSE AGREEMENT TMS1002
|
TEXT IN ILLUSTRATION
| *1 |
Adhesive Tape |
| *2 |
Protective Cover |
- Cover the airbag with a cloth or piece of nylon and secure the ends of the cover with tape, as shown in the illustration.
NOTE:
Cover the curtain shield airbag with a protective cover as soon as the front pillar garnish is removed.
- REMOVE FRONT PILLAR GARNISH LH
HINT:
Use the same procedure as for the RH side.
- REMOVE FRONT PILLAR LOWER GARNISH RH
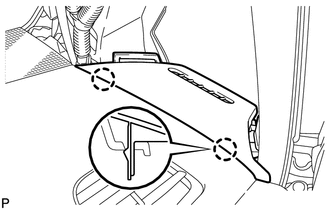 Courtesy of © TOYOTA, LICENSE AGREEMENT TMS1002 Courtesy of © TOYOTA, LICENSE AGREEMENT TMS1002
|
- Disengage the 2 claws to remove the front pillar lower garnish RH.
- REMOVE FRONT PILLAR LOWER GARNISH LH
HINT:
Use the same procedure as for the RH side.
- REMOVE REAR DOOR SCUFF PLATE RH
- Disengage the 4 claws, 7 clips and guide to remove the rear door scuff plate RH.
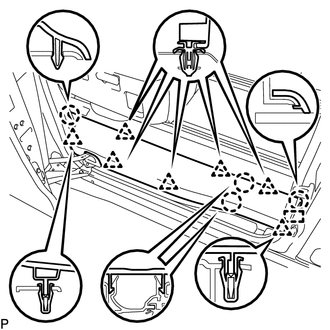 Courtesy of © TOYOTA, LICENSE AGREEMENT TMS1002 Courtesy of © TOYOTA, LICENSE AGREEMENT TMS1002
|
- REMOVE REAR DOOR SCUFF PLATE LH
HINT:
Use the same procedure as for the RH side.
- SEPARATE SLIDE DOOR WEATHERSTRIP RH
- SEPARATE SLIDE DOOR WEATHERSTRIP LH
- REMOVE BACK DOOR SCUFF PLATE
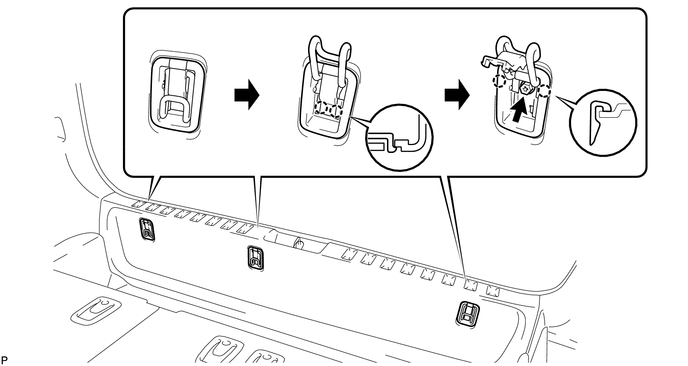 Courtesy of © TOYOTA, LICENSE AGREEMENT TMS1002 Courtesy of © TOYOTA, LICENSE AGREEMENT TMS1002
|
- Disengage the 2 claws to open the flap.
- Remove the bolt.
- Disengage the 2 claws to remove the hook cover assembly.
HINT:
Use the same procedure for the other 2 hook covers.
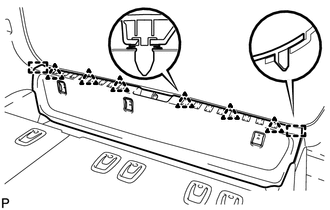
- Disengage the 6 clips and 2 guides to remove the back door scuff plate.
 Courtesy of © TOYOTA, LICENSE AGREEMENT TMS1002 Courtesy of © TOYOTA, LICENSE AGREEMENT TMS1002
|
- SEPARATE BACK DOOR WEATHERSTRIP
- REMOVE ROOF HEADLINING REAR GARNISH
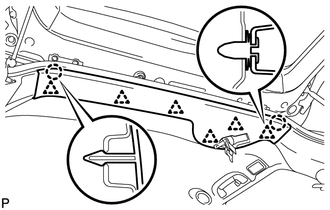
- Disengage the 2 claws and the 6 clips to remove the roof headlining rear garnish.
 Courtesy of © TOYOTA, LICENSE AGREEMENT TMS1002 Courtesy of © TOYOTA, LICENSE AGREEMENT TMS1002
|
- REMOVE CENTER PILLAR LOWER GARNISH RH
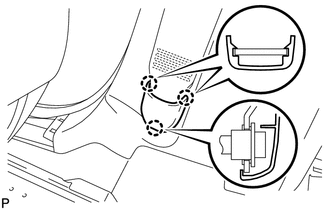
- Disengage the 3 claws to remove the anchor cover.
 Courtesy of © TOYOTA, LICENSE AGREEMENT TMS1002 Courtesy of © TOYOTA, LICENSE AGREEMENT TMS1002
|
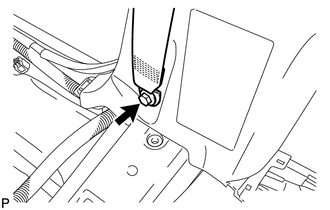
- Remove the bolt to separate the front seat outer belt RH on the floor anchor side.
 Courtesy of © TOYOTA, LICENSE AGREEMENT TMS1002 Courtesy of © TOYOTA, LICENSE AGREEMENT TMS1002
|
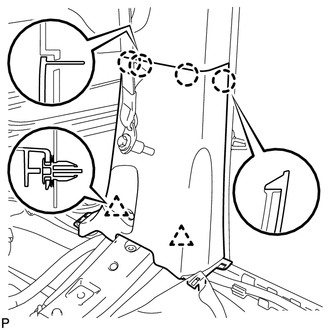
- Disengage the 4 claws and 2 clips to remove the center pillar lower garnish RH.
 Courtesy of © TOYOTA, LICENSE AGREEMENT TMS1002 Courtesy of © TOYOTA, LICENSE AGREEMENT TMS1002
|
- REMOVE CENTER PILLAR LOWER GARNISH LH
HINT:
Use the same procedure as for the RH side.
- REMOVE CENTER PILLAR UPPER GARNISH RH
 Courtesy of © TOYOTA, LICENSE AGREEMENT TMS1002 Courtesy of © TOYOTA, LICENSE AGREEMENT TMS1002
|
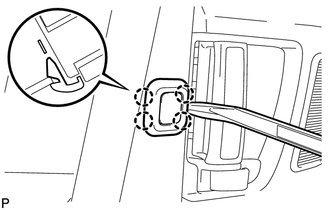
- Using a moulding remover, disengage the 4 claws to remove the power slide door control switch (w/ power slide door).
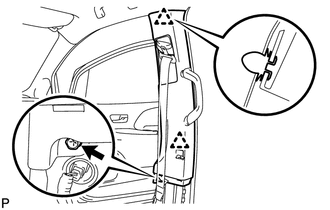
- Disconnect the connector (w/ power slide door).
- Remove the screw.
 Courtesy of © TOYOTA, LICENSE AGREEMENT TMS1002 Courtesy of © TOYOTA, LICENSE AGREEMENT TMS1002
|
- Disengage the 2 clips to remove the center pillar upper garnish RH.
- REMOVE CENTER PILLAR UPPER GARNISH LH
HINT:
Use the same procedure as for the RH side.
- SEPARATE REAR NO. 2 SEAT OUTER BELT ASSEMBLY RH
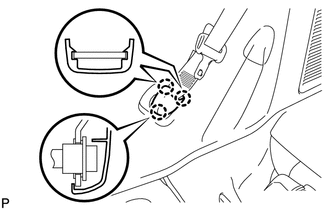
- Disengage the 3 claws to remove the anchor cover.
 Courtesy of © TOYOTA, LICENSE AGREEMENT TMS1002 Courtesy of © TOYOTA, LICENSE AGREEMENT TMS1002
|
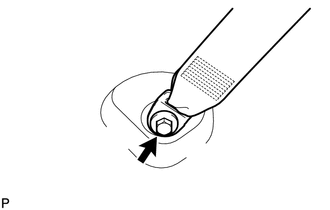
- Remove the bolt to disconnect the rear No. 2 seat outer belt RH on the floor anchor side.
 Courtesy of © TOYOTA, LICENSE AGREEMENT TMS1002 Courtesy of © TOYOTA, LICENSE AGREEMENT TMS1002
|
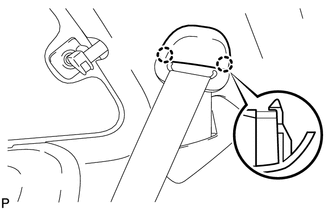
- Using a screwdriver with its tip wrapped in protective tape, disengage the 2 claws to open the anchor cover.
 Courtesy of © TOYOTA, LICENSE AGREEMENT TMS1002 Courtesy of © TOYOTA, LICENSE AGREEMENT TMS1002
|
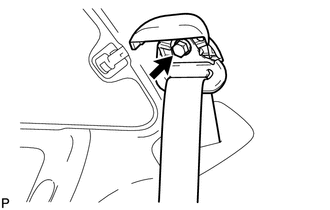
- Loosen the bolt and shoulder anchor.
 Courtesy of © TOYOTA, LICENSE AGREEMENT TMS1002 Courtesy of © TOYOTA, LICENSE AGREEMENT TMS1002
|
- SEPARATE REAR NO. 2 SEAT OUTER BELT ASSEMBLY LH
HINT:
Use the same procedure as for the RH side.
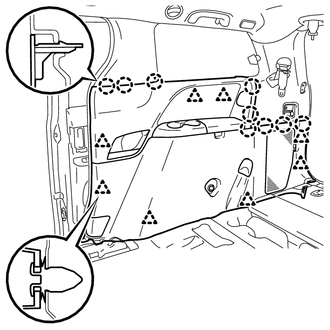
- REMOVE QUARTER TRIM PANEL ASSEMBLY RH
 Courtesy of © TOYOTA, LICENSE AGREEMENT TMS1002 Courtesy of © TOYOTA, LICENSE AGREEMENT TMS1002
|
- Disengage the 9 claws and 8 clips.
- Disconnect the connectors to remove the quarter trim panel assembly RH.
- REMOVE QUARTER TRIM PANEL ASSEMBLY LH
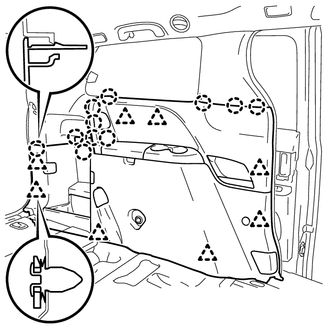 Courtesy of © TOYOTA, LICENSE AGREEMENT TMS1002 Courtesy of © TOYOTA, LICENSE AGREEMENT TMS1002
|
- Disengage the 11 claws and 8 clips.
- Disconnect the connectors to remove the quarter trim panel assembly LH.
- REMOVE REAR NO. 2 WINDOW SIDE GARNISH ASSEMBLY RH
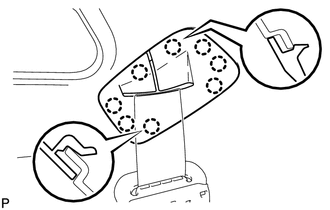 Courtesy of © TOYOTA, LICENSE AGREEMENT TMS1002 Courtesy of © TOYOTA, LICENSE AGREEMENT TMS1002
|
- Disengage the 8 claws to remove the belt hole cover.
- Depress the center portion of the trim hook, disengage the 2 claws to remove the trim hook.
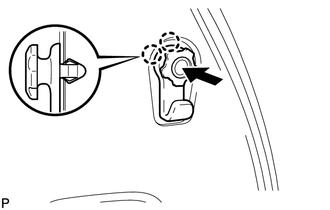 Courtesy of © TOYOTA, LICENSE AGREEMENT TMS1002 Courtesy of © TOYOTA, LICENSE AGREEMENT TMS1002
|
- Disengage the 5 clips.
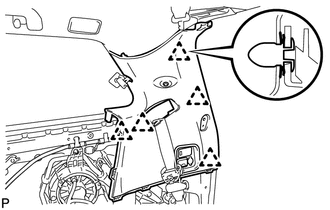 Courtesy of © TOYOTA, LICENSE AGREEMENT TMS1002 Courtesy of © TOYOTA, LICENSE AGREEMENT TMS1002
|
- Disconnect the connectors to remove the rear No. 2 window side garnish assembly RH.
- REMOVE REAR NO. 2 WINDOW SIDE GARNISH ASSEMBLY LH
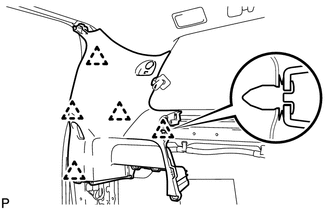
- Depress the center portion of the trim hook, disengage the 2 claws to remove the trim hook.
- Disengage the 5 clips and guide to remove the rear No. 2 window side garnish assembly LH.
 Courtesy of © TOYOTA, LICENSE AGREEMENT TMS1002 Courtesy of © TOYOTA, LICENSE AGREEMENT TMS1002
|
- REMOVE QUARTER LOCK PILLAR GARNISH RH
 Courtesy of © TOYOTA, LICENSE AGREEMENT TMS1002 Courtesy of © TOYOTA, LICENSE AGREEMENT TMS1002
|
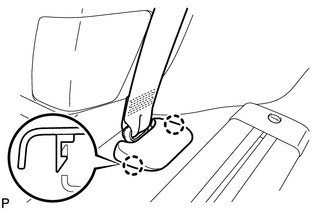
- Disengage the 2 claws to remove the anchor cover (w/ rear No. 1 seat belt).
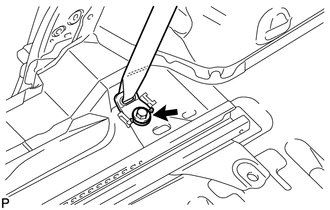
- Remove the bolt to separate the rear No. 1 seat outer belt (w/ rear No. 1 seat belt).
 Courtesy of © TOYOTA, LICENSE AGREEMENT TMS1002 Courtesy of © TOYOTA, LICENSE AGREEMENT TMS1002
|
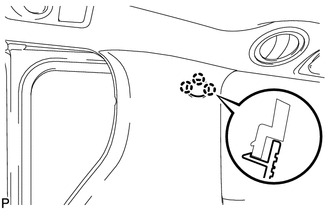
- Disengage the 3 claws to open the cover.
 Courtesy of © TOYOTA, LICENSE AGREEMENT TMS1002 Courtesy of © TOYOTA, LICENSE AGREEMENT TMS1002
|
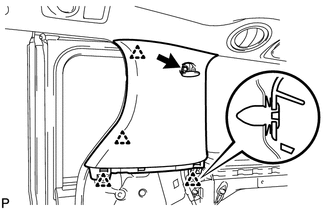
- Remove the bolt.
 Courtesy of © TOYOTA, LICENSE AGREEMENT TMS1002 Courtesy of © TOYOTA, LICENSE AGREEMENT TMS1002
|
- Disengage the 4 clips to remove the quarter lock pillar garnish.
- REMOVE QUARTER LOCK PILLAR GARNISH LH
HINT:
Use the same procedure as for the RH side.
- REMOVE ASSIST GRIP SUB-ASSEMBLY
 Courtesy of © TOYOTA, LICENSE AGREEMENT TMS1002 Courtesy of © TOYOTA, LICENSE AGREEMENT TMS1002
|
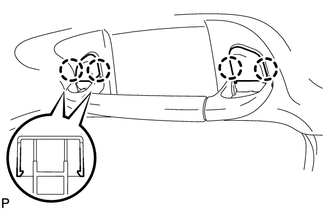
- Disengage the 4 claws to remove the 2 assist grip covers.
- Disengage the 2 clips to remove the assist grip sub-assembly.
 Courtesy of © TOYOTA, LICENSE AGREEMENT TMS1002 Courtesy of © TOYOTA, LICENSE AGREEMENT TMS1002
|
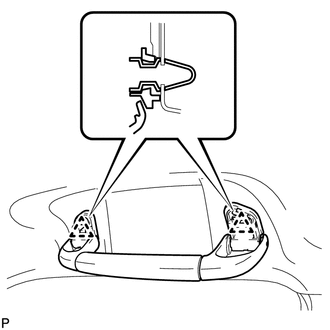
- Remove the 2 clips from the vehicle body.
HINT:
Use the same procedure for the other assist grip.
- REMOVE REAR ASSIST GRIP ASSEMBLY
 Courtesy of © TOYOTA, LICENSE AGREEMENT TMS1002 Courtesy of © TOYOTA, LICENSE AGREEMENT TMS1002
|
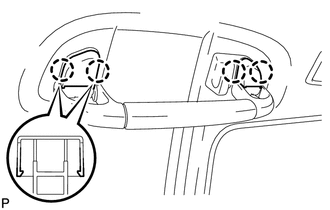
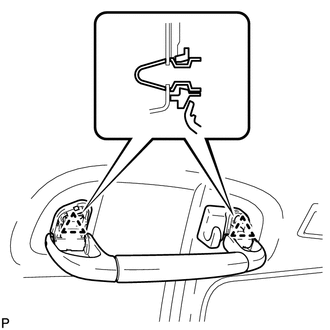
- Disengage the 4 claws to remove the 2 assist grip covers.
- Disengage the 2 clips to remove the rear assist grip assembly.
 Courtesy of © TOYOTA, LICENSE AGREEMENT TMS1002 Courtesy of © TOYOTA, LICENSE AGREEMENT TMS1002
|
- Remove the 2 clips from the vehicle body.
HINT:
Use the same procedure for the other 3 rear assist grips.
- REMOVE VISOR ASSEMBLY RH
Refer to PROCEDURE - Step 1
- REMOVE VISOR ASSEMBLY LH
HINT:
Use the same procedure as for the RH side.
- REMOVE VISOR HOLDER
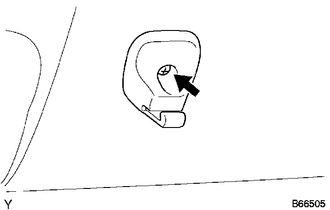
- Remove the screw and visor holder.
 Courtesy of © TOYOTA, LICENSE AGREEMENT TMS1002 Courtesy of © TOYOTA, LICENSE AGREEMENT TMS1002
|
- REMOVE ROOF CONSOLE BOX ASSEMBLY
Refer to PROCEDURE - Step 1
- REMOVE NO. 6 REAR AIR DUCT
 Courtesy of © TOYOTA, LICENSE AGREEMENT TMS1002 Courtesy of © TOYOTA, LICENSE AGREEMENT TMS1002
|
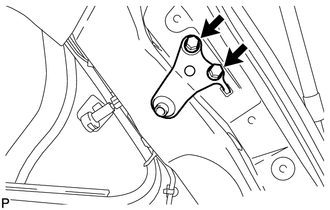
- Remove the 2 bolts and outer belt anchor bracket.
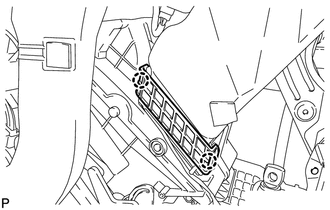
- Disengage the 2 claws to remove the cooler plate.
 Courtesy of © TOYOTA, LICENSE AGREEMENT TMS1002 Courtesy of © TOYOTA, LICENSE AGREEMENT TMS1002
|
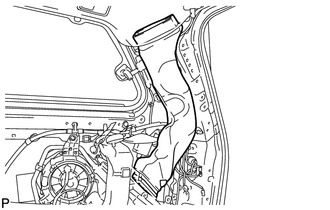
- Remove the No. 6 rear air duct.
 Courtesy of © TOYOTA, LICENSE AGREEMENT TMS1002 Courtesy of © TOYOTA, LICENSE AGREEMENT TMS1002
|
- REMOVE ROOF HEADLINING ASSEMBLY
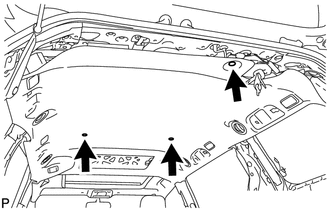
- Disconnect the connectors.
- Disconnect the 2 washer hoses.
- Using a clip remover, remove the 3 clips to roof headlining assembly.
 Courtesy of © TOYOTA, LICENSE AGREEMENT TMS1002 Courtesy of © TOYOTA, LICENSE AGREEMENT TMS1002
|
- Using a clip remover, remove the clip to roof headlining assembly (w/ rear sliding roof).
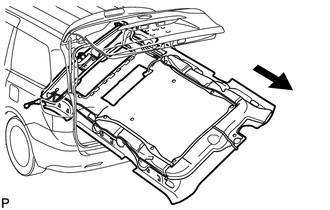
- Remove the roof headlining assembly from the vehicle through the back door.
 Courtesy of © TOYOTA, LICENSE AGREEMENT TMS1002 Courtesy of © TOYOTA, LICENSE AGREEMENT TMS1002
|
NOTE:
Do not damage the roof headlining assembly or body interior.