- REMOVE RADIATOR ASSEMBLY
Refer to REMOVAL [12/2013 - 11/2016]
- REMOVE NO. 2 ENGINE UNDER COVER
Refer to PROCEDURE - Step 9
- REMOVE FRONT FLOOR COVER LH
- Remove the clip (A), 2 screws and 4 bolts from the front floor cover LH.
 Courtesy of © TOYOTA, LICENSE AGREEMENT TMS1002 Courtesy of © TOYOTA, LICENSE AGREEMENT TMS1002
|
 |
Bolt |
 |
Screw |
- Disconnect the 2 clips (B) to remove the front floor cover LH.
- REMOVE PROPELLER WITH CENTER BEARING SHAFT ASSEMBLY (for 4WD)
Refer to PROCEDURE - Step 2
- REMOVE FRONT NO. 3 EXHAUST PIPE SUB-ASSEMBLY
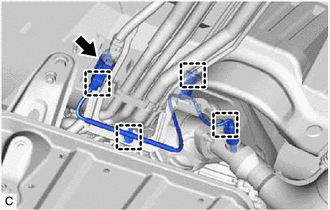
- Disengage the 4 wire harness clamps.
 Courtesy of © TOYOTA, LICENSE AGREEMENT TMS1002 Courtesy of © TOYOTA, LICENSE AGREEMENT TMS1002
|
- Disconnect the heated oxygen sensor (for Bank 1) connector.
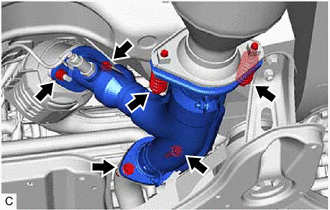
- Remove the 4 bolts, 2 nuts and 2 compression springs and front No. 3 exhaust pipe sub-assembly.
 Courtesy of © TOYOTA, LICENSE AGREEMENT TMS1002 Courtesy of © TOYOTA, LICENSE AGREEMENT TMS1002
|
- Remove the 3 gaskets from the front No. 3 exhaust pipe sub-assembly.
- REMOVE MANIFOLD STAY
- Remove the bolt, nut and manifold stay from the exhaust manifold sub-assembly RH (TWC: Front Catalyst) and automatic transaxle assembly.
 Courtesy of © TOYOTA, LICENSE AGREEMENT TMS1002 Courtesy of © TOYOTA, LICENSE AGREEMENT TMS1002
|
- REMOVE EXHAUST MANIFOLD SUB-ASSEMBLY RH (TWC: Front Catalyst)
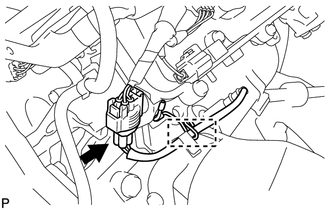
- Disconnect the air fuel ratio sensor (for Bank 1) connector.
 Courtesy of © TOYOTA, LICENSE AGREEMENT TMS1002 Courtesy of © TOYOTA, LICENSE AGREEMENT TMS1002
|
- Disengage the wire harness clamp.
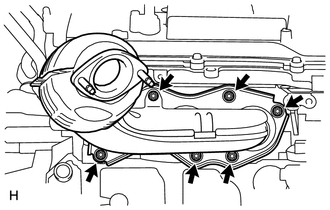
- Using a 12 mm deep socket wrench, remove the 6 nuts and exhaust manifold sub-assembly RH (TWC: Front Catalyst).
 Courtesy of © TOYOTA, LICENSE AGREEMENT TMS1002 Courtesy of © TOYOTA, LICENSE AGREEMENT TMS1002
|
- REMOVE EXHAUST MANIFOLD TO HEAD GASKET
- Remove the exhaust manifold to head gasket from the cylinder head sub-assembly.
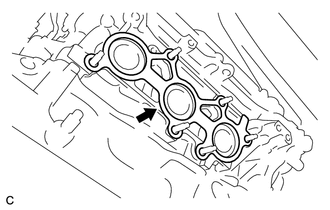 Courtesy of © TOYOTA, LICENSE AGREEMENT TMS1002 Courtesy of © TOYOTA, LICENSE AGREEMENT TMS1002
|
- REMOVE NO. 1 EXHAUST PIPE SUPPORT BRACKET (for Lower Side)
- Remove the 2 bolts and No. 1 exhaust pipe support bracket.
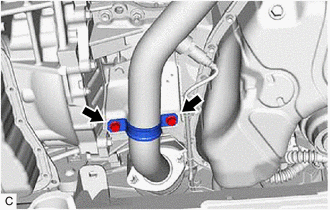 Courtesy of © TOYOTA, LICENSE AGREEMENT TMS1002 Courtesy of © TOYOTA, LICENSE AGREEMENT TMS1002
|
- REMOVE FRONT EXHAUST PIPE ASSEMBLY
- Disengage the 3 wire harness clamps.
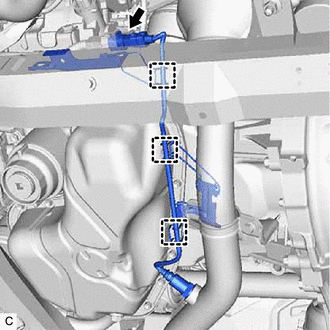 Courtesy of © TOYOTA, LICENSE AGREEMENT TMS1002 Courtesy of © TOYOTA, LICENSE AGREEMENT TMS1002
|
- Disconnect the heated oxygen sensor (for Bank 2) connector.
- Remove the 2 nuts and front exhaust pipe assembly from the exhaust manifold sub-assembly LH (TWC: Front Catalyst).
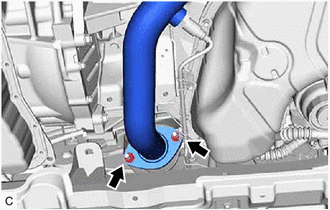 Courtesy of © TOYOTA, LICENSE AGREEMENT TMS1002 Courtesy of © TOYOTA, LICENSE AGREEMENT TMS1002
|
- Remove the gasket from the front exhaust pipe assembly.
- REMOVE AIR FUEL RATIO SENSOR (for Bank 2)
Refer to PROCEDURE - Step 1
- REMOVE NO. 2 ENGINE OIL LEVEL DIPSTICK GUIDE
Refer to PROCEDURE - Step 8
- REMOVE NO. 2 EXHAUST MANIFOLD HEAT INSULATOR
- Remove the 3 bolts and No. 2 exhaust manifold heat insulator from the exhaust manifold sub-assembly LH (TWC: Front Catalyst).
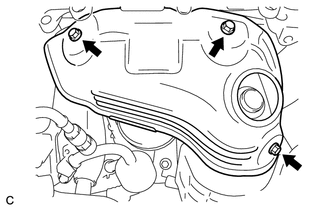 Courtesy of © TOYOTA, LICENSE AGREEMENT TMS1002 Courtesy of © TOYOTA, LICENSE AGREEMENT TMS1002
|
- REMOVE NO. 2 MANIFOLD STAY
- Remove the bolt, nut and No. 2 manifold stay from the exhaust manifold sub-assembly LH (TWC: Front Catalyst) and cylinder block sub-assembly.
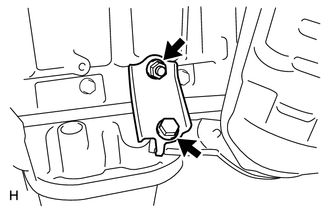 Courtesy of © TOYOTA, LICENSE AGREEMENT TMS1002 Courtesy of © TOYOTA, LICENSE AGREEMENT TMS1002
|
- REMOVE EXHAUST MANIFOLD SUB-ASSEMBLY LH (TWC: Front Catalyst)
- Using a 12 mm deep socket wrench, remove the 6 nuts and exhaust manifold sub-assembly LH (TWC: Front Catalyst).
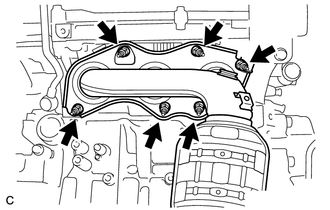 Courtesy of © TOYOTA, LICENSE AGREEMENT TMS1002 Courtesy of © TOYOTA, LICENSE AGREEMENT TMS1002
|
- REMOVE AIR FUEL RATIO SENSOR (for Bank 1)
Refer to PROCEDURE - Step 4
- REMOVE EXHAUST MANIFOLD TO HEAD GASKET LH
- Remove the exhaust manifold to head gasket LH from the cylinder head sub-assembly.
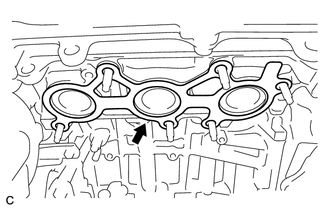 Courtesy of © TOYOTA, LICENSE AGREEMENT TMS1002 Courtesy of © TOYOTA, LICENSE AGREEMENT TMS1002
|