- DRAIN COOLANT (for Intercooler)
Refer to PROCEDURE - Step 4
- REMOVE THROTTLE BODY WITH MOTOR ASSEMBLY
Refer to REMOVAL [12/2017 - ]
- DISCONNECT FUEL VAPOR FEED PIPE
- Remove the 2 bolts and disconnect the fuel vapor feed pipe from the intake air surge tank assembly with intercooler.
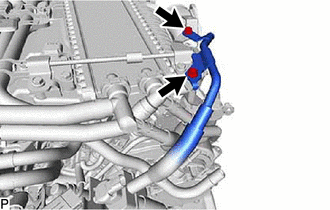 Courtesy of © TOYOTA, LICENSE AGREEMENT TMS1002 Courtesy of © TOYOTA, LICENSE AGREEMENT TMS1002
|
- REMOVE V-BANK COVER BRACKET
- Remove the 4 bolts, No. 1 V-bank cover bracket and No. 2 V-bank cover bracket from the intake air surge tank assembly with intercooler.
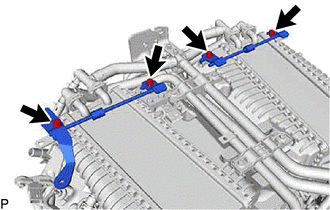 Courtesy of © TOYOTA, LICENSE AGREEMENT TMS1002 Courtesy of © TOYOTA, LICENSE AGREEMENT TMS1002
|
- REMOVE NO. 1 VACUUM SWITCHING VALVE ASSEMBLY
Refer to PROCEDURE - Step 12
- DISCONNECT ENGINE WIRE HARNESS
- for Bank 2:
- Remove the bolt.
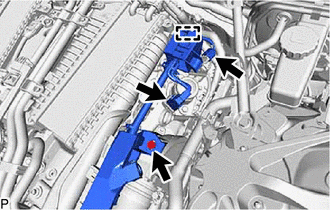 Courtesy of © TOYOTA, LICENSE AGREEMENT TMS1002 Courtesy of © TOYOTA, LICENSE AGREEMENT TMS1002
|
- Disconnect the connectors and detach the clamp.
- Remove the 2 bolts.
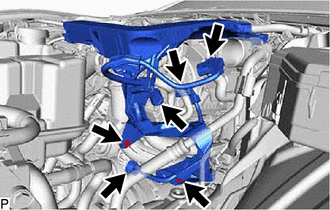 Courtesy of © TOYOTA, LICENSE AGREEMENT TMS1002 Courtesy of © TOYOTA, LICENSE AGREEMENT TMS1002
|
- Disconnect the connectors.
- Engine Front Side:
- Remove the 2 bolts.
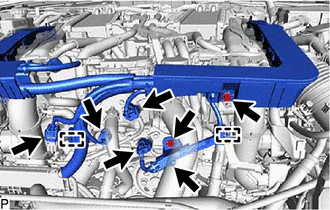 Courtesy of © TOYOTA, LICENSE AGREEMENT TMS1002 Courtesy of © TOYOTA, LICENSE AGREEMENT TMS1002
|
- Disconnect the connectors and detach the clamps.
- Remove the bolt.
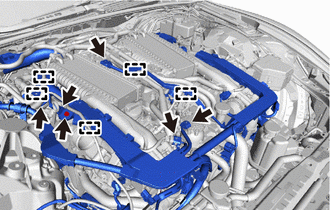 Courtesy of © TOYOTA, LICENSE AGREEMENT TMS1002 Courtesy of © TOYOTA, LICENSE AGREEMENT TMS1002
|
- Disconnect the connectors and detach the clamps.
- for Bank 1:
- Remove the 4 bolts.
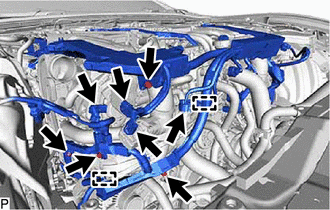 Courtesy of © TOYOTA, LICENSE AGREEMENT TMS1002 Courtesy of © TOYOTA, LICENSE AGREEMENT TMS1002
|
- Disconnect the connectors and detach the clamps.
- DISCONNECT HEATER WATER HOSE INLET
Refer to PROCEDURE - Step 50 [12/2017 - 09/2018]
, or refer to PROCEDURE - Step 50 [09/2018 - 10/2020]
- DISCONNECT HEATER WATER HOSE OUTLET
Refer to PROCEDURE - Step 51 [12/2017 - 09/2018]
, or refer to PROCEDURE - Step 51 [09/2018 - 10/2020]
- REMOVE NO. 1 WATER BY-PASS TUBE
NOTE:
Do not bend the No. 1 water by-pass tube when removing it.
- Remove the 5 bolts.
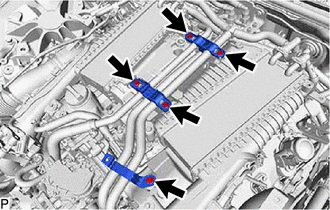 Courtesy of © TOYOTA, LICENSE AGREEMENT TMS1002 Courtesy of © TOYOTA, LICENSE AGREEMENT TMS1002
|
- Slide the clips and disconnect the intercooler cooling water inlet hose and intercooler cooling water outlet hose from the No. 1 water by-pass tube.
 Courtesy of © TOYOTA, LICENSE AGREEMENT TMS1002 Courtesy of © TOYOTA, LICENSE AGREEMENT TMS1002
|
- Slide the clip and disconnect the No. 1 water by-pass hose from the No. 1 water by-pass tube.
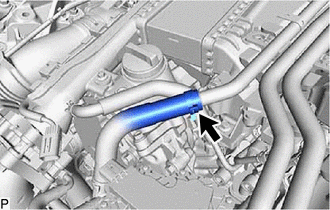 Courtesy of © TOYOTA, LICENSE AGREEMENT TMS1002 Courtesy of © TOYOTA, LICENSE AGREEMENT TMS1002
|
- Slide the clips and disconnect the No. 1 turbo water hose and No. 2 turbo water hose from the turbo water pipe sub-assembly.
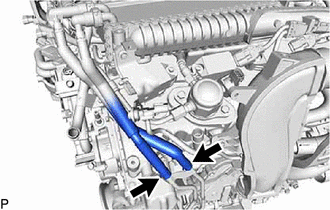 Courtesy of © TOYOTA, LICENSE AGREEMENT TMS1002 Courtesy of © TOYOTA, LICENSE AGREEMENT TMS1002
|
- for Bank 1:
- Move the retainer and disconnect the No. 1 water by-pass pipe from the intake air surge tank assembly with intercooler as shown in the illustration.
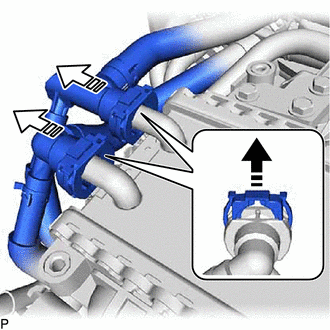 Courtesy of © TOYOTA, LICENSE AGREEMENT TMS1002 Courtesy of © TOYOTA, LICENSE AGREEMENT TMS1002
|
 |
Move the Retainer Upwards |
 |
Disconnect the No. 1 Water By-pass Pipe |
- for Bank 2:
- Move the retainer and disconnect the No. 1 water by-pass pipe from the intake air surge tank assembly with intercooler as shown in the illustration.
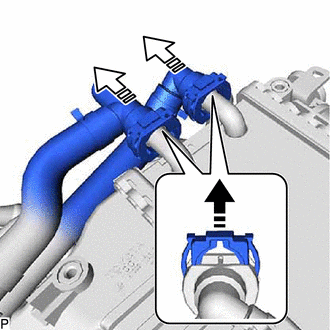 Courtesy of © TOYOTA, LICENSE AGREEMENT TMS1002 Courtesy of © TOYOTA, LICENSE AGREEMENT TMS1002
|
|
Move the Retainer Upwards |
|
Disconnect the No. 1 Water By-pass Pipe |
- Remove the bolt and disconnect the No. 1 water by-pass tube clamp from the No. 2 water outlet pipe.
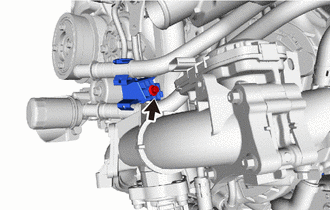 Courtesy of © TOYOTA, LICENSE AGREEMENT TMS1002 Courtesy of © TOYOTA, LICENSE AGREEMENT TMS1002
|
- Remove the bolt and No. 1 water by-pass tube from the intake air surge tank assembly with intercooler.
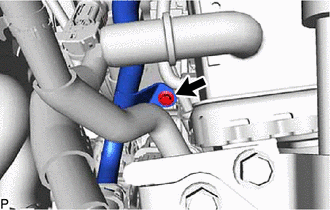 Courtesy of © TOYOTA, LICENSE AGREEMENT TMS1002 Courtesy of © TOYOTA, LICENSE AGREEMENT TMS1002
|
- REMOVE SURGE TANK COVER
- Remove the surge tank cover from the intake air surge tank assembly with intercooler.
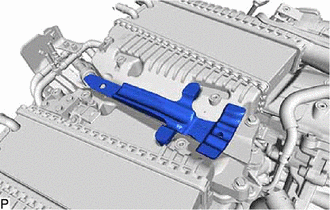 Courtesy of © TOYOTA, LICENSE AGREEMENT TMS1002 Courtesy of © TOYOTA, LICENSE AGREEMENT TMS1002
|
- REMOVE NO. 9 ENGINE WIRE
- Disconnect the connectors, detach the clamps and disconnect the No. 9 engine wire from the intake air surge tank assembly with intercooler.
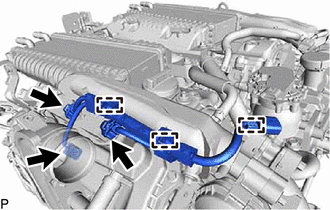 Courtesy of © TOYOTA, LICENSE AGREEMENT TMS1002 Courtesy of © TOYOTA, LICENSE AGREEMENT TMS1002
|
- REMOVE NO. 10 ENGINE WIRE
- Disconnect the connectors, detach the clamps and disconnect the No. 10 engine wire from the intake air surge tank assembly with intercooler.
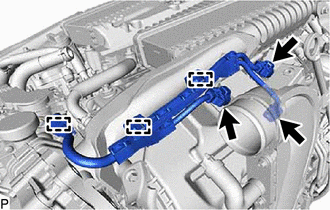 Courtesy of © TOYOTA, LICENSE AGREEMENT TMS1002 Courtesy of © TOYOTA, LICENSE AGREEMENT TMS1002
|
- REMOVE NO. 9 FUEL VAPOR FEED HOSE
- Slide the clips and remove the No. 9 fuel vapor feed hose from the intake air surge tank assembly with intercooler and fuel vapor feed pipe sub-assembly.
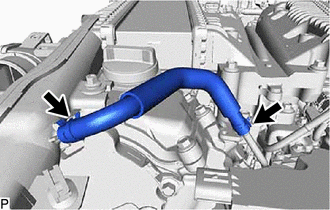 Courtesy of © TOYOTA, LICENSE AGREEMENT TMS1002 Courtesy of © TOYOTA, LICENSE AGREEMENT TMS1002
|
- REMOVE NO. 8 FUEL VAPOR FEED HOSE
- Slide the clips and remove the No. 8 fuel vapor feed hose from the intake air surge tank assembly with intercooler and fuel vapor feed pipe sub-assembly.
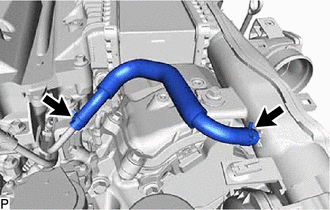 Courtesy of © TOYOTA, LICENSE AGREEMENT TMS1002 Courtesy of © TOYOTA, LICENSE AGREEMENT TMS1002
|
- REMOVE NO. 3 TURBO PRESSURE SENSOR
Refer to PROCEDURE - Step 6
- REMOVE E.F.I. VACUUM SENSOR ASSEMBLY
Refer to PROCEDURE - Step 5
- REMOVE NO. 1 SURGE TANK STAY
- Remove the 2 bolts and No. 1 surge tank stay from the No. 2 timing chain cover assembly and intake air surge tank assembly with intercooler.
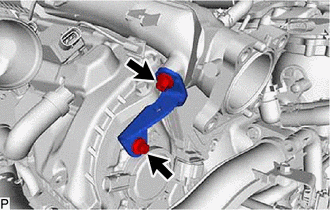 Courtesy of © TOYOTA, LICENSE AGREEMENT TMS1002 Courtesy of © TOYOTA, LICENSE AGREEMENT TMS1002
|
- REMOVE NO. 2 SURGE TANK STAY
- Remove the 2 bolts and No. 2 surge tank stay from the No. 2 timing chain cover assembly and intake air surge tank assembly with intercooler.
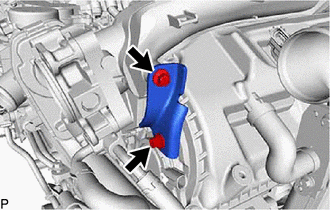 Courtesy of © TOYOTA, LICENSE AGREEMENT TMS1002 Courtesy of © TOYOTA, LICENSE AGREEMENT TMS1002
|
- REMOVE INTERCOOLER SUPPORT BRACKET
- Remove the bolt and nut in several steps and in the sequence shown in the illustration.
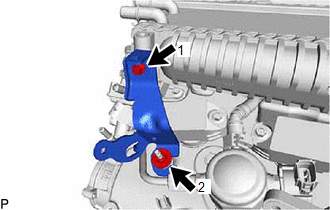 Courtesy of © TOYOTA, LICENSE AGREEMENT TMS1002
- REMOVE NO. 2 INTERCOOLER SUPPORT BRACKET
- Remove the bolt and nut in several steps and in the sequence shown in the illustration.
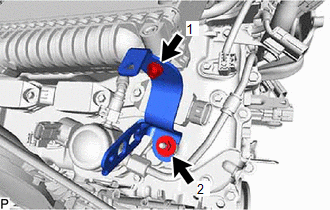 Courtesy of © TOYOTA, LICENSE AGREEMENT TMS1002
- REMOVE INTAKE AIR SURGE TANK ASSEMBLY WITH INTERCOOLER
- Remove the 2 bolts.
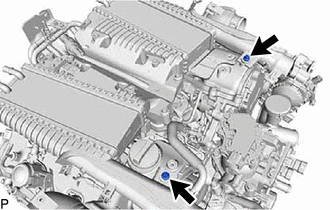 Courtesy of © TOYOTA, LICENSE AGREEMENT TMS1002 Courtesy of © TOYOTA, LICENSE AGREEMENT TMS1002
|
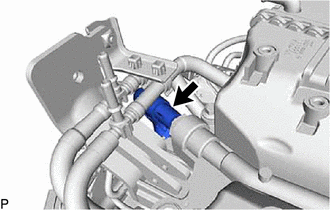
- Slide the clip and disconnect the PCV hose from the intake air surge tank assembly with intercooler.
 Courtesy of © TOYOTA, LICENSE AGREEMENT TMS1002 Courtesy of © TOYOTA, LICENSE AGREEMENT TMS1002
|
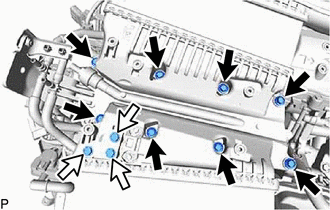
- Remove the 8 bolts and intake air surge tank assembly with intercooler.
HINT:
Do not loosen the non-removable bolt shown in the illustration.
 Courtesy of © TOYOTA, LICENSE AGREEMENT TMS1002 Courtesy of © TOYOTA, LICENSE AGREEMENT TMS1002
|
 |
Intake Air Surge Tank Assembly with Intercooler Installation Bolt |
 |
Do not Tighten the Non-removable Bolt |
- Remove the gasket from the intake air surge tank assembly with intercooler.