Removal Procedure
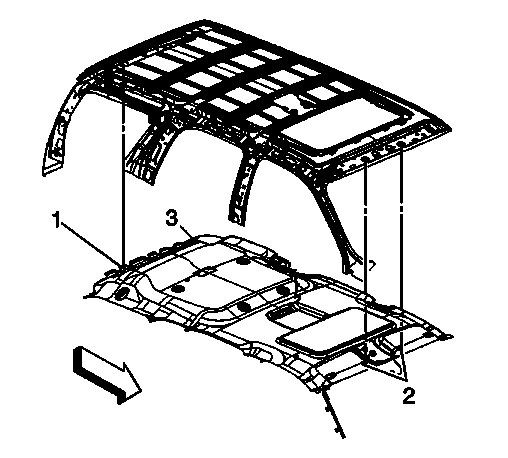 Courtesy of GENERAL MOTORS COMPANY
- Disable the roof rail SIR system. Refer to SIR Disabling and Enabling
.
- Remove the front assist handle. Refer to Front Assist Handle Replacement
.
- Remove the windshield garnish molding. Refer to Windshield Pillar Garnish Molding Replacement
.
- Remove the sunshade assembly and the sunshade retainers. Refer to Sunshade Replacement
.
- Remove the roof console assembly. Refer to Roof Console Replacement
.
- Remove the front door sill plate. Refer to Front Side Door Sill Trim Plate Replacement
.
- Remove the rear door sill plate. Refer to Rear Side Door Sill Trim Plate Replacement (Extended Wheelbase)
, Rear Side Door Sill Trim Plate Replacement (Standard Wheelbase)
.
- Remove the center pillar lower molding. Refer to Center Pillar Lower Garnish Molding Replacement
.
- Remove the center pillar upper molding. Refer to Center Pillar Upper Garnish Molding Replacement
.
- Remove the lock pillar molding. Refer to Body Lock Pillar Garnish Molding Replacement (Standard Wheelbase)
, Body Lock Pillar Garnish Molding Replacement (Avalanche/Escalade EXT)
, Body Lock Pillar Garnish Molding Replacement (Extended Wheelbase)
.
- Remove the auxiliary air distributor duct upper. Refer to Auxiliary Air Distributor Duct Replacement (Lower/Extended Wheelbase)
.
- Remove the back body opening molding. Refer to Rear Door Upper Garnish Molding Replacement
.
- Remove the body rear corner upper molding. Refer to Body Rear Corner Garnish Molding Replacement - Right Side
, and Body Rear Corner Garnish Molding Replacement - Left Side (With E61)
, Body Rear Corner Garnish Molding Replacement - Left Side (Without E61)
.
- Remove the coat hooks. Refer to Coat Hook Replacement
.
- Remove the sunroof panel window molding. Refer to Sunroof Panel/Window Garnish Molding Replacement (Crew Cab)
.
- Remove the rear overhead console. Refer to Video Display Replacement (Second Row)
, Video Display Replacement (Third Row)
.
- Place the rear seats in the stowed position.
- Remove the front seat headrest.
- Remove the instrument panel (I/P) upper trim pad. Refer to Instrument Panel Upper Trim Panel Replacement (Except Cadillac)
, Instrument Panel Upper Trim Panel Replacement (Cadillac)
.
- Remove the roof assist handles. Refer to Front Assist Handle Replacement
, and Roof Rail Rear Assist Handle Replacement
.
- Remove the front seat. Refer to Front Seat Removal and Installation - Bucket (without HP2)
, Front Seat Removal and Installation - Bucket (with HP2)
.
- Remove the second row right seat. Refer to Rear Seat Removal and Installation (Avalanche/Escalade EXT)
, Rear Seat Removal and Installation (Tahoe/Yukon/Escalade with Split Bench)
, Rear Seat Removal and Installation (Tahoe/Yukon/Escalade with Bucket Seat)
.
- Remove the third row right seat. Refer to 3rd Row Seat Removal and Installation (Suburban/Yukon XL)
, 3rd Row Seat Removal and Installation (Tahoe/Yukon/Escalade)
.
- Disconnect the electrical harness retainers from the windshield pillars.
- Disconnect the electrical harness from the BEC under the steering column. Route the wires out.
- Remove the right side rear quarter trim. Refer to Rear Quarter Trim Panel Replacement - Right Side (Extended Wheelbase)
, Rear Quarter Trim Panel Replacement - Right Side (Standard Wheelbase)
.
- Remove the rearview mirror trim and disconnect the electrical connectors. Refer to Inside Rearview Mirror Replacement
.
- Remove the sunshade anchor. Refer to Sunshade Anchor Replacement
.
- Note routing of the wire harness and remove the headliner trim panel assembly (3).