Drain Channel Slider and Cable Assembly Replacement
- Remove the frame (see FRAME AND DRAIN TUBE REPLACEMENT
).
- Remove these parts from the frame:
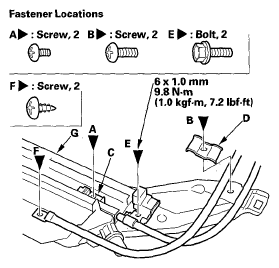
- Put on gloves to protect your hands. Remove the screws (A, B) securing the slide stops (C), and cable tube rear brackets (D), cable tube side bracket mounting bolts (E) and the cable tube mounting screws (F) from both sides of the frame (G).
 Courtesy of AMERICAN HONDA MOTOR CO., INC.
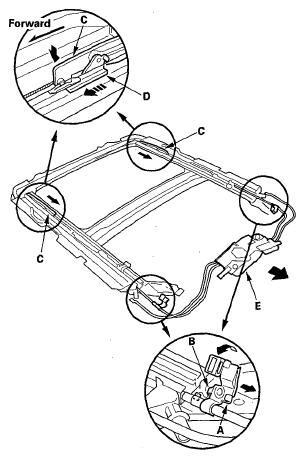
- Turn both cable tube side brackets (A) up to release the hooks (B) from the holes in both sides of the frame.
 Courtesy of AMERICAN HONDA MOTOR CO., INC.
- Pivot the glass bracket (C) down by sliding the link lifter (D) back, then slide both glass brackets back with the link lifter.
- Slide the cable assembly (E) half-way.
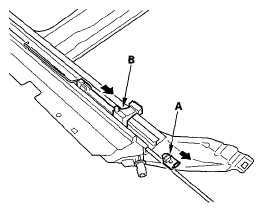
- Remove the slide stops (A) and the drain channel sliders (B) from both sides.
 Courtesy of AMERICAN HONDA MOTOR CO., INC.
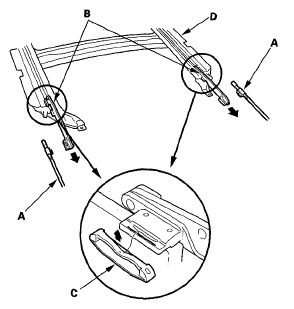
- Slide the cable assembly (A) and both glass brackets (B) back, remove the deflector sliders (C) from both glass brackets, then remove them from the frame (D).
 Courtesy of AMERICAN HONDA MOTOR CO., INC.
- Install the slider and cable assembly in the reverse order of removal, and note these items:
- Damaged parts should be replaced.
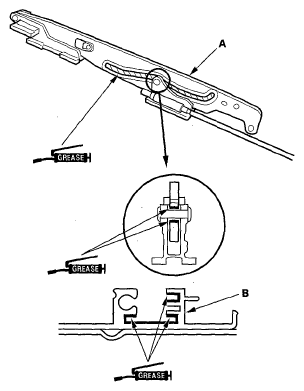
- Apply multipurpose grease to the glass bracket (A) and guide rail portion of the frame (B) indicated by the arrows.
- Before reinstalling the motor, make sure both link lifters are parallel, and in the fully closed position.
- Before reinstalling the motor, install the frame and glass, then check the opening drag (see CLOSING FORCE AND OPENING DRAG CHECK
).
 Courtesy of AMERICAN HONDA MOTOR CO., INC.