- DISCONNECT BATTERY NEGATIVE TERMINAL
Refer to REMOVAL [03/2019 - ]
- REMOVE SHIFT LEVER KNOB SUB-ASSEMBLY
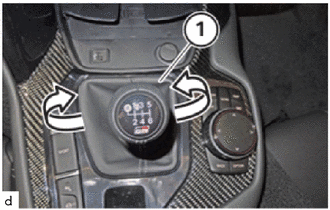
- Pull shifter cover mounting frame (1) on the sides up and out of the center console.
NOTE:
Do not use tools.
Using tools may damage the shift lever cover mounting frame or the center console.
 Courtesy of © TOYOTA, LICENSE AGREEMENT TMS1002 Courtesy of © TOYOTA, LICENSE AGREEMENT TMS1002
|
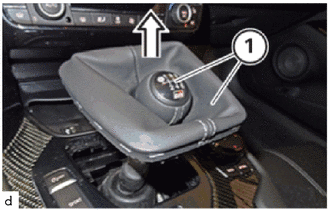
- shifter knob with the shifter cover (1) with a pull off a strong jerk.
 Courtesy of © TOYOTA, LICENSE AGREEMENT TMS1002 Courtesy of © TOYOTA, LICENSE AGREEMENT TMS1002
|
- Be careful not to hold the shift knob (1) when pulling it off is not twisted. This allows the anti-rotation in shift knob can be sheared off.
- REMOVE FRONT FLOOR COVER
Refer to PROCEDURE - Step 4
- REMOVE FRONT FLOOR COVER LH
Refer to PROCEDURE - Step 2
- REMOVE FRONT FLOOR COVER RH
HINT:
Use the same procedure as for the LH side.
- REMOVE EXHAUST PIPE ASSEMBLY
Refer to REMOVAL [03/2019 - ]
- REMOVE FRONT NO. 1 FLOOR HEAT INSULATOR
Refer to PROCEDURE - Step 7
- REMOVE FLOOR HEAT INSULATOR
Refer to PROCEDURE - Step 20
- REMOVE REAR ENGINE MOUNTING MEMBER
Refer to PROCEDURE - Step 21
- SEPARATE PROPELLER SHAFT ASSEMBLY WITH CENTER BEARING
Refer to PROCEDURE - Step 10
- SEPARATE SHIFT LEVER ARM
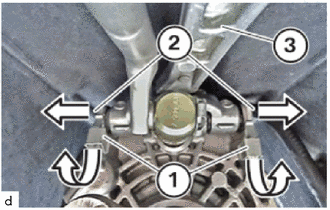
- Unlock the locks (1) in the direction of the arrow.
 Courtesy of © TOYOTA, LICENSE AGREEMENT TMS1002 Courtesy of © TOYOTA, LICENSE AGREEMENT TMS1002
|
- Pull out the bearing pin (2) and loosen the shift lever arm (3).
- REMOVE FLOOR SHIFT CONTROL SHAFT
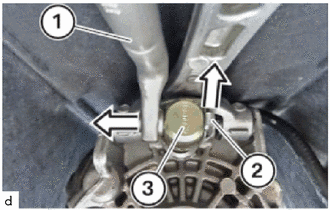
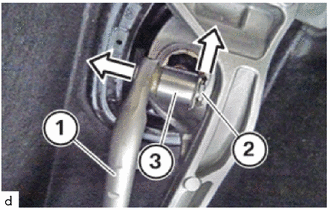
- Pull off the safety clip (2).
 Courtesy of © TOYOTA, LICENSE AGREEMENT TMS1002 Courtesy of © TOYOTA, LICENSE AGREEMENT TMS1002
|
- Pull the selector rod (1) out of the selector rod joint (3) in the direction of the arrow.
- Pull off the safety clip (2).
 Courtesy of © TOYOTA, LICENSE AGREEMENT TMS1002 Courtesy of © TOYOTA, LICENSE AGREEMENT TMS1002
|
- Pull the selector rod (1) out of the selector rod joint (3) in the direction of the arrow.
- REMOVE SUPPORT BEARING
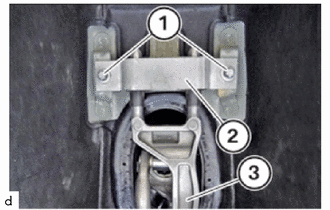
- Loosen the E11 bolts (1) from the support bearing (2).
 Courtesy of © TOYOTA, LICENSE AGREEMENT TMS1002 Courtesy of © TOYOTA, LICENSE AGREEMENT TMS1002
|
- Pull the support bearing (2) off the shift lever arm (3).
- REMOVE SHIFT LEVER ARM
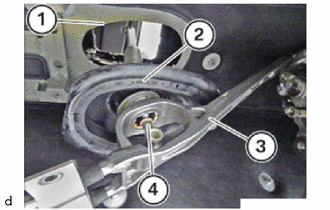
- Carefully thread the rolling gaiter (2) with shift lever arm (3) and floor shift lever assembly (4) downwards out of the body cutout (1).
 Courtesy of © TOYOTA, LICENSE AGREEMENT TMS1002 Courtesy of © TOYOTA, LICENSE AGREEMENT TMS1002
|
NOTE:
The guide for the body cut-out inserted in the rolling bellows is made of polyvinyl chloride (PVC) and can easily break when removing and installing.
- REMOVE FLOOR SHIFT LEVER ASSEMBLY
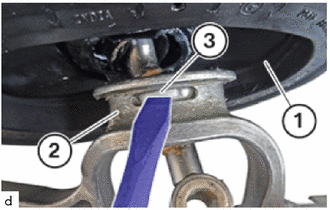
- Detach the rolling bellows (1) from the shift lever arm (2).
 Courtesy of © TOYOTA, LICENSE AGREEMENT TMS1002 Courtesy of © TOYOTA, LICENSE AGREEMENT TMS1002
|
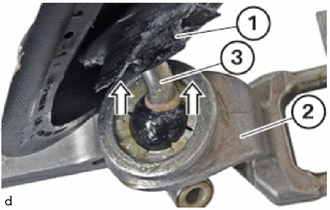
- Unlock the retaining lugs (3) with a suitable tool.
- Detach the floor shift lever assembly (3) with the bellows (1) from the shift lever arm (2) in the direction of the arrow.
 Courtesy of © TOYOTA, LICENSE AGREEMENT TMS1002 Courtesy of © TOYOTA, LICENSE AGREEMENT TMS1002
|
- REMOVE SPACER RING
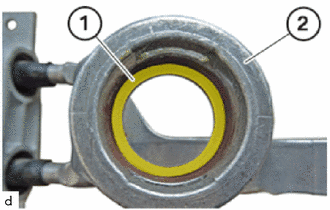
- Remove the spacer ring (1) with shift lever arm (2)
 Courtesy of © TOYOTA, LICENSE AGREEMENT TMS1002 Courtesy of © TOYOTA, LICENSE AGREEMENT TMS1002
|
HINT:
Check spacer ring (1) for damage and replace if necessary.
- REMOVE SHIFT LEVER BUSH
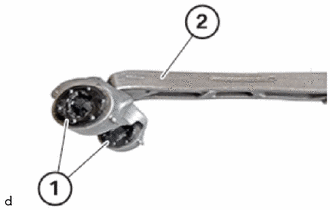
- Press the bearing bushes (1) out of the shift lever arm (2).
 Courtesy of © TOYOTA, LICENSE AGREEMENT TMS1002 Courtesy of © TOYOTA, LICENSE AGREEMENT TMS1002
|
- Clean dirt from the recesses for the bearing bushes on the shift lever arm (2) and remove any rubber residue.
- REMOVE SHIFT BALL
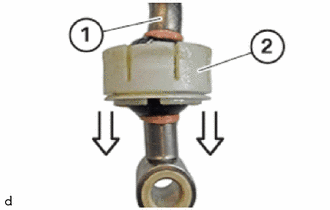
- Pull the ball socket (2) off the floor shift lever assembly (1) in the direction of the arrow and remove it.
 Courtesy of © TOYOTA, LICENSE AGREEMENT TMS1002 Courtesy of © TOYOTA, LICENSE AGREEMENT TMS1002
|
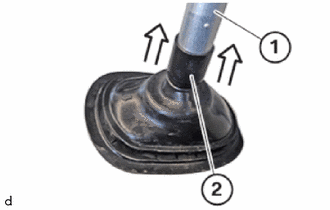
- REMOVE SHIFT LEVER BOOT
- Pull the rolling bellows (2) off the floor shift lever assembly (1) in the direction of the arrow.
 Courtesy of © TOYOTA, LICENSE AGREEMENT TMS1002 Courtesy of © TOYOTA, LICENSE AGREEMENT TMS1002
|