Installation [11/2018 - 10/2019]: Procedure
WARNING: This page is about a different variant/trim than selected.
- INSTALL NAVIGATION ECU
- INSTALL NO. 2 MULTI-MEDIA MODULE BRACKET
- w/o Mayday System:
- Install the No. 2 multi-media module bracket with the 2 screws.
 Courtesy of © TOYOTA, LICENSE AGREEMENT TMS1002 Courtesy of © TOYOTA, LICENSE AGREEMENT TMS1002
|
Torque: 3.0 N.m (31 kgf/cm, 27 in.lbf)
- w/ Mayday System:
- Install the No. 2 multi-media module bracket with the 3 screws.
 Courtesy of © TOYOTA, LICENSE AGREEMENT TMS1002 Courtesy of © TOYOTA, LICENSE AGREEMENT TMS1002
|
Torque: 3.0 N.m (31 kgf/cm, 27 in.lbf)
- INSTALL NO. 1 MULTI-MEDIA MODULE BRACKET
- w/o Mayday System:
- Install the No. 1 multi-media module bracket with the 2 screws.
Torque: 3.0 N.m (31 kgf/cm, 27 in.lbf)
 Courtesy of © TOYOTA, LICENSE AGREEMENT TMS1002 Courtesy of © TOYOTA, LICENSE AGREEMENT TMS1002
|
- w/ Mayday System:
- Install the No. 1 multi-media module bracket with the 3 screws.
 Courtesy of © TOYOTA, LICENSE AGREEMENT TMS1002 Courtesy of © TOYOTA, LICENSE AGREEMENT TMS1002
|
Torque: 3.0 N.m (31 kgf/cm, 27 in.lbf)
- INSTALL TELEPHONE ECU WIRE (TO TRANSCEIVER) (w/ Mayday System)
- Attach the clamp to install the telephone ECU wire (to transceiver).
 Courtesy of © TOYOTA, LICENSE AGREEMENT TMS1002 Courtesy of © TOYOTA, LICENSE AGREEMENT TMS1002
|
- Connect the 2 connectors.
- INSTALL NO. 2 NAVIGATION WIRE
- w/ Mayday System:
- Attach the clamp to install the No. 2 navigation wire.
 Courtesy of © TOYOTA, LICENSE AGREEMENT TMS1002 Courtesy of © TOYOTA, LICENSE AGREEMENT TMS1002
|
- Connect the connector.
- w/o Mayday System:
- Attach the clamp to install the No. 2 navigation wire.
 Courtesy of © TOYOTA, LICENSE AGREEMENT TMS1002 Courtesy of © TOYOTA, LICENSE AGREEMENT TMS1002
|
- Connect the connector.
- INSTALL NO. 2 ANTENNA CORD SUB-ASSEMBLY
- w/ Mayday System:
- Attach the clamp to install the No. 2 antenna cord sub-assembly.
 Courtesy of © TOYOTA, LICENSE AGREEMENT TMS1002 Courtesy of © TOYOTA, LICENSE AGREEMENT TMS1002
|
- Connect the 4 connectors.
- w/o Mayday System:
- Attach the clamp to install the No. 2 antenna cord sub-assembly.
 Courtesy of © TOYOTA, LICENSE AGREEMENT TMS1002 Courtesy of © TOYOTA, LICENSE AGREEMENT TMS1002
|
- Connect the connector.
- INSTALL NAVIGATION ECU WITH BRACKET
- w/ Mayday System:
- Connect the 2 connectors.
- Place your hand at the position shown in the illustration, and then while bending the instrument panel safety pad assembly, attach the guide to temporarily install the navigation ECU with bracket.
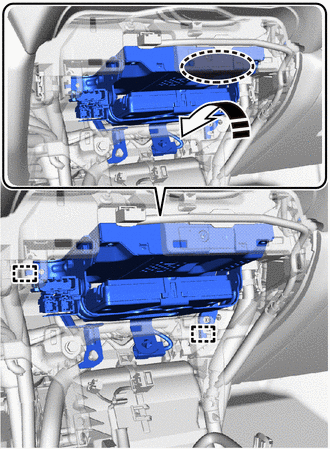 Courtesy of © TOYOTA, LICENSE AGREEMENT TMS1002 Courtesy of © TOYOTA, LICENSE AGREEMENT TMS1002
|
 |
Place hand here |
 |
Install in this Direction |
- Attach the clamp and connect the 4 connectors.
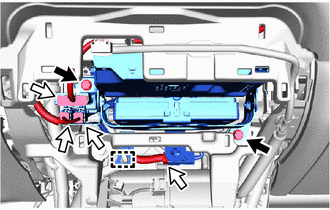 Courtesy of © TOYOTA, LICENSE AGREEMENT TMS1002 Courtesy of © TOYOTA, LICENSE AGREEMENT TMS1002
|
 |
Bolt |
 |
Connector |
- Install the 2 bolts.
Torque: 12 N.m (122 kgf/cm, 9 ft.lbf)
- w/o Mayday System:
- Connect each connector.
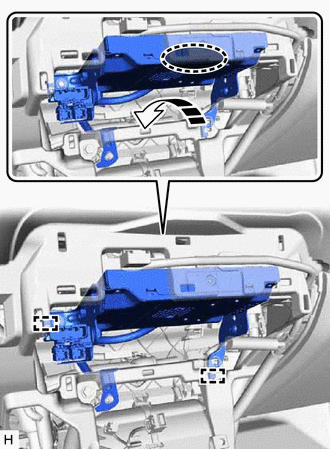 Courtesy of © TOYOTA, LICENSE AGREEMENT TMS1002 Courtesy of © TOYOTA, LICENSE AGREEMENT TMS1002
|
|
Place Hand Here |
|
Install in this Direction |
Place your hand at the position shown in the illustration, and then while bending the instrument panel safety pad assembly, attach the guide to temporarily install the navigation ECU with bracket.
- Attach the clamp and connect the 3 connectors.
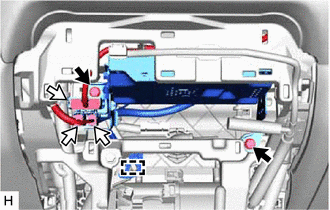 Courtesy of © TOYOTA, LICENSE AGREEMENT TMS1002 Courtesy of © TOYOTA, LICENSE AGREEMENT TMS1002
|
|
Bolt |
|
Connector |
- Install the 2 bolts.
Torque: 12 N.m (122 kgf/cm, 9 ft.lbf)
- INSTALL LOWER CENTER INSTRUMENT PANEL FINISH PANEL
Refer to PROCEDURE - Step 28
- INSTALL AIR CONDITIONING CONTROL ASSEMBLY
Refer to PROCEDURE - Step 1
- INSTALL CONSOLE BOX ASSEMBLY
Refer to INSTALLATION [11/2018 - 12/2021]