Installation [10/2022 - ]: Procedure
WARNING: This page is about a different variant/trim than selected.
- INSTALL RADIO AND DISPLAY RECEIVER ASSEMBLY
- INSTALL NO. 1 RADIO RECEIVER BRACKET
- for 8 Inch Display:
Install the No. 1 radio receiver bracket with the 2 screws.
Torque: 3.0 N.m (31 kgf/cm, 27 in.lbf)
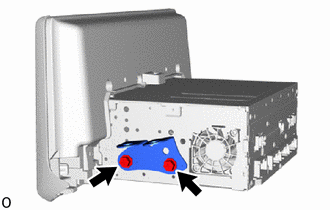 Courtesy of © TOYOTA, LICENSE AGREEMENT TMS1002 Courtesy of © TOYOTA, LICENSE AGREEMENT TMS1002
|
- for 10.5 Inch Display:
Install the No. 1 radio receiver bracket with the 2 screws.
Torque: 3.0 N.m (31 kgf/cm, 27 in.lbf)
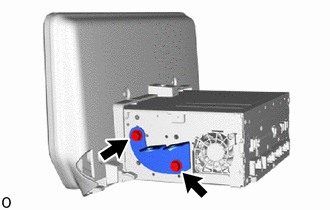 Courtesy of © TOYOTA, LICENSE AGREEMENT TMS1002 Courtesy of © TOYOTA, LICENSE AGREEMENT TMS1002
|
- INSTALL NO. 2 RADIO RECEIVER BRACKET
- for 8 Inch Display:
Install the No. 2 radio receiver bracket with the 2 screws.
Torque: 3.0 N.m (31 kgf/cm, 27 in.lbf)
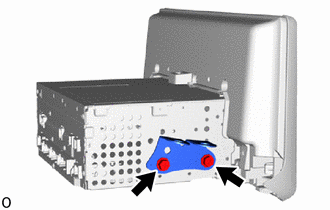 Courtesy of © TOYOTA, LICENSE AGREEMENT TMS1002 Courtesy of © TOYOTA, LICENSE AGREEMENT TMS1002
|
- for 10.5 Inch Display:
Install the No. 2 radio receiver bracket with the 2 screws.
Torque: 3.0 N.m (31 kgf/cm, 27 in.lbf)
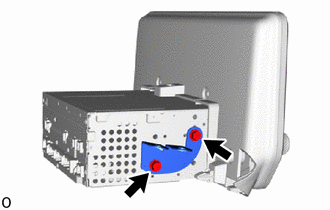 Courtesy of © TOYOTA, LICENSE AGREEMENT TMS1002 Courtesy of © TOYOTA, LICENSE AGREEMENT TMS1002
|
- INSTALL RADIO AND DISPLAY RECEIVER ASSEMBLY WITH BRACKET
- for 8 Inch Display:
- Connect each connector.
- Attach the clip to install the radio and display receiver assembly with bracket.
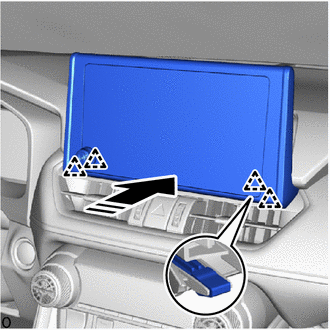 Courtesy of © TOYOTA, LICENSE AGREEMENT TMS1002 Courtesy of © TOYOTA, LICENSE AGREEMENT TMS1002
|
 |
Install in this Direction |
- Install the 4 bolts in the order shown in the illustration.
Torque: 12 N.m (122 kgf/cm, 9 ft.lbf)
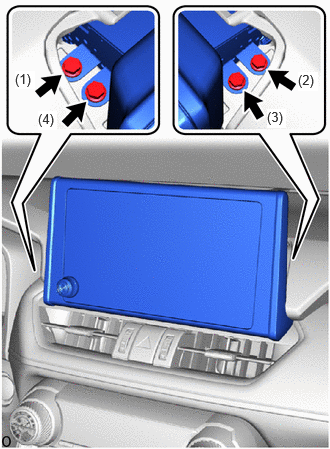 Courtesy of © TOYOTA, LICENSE AGREEMENT TMS1002
- for 10.5 Inch Display:
- Connect each connector.
- Attach the clip to install the radio and display receiver assembly with bracket.
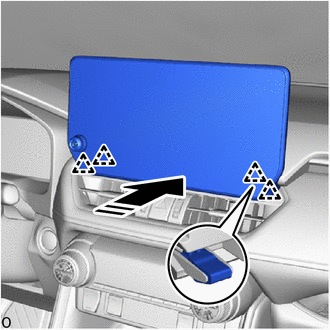 Courtesy of © TOYOTA, LICENSE AGREEMENT TMS1002 Courtesy of © TOYOTA, LICENSE AGREEMENT TMS1002
|
|
Install in this Direction |
- Install the 4 bolts in the order shown in the illustration.
Torque: 12 N.m (122 kgf/cm, 9 ft.lbf)
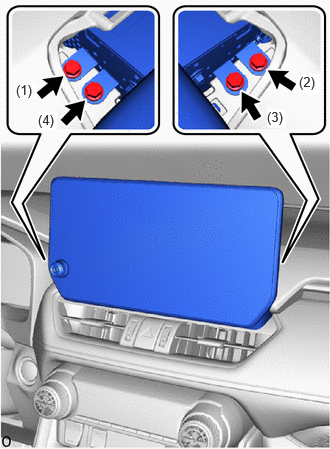 Courtesy of © TOYOTA, LICENSE AGREEMENT TMS1002
- INSTALL CENTER UPPER INSTRUMENT CLUSTER FINISH PANEL
Refer to PROCEDURE - Step 33
- PERFORM REGISTRATION
HINT:
When replacing the radio and display receiver assembly, perform registration.
Refer to REGISTRATION [10/2022 - ]