- PRECAUTION
- REMOVE CONSOLE BOX ASSEMBLY
Refer to REMOVAL [11/2021 - ]
- REMOVE INSTRUMENT PANEL FINISH PANEL END LH
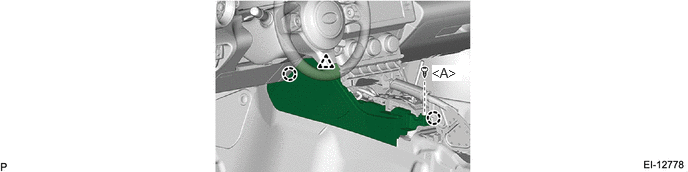 Courtesy of © TOYOTA, LICENSE AGREEMENT TMS1002 Courtesy of © TOYOTA, LICENSE AGREEMENT TMS1002
|
- REMOVE INSTRUMENT PANEL FINISH PANEL END RH
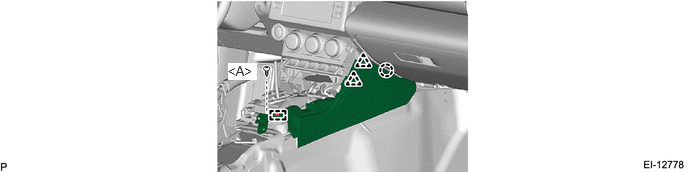 Courtesy of © TOYOTA, LICENSE AGREEMENT TMS1002 Courtesy of © TOYOTA, LICENSE AGREEMENT TMS1002
|
- REMOVE CENTER NO. 2 INSTRUMENT CLUSTER FINISH PANEL
 |
NOTE:
When removing the center No. 2 instrument cluster finish panel, be sure to pull it toward you. If attempting to remove by turning it upward, the claws may be damaged.
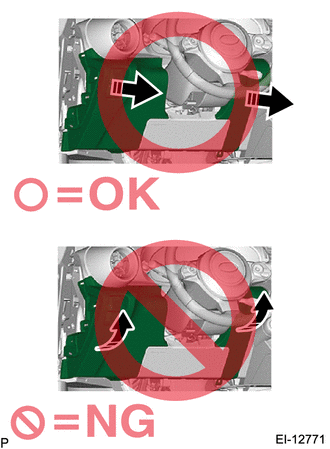 Courtesy of © TOYOTA, LICENSE AGREEMENT TMS1002 Courtesy of © TOYOTA, LICENSE AGREEMENT TMS1002
|
|
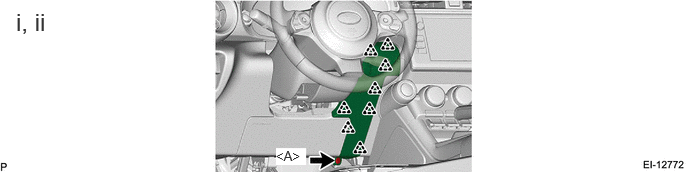 Courtesy of © TOYOTA, LICENSE AGREEMENT TMS1002 Courtesy of © TOYOTA, LICENSE AGREEMENT TMS1002
|
- Remove the screw.
- Disengage the clips.
- Disconnect the connector and aspirator hose to remove the center No. 2 instrument cluster finish panel.
- REMOVE INSTRUMENT SIDE PANEL LH
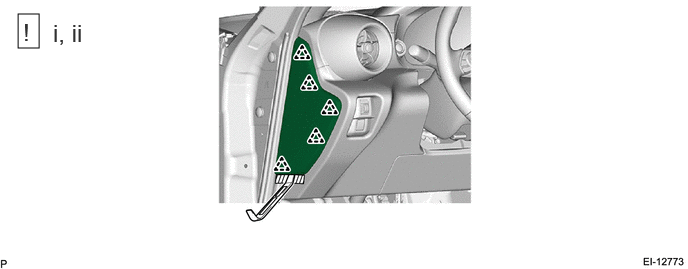 Courtesy of © TOYOTA, LICENSE AGREEMENT TMS1002 Courtesy of © TOYOTA, LICENSE AGREEMENT TMS1002
|
- Apply protective tape to the area shown in the illustration.
- Using a moulding remover, disengage the clips as shown in the illustration to remove the instrument side panel LH.
- REMOVE INSTRUMENT PANEL FINISH PANEL SUB-ASSEMBLY
|
NOTE:
When removing the instrument panel finish panel sub-assembly, be sure to pull it toward you. If attempting to remove by turning it upward, the claws may be damaged.
Courtesy of © TOYOTA, LICENSE AGREEMENT TMS1002
|
|
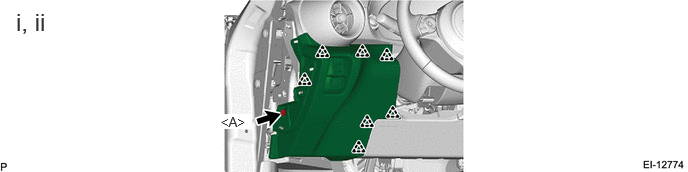 Courtesy of © TOYOTA, LICENSE AGREEMENT TMS1002 Courtesy of © TOYOTA, LICENSE AGREEMENT TMS1002
|
- Remove the screw.
- Disengage the clips.
- Disconnect the connector to remove the instrument panel finish panel sub-assembly.
- REMOVE INSTRUMENT SIDE PANEL RH
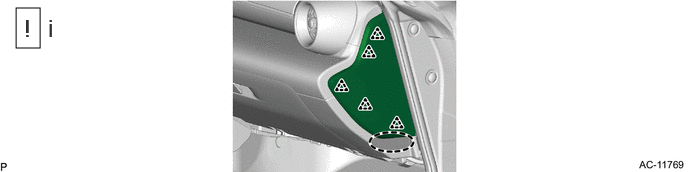 Courtesy of © TOYOTA, LICENSE AGREEMENT TMS1002 Courtesy of © TOYOTA, LICENSE AGREEMENT TMS1002
|
- Apply protective tape to the area shown in the illustration.
- Using a moulding remover, disengage the clips as shown in the illustration to remove the instrument side panel RH.
- REMOVE INSTRUMENT PANEL ORNAMENT
- Open the glove compartment door assembly.
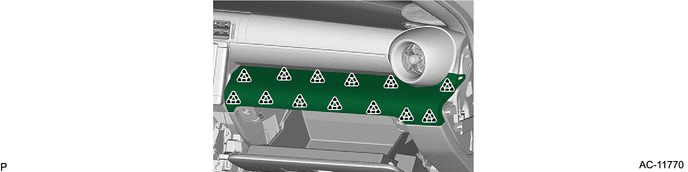 Courtesy of © TOYOTA, LICENSE AGREEMENT TMS1002 Courtesy of © TOYOTA, LICENSE AGREEMENT TMS1002
|
- REMOVE INSTRUMENT CLUSTER FINISH PANEL SUB-ASSEMBLY
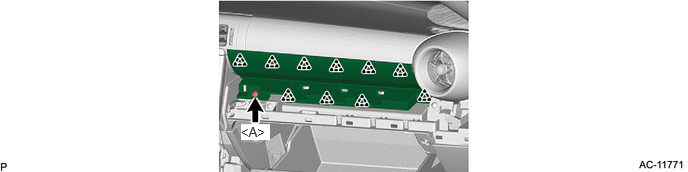 Courtesy of © TOYOTA, LICENSE AGREEMENT TMS1002 Courtesy of © TOYOTA, LICENSE AGREEMENT TMS1002
|
- REMOVE METER HOOD SUB-ASSEMBLY
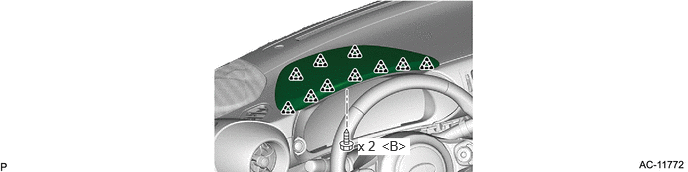 Courtesy of © TOYOTA, LICENSE AGREEMENT TMS1002 Courtesy of © TOYOTA, LICENSE AGREEMENT TMS1002
|
- REMOVE CENTER INSTRUMENT PANEL REGISTER ASSEMBLY
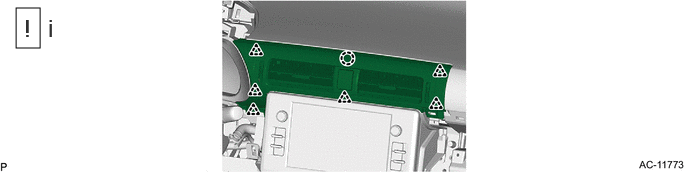 Courtesy of © TOYOTA, LICENSE AGREEMENT TMS1002 Courtesy of © TOYOTA, LICENSE AGREEMENT TMS1002
|
- Disengage the clips and claw.
NOTE:
Be careful not to damage the center instrument panel register assembly.
- Disconnect the connector to remove the center instrument panel register assembly.
- REMOVE NAVIGATION RECEIVER WITH BRACKET
Refer to PROCEDURE - Step 8
- REMOVE AIR CONDITIONING CONTROL ASSEMBLY
Refer to PROCEDURE - Step 12
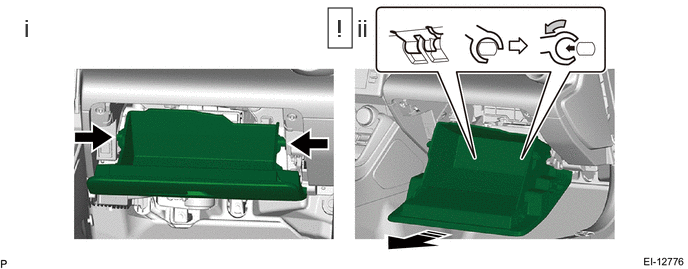
- REMOVE GLOVE COMPARTMENT DOOR ASSEMBLY
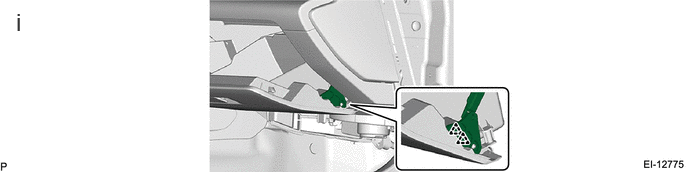 Courtesy of © TOYOTA, LICENSE AGREEMENT TMS1002 Courtesy of © TOYOTA, LICENSE AGREEMENT TMS1002
|
- Disengage the clips to disconnect the link pocket assembly.
 Courtesy of © TOYOTA, LICENSE AGREEMENT TMS1002 Courtesy of © TOYOTA, LICENSE AGREEMENT TMS1002
|
- Release the stoppers.
- Remove the glove compartment door assembly as shown in the illustration.
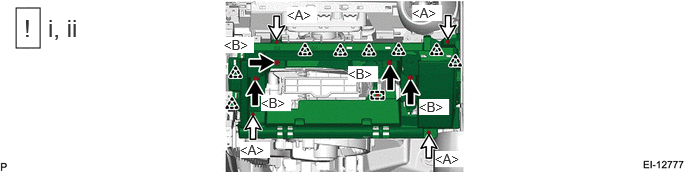
- REMOVE LOWER INSTRUMENT PANEL SUB-ASSEMBLY
 Courtesy of © TOYOTA, LICENSE AGREEMENT TMS1002 Courtesy of © TOYOTA, LICENSE AGREEMENT TMS1002
|
 |
Screw (a) |
- |
- |
- Remove the screws.
HINT:
The screws marked (a) need to be installed in their designated locations.
- Disengage the clamp and clips.
- Disconnect the connector to remove the lower instrument panel sub-assembly.
- REMOVE LOWER NO. 1 INSTRUMENT PANEL AIRBAG ASSEMBLY
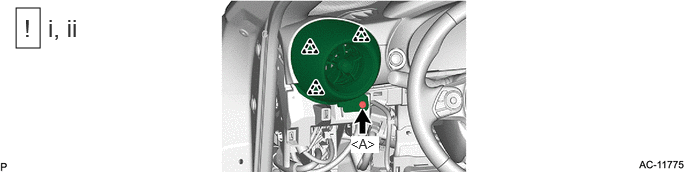
- REMOVE NO. 2 INSTRUMENT PANEL REGISTER SUB-ASSEMBLY
 Courtesy of © TOYOTA, LICENSE AGREEMENT TMS1002 Courtesy of © TOYOTA, LICENSE AGREEMENT TMS1002
|
- Remove the screw.
- Disengage the clips to remove the No. 2 instrument panel register sub-assembly.
NOTE:
Be careful not to damage the No. 2 instrument panel register sub-assembly.
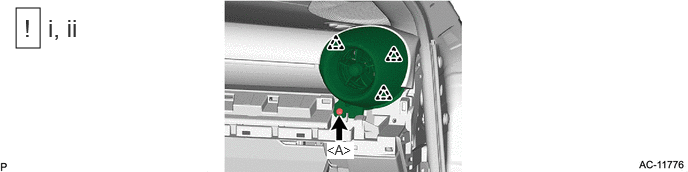
- REMOVE NO. 1 INSTRUMENT PANEL REGISTER SUB-ASSEMBLY
 Courtesy of © TOYOTA, LICENSE AGREEMENT TMS1002 Courtesy of © TOYOTA, LICENSE AGREEMENT TMS1002
|
- Remove the screw.
- Disengage the clips to remove the No. 1 instrument panel register sub-assembly.
NOTE:
Be careful not to damage the No. 1 instrument panel register sub-assembly.
- STEERING WHEEL POSITION
Refer to PROCEDURE - Step 3
- REMOVE UPPER INSTRUMENT PANEL METER ORNAMENT
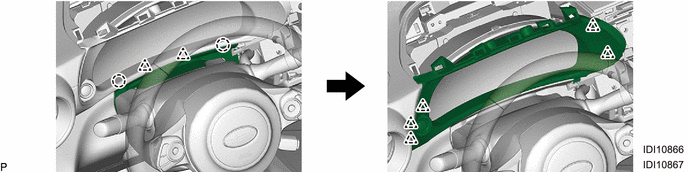 Courtesy of © TOYOTA, LICENSE AGREEMENT TMS1002 Courtesy of © TOYOTA, LICENSE AGREEMENT TMS1002
|
- Disconnect the connector to remove the upper instrument panel meter ornament.
- REMOVE COMBINATION METER ASSEMBLY
- REMOVE FRONT NO. 4 SPEAKER ASSEMBLY
Refer to PROCEDURE - Step 2
- REMOVE NO. 2 INSTRUMENT PANEL SPEAKER PANEL SUB-ASSEMBLY
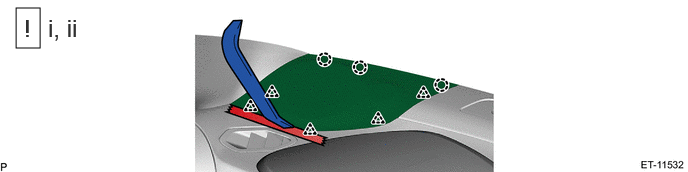 Courtesy of © TOYOTA, LICENSE AGREEMENT TMS1002 Courtesy of © TOYOTA, LICENSE AGREEMENT TMS1002
|
- Apply protective tape to the area shown in the illustration.
- Using a moulding remover, disengage the clips and claws as shown in the illustration.
- Disconnect the connector to remove the No. 2 instrument panel speaker panel sub-assembly.
- REMOVE NO. 1 INSTRUMENT PANEL SPEAKER PANEL SUB-ASSEMBLY
- Use the same procedure as for the LH side.
- REMOVE FRONT NO. 3 SPEAKER ASSEMBLY
- Use the same procedure as for the LH side and RH side.
Refer to PROCEDURE - Step 4
- REMOVE FRONT DOOR SCUFF PLATE RH
|
See step 5 |
- REMOVE COWL SIDE TRIM BOARD RH
See step 7
- REMOVE FRONT DOOR SCUFF PLATE LH
- Use the same procedure as for the RH side.
- REMOVE COWL SIDE TRIM BOARD LH
- Use the same procedure as for the RH side.
- REMOVE FRONT DOOR OPENING TRIM WEATHERSTRIP LH
Refer to PROCEDURE - Step 3
- REMOVE FRONT DOOR OPENING TRIM WEATHERSTRIP RH
- Use the same procedure as for the LH side.
- REMOVE FRONT PILLAR GARNISH RH
|
See step 13 |
- REMOVE FRONT PILLAR GARNISH LH
- Use the same procedure as for the RH side.
- REMOVE NO. 1 DEFROSTER NOZZLE GARNISH
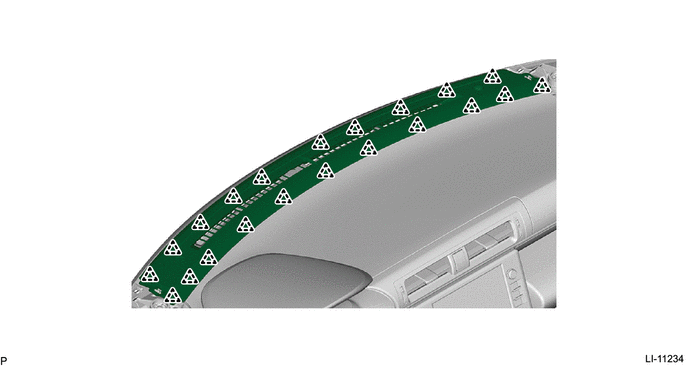 Courtesy of © TOYOTA, LICENSE AGREEMENT TMS1002 Courtesy of © TOYOTA, LICENSE AGREEMENT TMS1002
|
- Disconnect the connectors to remove the No. 1 defroster nozzle garnish.
- REMOVE INSTRUMENT PANEL SAFETY PAD SUB-ASSEMBLY
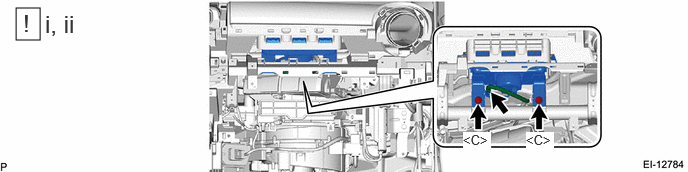 Courtesy of © TOYOTA, LICENSE AGREEMENT TMS1002 Courtesy of © TOYOTA, LICENSE AGREEMENT TMS1002
|
- Disconnect the airbag connector.
HINT:
Refer to How to Connect or Disconnect Airbag Connector.
Refer to HOW TO CONNECT OR DISCONNECT AIRBAG CONNECTOR [11/2021 - ]
- Remove the bolts.
 Courtesy of © TOYOTA, LICENSE AGREEMENT TMS1002 Courtesy of © TOYOTA, LICENSE AGREEMENT TMS1002
|
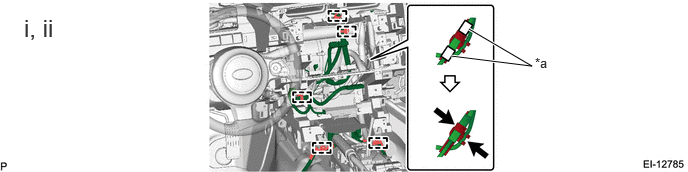
- Remove the slit tape, and then remove the navigation antenna assembly and the telephone antenna assembly.
- Disengage the clamps.
- Remove the indoor electrical key oscillator.
Refer to PROCEDURE - Step 2
 Courtesy of © TOYOTA, LICENSE AGREEMENT TMS1002 Courtesy of © TOYOTA, LICENSE AGREEMENT TMS1002
|
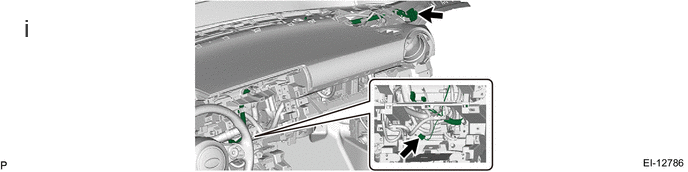
- Disconnect the connectors.
 Courtesy of © TOYOTA, LICENSE AGREEMENT TMS1002 Courtesy of © TOYOTA, LICENSE AGREEMENT TMS1002
|
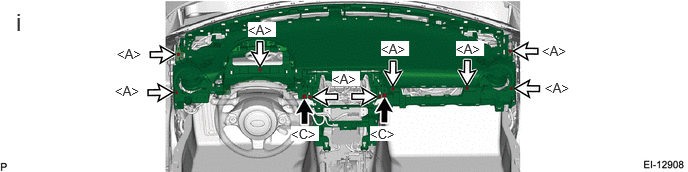
- Remove the bolts, screws and instrument panel safety pad sub-assembly.
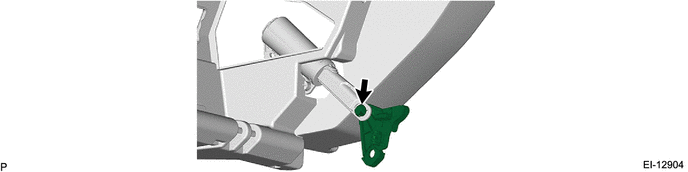
- REMOVE GLOVE COMPARTMENT DOOR DAMPER
HINT:
Perform this procedure only when replacement of the glove compartment door damper.
 Courtesy of © TOYOTA, LICENSE AGREEMENT TMS1002 Courtesy of © TOYOTA, LICENSE AGREEMENT TMS1002
|
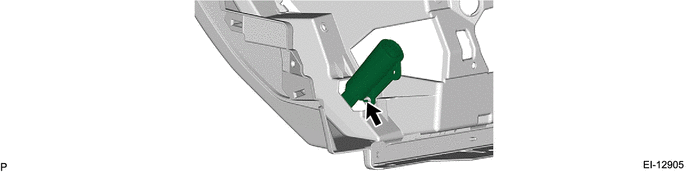 Courtesy of © TOYOTA, LICENSE AGREEMENT TMS1002 Courtesy of © TOYOTA, LICENSE AGREEMENT TMS1002
|
- REMOVE GLOVE COMPARTMENT CUSHION
HINT:
Perform this procedure only when replacement of the glove compartment cushion.
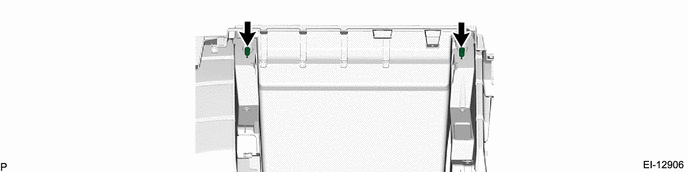 Courtesy of © TOYOTA, LICENSE AGREEMENT TMS1002 Courtesy of © TOYOTA, LICENSE AGREEMENT TMS1002
|
- REMOVE GLOVE COMPARTMENT DOOR REINFORCEMENT
HINT:
Perform this procedure only when replacement of the glove compartment door reinforcement.
- REMOVE NO. 2 INSTRUMENT PANEL REGISTER
HINT:
Perform this procedure only when replacement of the No. 2 instrument panel register.
 Courtesy of © TOYOTA, LICENSE AGREEMENT TMS1002 Courtesy of © TOYOTA, LICENSE AGREEMENT TMS1002
|
- REMOVE NO. 1 INSTRUMENT PANEL REGISTER
HINT:
Perform this procedure only when replacement of the No. 1 instrument panel register.
 Courtesy of © TOYOTA, LICENSE AGREEMENT TMS1002 Courtesy of © TOYOTA, LICENSE AGREEMENT TMS1002
|