- PRECAUTION
NOTE:
After turning the power switch off, waiting time may be required before disconnecting the cable from the negative (-) auxiliary battery terminal. Therefore, make sure to read the disconnecting the cable from the negative (-) auxiliary battery terminal notices before proceeding with work.
Refer to INITIALIZATION [11/2018 - ]
- REMOVE LUGGAGE TRIM SERVICE HOLE COVER
Refer to PROCEDURE - Step 2
- DISCONNECT CABLE FROM NEGATIVE AUXILIARY BATTERY TERMINAL
Refer to PROCEDURE - Step 3
- REMOVE REAR DOOR INSIDE HANDLE BEZEL PLUG
- Using a moulding remover A, disengage the claws to remove the rear door inside handle bezel plug.
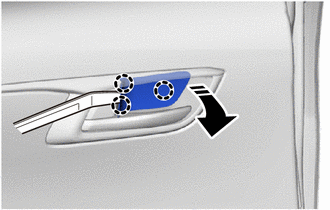 Courtesy of © TOYOTA, LICENSE AGREEMENT TMS1002 Courtesy of © TOYOTA, LICENSE AGREEMENT TMS1002
|
 |
Remove in this Direction |
- REMOVE REAR DOOR ARMREST COVER
- Using a moulding remover A, disengage the claw and guides to remove the rear door armrest cover.
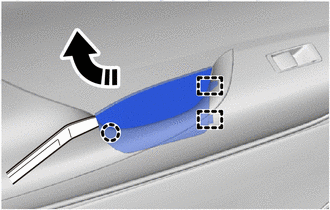 Courtesy of © TOYOTA, LICENSE AGREEMENT TMS1002 Courtesy of © TOYOTA, LICENSE AGREEMENT TMS1002
|
|
Remove in this Direction |
- REMOVE NO. 1 REAR DOOR STIFFENER CUSHION
- Remove the No. 1 rear door stiffener cushion.
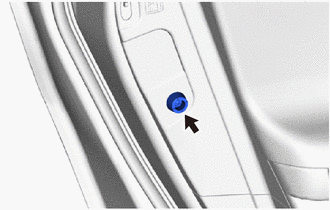 Courtesy of © TOYOTA, LICENSE AGREEMENT TMS1002 Courtesy of © TOYOTA, LICENSE AGREEMENT TMS1002
|
- REMOVE COURTESY LIGHT ASSEMBLY
Refer to PROCEDURE - Step 1
- REMOVE REAR DOOR TRIM BOARD SUB-ASSEMBLY
- Remove the 3 screws.
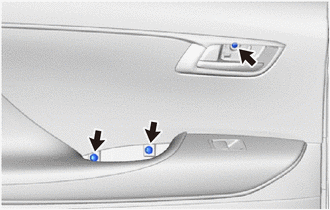 Courtesy of © TOYOTA, LICENSE AGREEMENT TMS1002 Courtesy of © TOYOTA, LICENSE AGREEMENT TMS1002
|
- Disengage the clips as shown in the illustration.
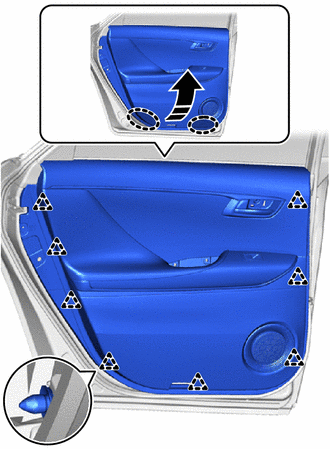 Courtesy of © TOYOTA, LICENSE AGREEMENT TMS1002 Courtesy of © TOYOTA, LICENSE AGREEMENT TMS1002
|
 |
Place Hands Here |
|
Remove in this Direction |
- Disengage the clamps to remove rear door trim board sub-assembly as shown in the illustration.
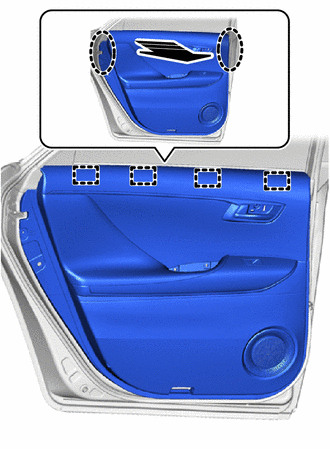 Courtesy of © TOYOTA, LICENSE AGREEMENT TMS1002 Courtesy of © TOYOTA, LICENSE AGREEMENT TMS1002
|
|
Place Hands Here |
|
Remove in this Direction |
- Disconnect the connector.
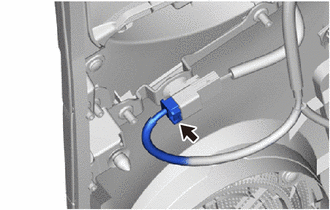 Courtesy of © TOYOTA, LICENSE AGREEMENT TMS1002 Courtesy of © TOYOTA, LICENSE AGREEMENT TMS1002
|
- Disengage the guides.
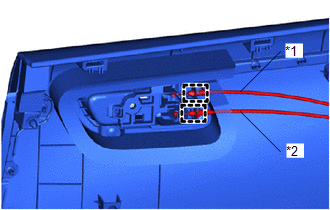 Courtesy of © TOYOTA, LICENSE AGREEMENT TMS1002 Courtesy of © TOYOTA, LICENSE AGREEMENT TMS1002
|
| *1 |
Rear Door Inside Locking Cable Assembly |
| *2 |
Rear Door Lock Remote Control Cable Assembly |
- Disconnect the rear door lock remote control cable assembly and rear door inside locking cable assembly to remove the rear door trim board sub-assembly.
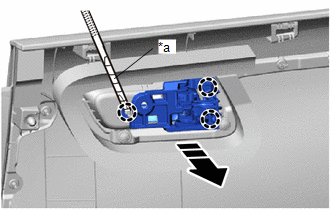
- REMOVE REAR DOOR INSIDE HANDLE SUB-ASSEMBLY
- Using a screwdriver with its tip wrapped with protective tape, disengage the claws to remove the rear door inside handle sub-assembly.
 Courtesy of © TOYOTA, LICENSE AGREEMENT TMS1002 Courtesy of © TOYOTA, LICENSE AGREEMENT TMS1002
|
| *a |
Protective Tape |
|
Remove in this Direction |
- REMOVE REAR POWER WINDOW REGULATOR SWITCH ASSEMBLY
Refer to PROCEDURE - Step 6
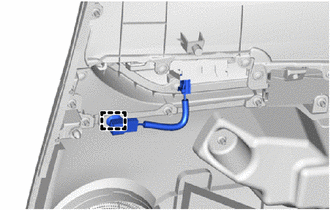
- REMOVE REAR DOOR WIRE
- Using a clip remover, disengage the clamp to remove the rear door wire.
 Courtesy of © TOYOTA, LICENSE AGREEMENT TMS1002 Courtesy of © TOYOTA, LICENSE AGREEMENT TMS1002
|
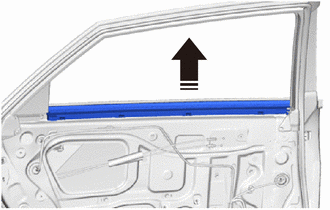
- REMOVE REAR DOOR GLASS INNER WEATHERSTRIP
- Remove the rear door glass inner weatherstrip as shown in the illustration.
 Courtesy of © TOYOTA, LICENSE AGREEMENT TMS1002 Courtesy of © TOYOTA, LICENSE AGREEMENT TMS1002
|
|
Remove in this Direction |
- REMOVE REAR SPEAKER ASSEMBLY
Refer to PROCEDURE - Step 6
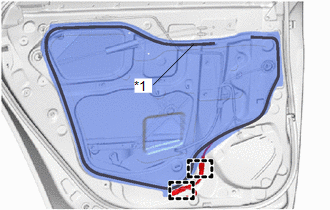
- REMOVE REAR DOOR SERVICE HOLE COVER
- Using a clip remover, disengage the clamps to separate the wire harness.
 Courtesy of © TOYOTA, LICENSE AGREEMENT TMS1002 Courtesy of © TOYOTA, LICENSE AGREEMENT TMS1002
|
- Remove the rear door service hole cover.
NOTE:
Remove any remaining butyl tape from the rear door panel.
- REMOVE REAR DOOR GLASS RUN
- Remove the rear door glass run as shown in the illustration.
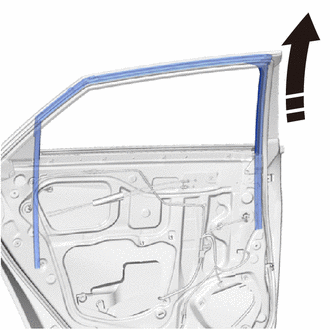 Courtesy of © TOYOTA, LICENSE AGREEMENT TMS1002 Courtesy of © TOYOTA, LICENSE AGREEMENT TMS1002
|
|
Remove in this Direction |
- REMOVE REAR DOOR FRAME GARNISH
- Disengage the guides to remove the rear door frame garnish as shown in the illustration.
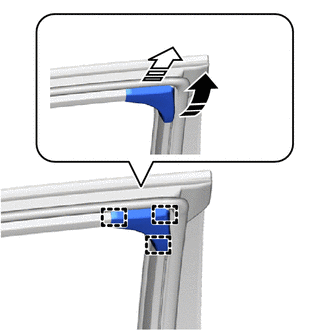 Courtesy of © TOYOTA, LICENSE AGREEMENT TMS1002 Courtesy of © TOYOTA, LICENSE AGREEMENT TMS1002
|
|
Remove in this Direction (1) |
 |
Remove in this Direction (2) |
- REMOVE REAR DOOR WINDOW REAR LOWER FRAME SUB-ASSEMBLY
- Remove the screw.
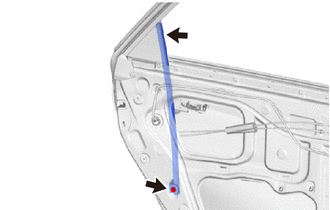 Courtesy of © TOYOTA, LICENSE AGREEMENT TMS1002 Courtesy of © TOYOTA, LICENSE AGREEMENT TMS1002
|
- Remove the bolt and rear door window rear lower frame sub-assembly.
- REMOVE REAR DOOR GLASS SUB-ASSEMBLY
- Connect the rear power window regulator switch assembly.
- Connect the cable to the auxiliary battery negative (-) terminal.
- More the rear door window regulator sub-assembly LH so that the door glass bolts can be seen.
- Disconnect the cable from the auxiliary battery negative (-) terminal.
WARNING:
- Wait at least 90 seconds after disconnecting the cable from the auxiliary battery negative (-) terminal to disable the SRS system.
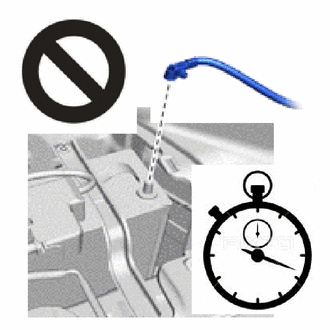 Courtesy of © TOYOTA, LICENSE AGREEMENT TMS1002 Courtesy of © TOYOTA, LICENSE AGREEMENT TMS1002
|
- If the airbag deploys for any reason, it may cause a serious accident.
NOTE:
When disconnecting the cable, some systems need to be initialized after the cable is reconnected.
Refer to INITIALIZATION [11/2018 - ]
- Disconnect the rear power window regulator switch assembly.
- Remove the 2 bolts.
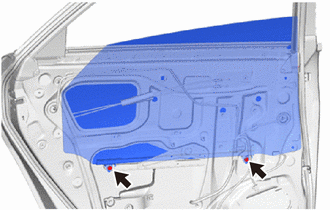 Courtesy of © TOYOTA, LICENSE AGREEMENT TMS1002 Courtesy of © TOYOTA, LICENSE AGREEMENT TMS1002
|
NOTE:
After the bolts are removed, do not allow the rear door glass sub-assembly to fall.
- Remove the rear door glass sub-assembly as shown in the illustration.
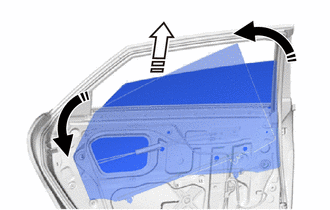 Courtesy of © TOYOTA, LICENSE AGREEMENT TMS1002 Courtesy of © TOYOTA, LICENSE AGREEMENT TMS1002
|
|
Remove in this Direction (1) |
|
Remove in this Direction (2) |
NOTE:
Do not damage the rear door glass sub-assembly.
- REMOVE REAR DOOR WINDOW REGULATOR SUB-ASSEMBLY
- Disconnect the connector.
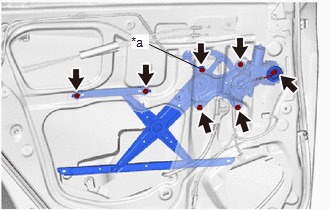 Courtesy of © TOYOTA, LICENSE AGREEMENT TMS1002 Courtesy of © TOYOTA, LICENSE AGREEMENT TMS1002
|
- Loosen the temporary bolt.
NOTE:
Do not remove the temporary bolt. If the temporary bolt is removed, the rear door window regulator sub-assembly may fall and cause damage.
- Remove the 5 bolts and rear door window regulator sub-assembly.
- Remove the temporary bolt from the rear door window regulator sub-assembly.
- REMOVE REAR DOOR CUSHION
- Remove the 2 bolts.
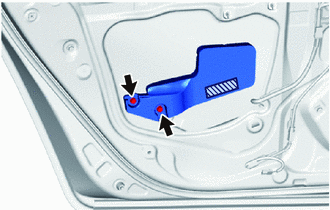 Courtesy of © TOYOTA, LICENSE AGREEMENT TMS1002 Courtesy of © TOYOTA, LICENSE AGREEMENT TMS1002
|
 |
Double-side Tape |
- Remove the double-side tape and rear door cushion.
NOTE:
Remove any remaining double-side tape from the rear door panel.
- REMOVE REAR DOOR REAR GUIDE SEAL
- Raise up the rear door weatherstrip and then remove the screw.
- Remove the 3 screws.
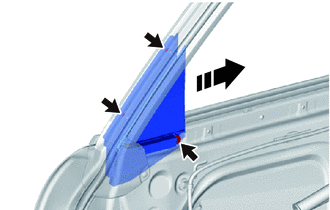 Courtesy of © TOYOTA, LICENSE AGREEMENT TMS1002 Courtesy of © TOYOTA, LICENSE AGREEMENT TMS1002
|
|
Remove in this Direction |
- Remove the rear door rear guide seal as shown in the illustration.
- REMOVE REAR DOOR LOCK ASSEMBLY
Refer to PROCEDURE - Step 14
- REMOVE REAR DOOR OUTSIDE HANDLE COVER
- Using a T30 "TORX" socket wrench, loosen the screw.
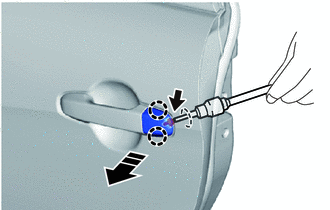 Courtesy of © TOYOTA, LICENSE AGREEMENT TMS1002 Courtesy of © TOYOTA, LICENSE AGREEMENT TMS1002
|
|
Remove in this Direction |
- Disengage the claws to remove the rear door outside handle cover as shown in the illustration.
- REMOVE REAR DOOR OUTSIDE HANDLE ASSEMBLY
- Remove the rear door outside handle assembly as shown in the illustration.
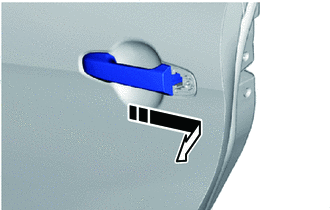 Courtesy of © TOYOTA, LICENSE AGREEMENT TMS1002 Courtesy of © TOYOTA, LICENSE AGREEMENT TMS1002
|
|
Remove in this Direction |
- REMOVE REAR DOOR FRONT OUTSIDE HANDLE PAD
- Disengage the claws to remove the rear door front outside handle pad.
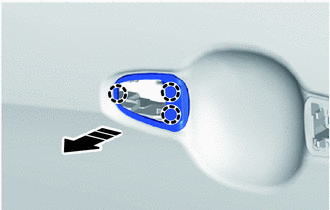 Courtesy of © TOYOTA, LICENSE AGREEMENT TMS1002 Courtesy of © TOYOTA, LICENSE AGREEMENT TMS1002
|
|
Remove in this Direction |
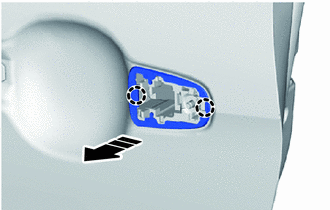
- REMOVE REAR DOOR REAR OUTSIDE HANDLE PAD
- Disengage the claws to remove the rear door rear outside handle pad.
 Courtesy of © TOYOTA, LICENSE AGREEMENT TMS1002 Courtesy of © TOYOTA, LICENSE AGREEMENT TMS1002
|
|
Remove in this Direction |
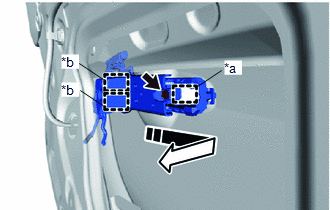
- REMOVE REAR DOOR OUTSIDE HANDLE FRAME SUB-ASSEMBLY
- Using a T30 "TORX" socket wrench, loosen the screw.
 Courtesy of © TOYOTA, LICENSE AGREEMENT TMS1002 Courtesy of © TOYOTA, LICENSE AGREEMENT TMS1002
|
| *a |
Grommet |
| *b |
Guide |
|
Remove in this Direction |
- Disengage the grommet and guides to remove the rear door outside handle frame sub-assembly as shown in the illustration.
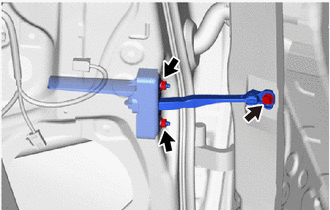
- REMOVE REAR DOOR CHECK ASSEMBLY
- Remove the bolt, 2 nuts and the rear door check assembly.
 Courtesy of © TOYOTA, LICENSE AGREEMENT TMS1002 Courtesy of © TOYOTA, LICENSE AGREEMENT TMS1002
|
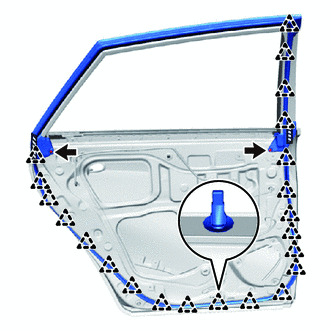
- REMOVE REAR DOOR WEATHERSTRIP
- Using a clip remover, remove the 2 clips.
 Courtesy of © TOYOTA, LICENSE AGREEMENT TMS1002 Courtesy of © TOYOTA, LICENSE AGREEMENT TMS1002
|
|
Double-side Tape |
- Using a clip remover, disengage the clips.
- Remove the double-side tape and rear door weatherstrip.
NOTE:
Remove any remaining double-side tape from the rear door panel.
- REMOVE REAR DOOR BELT MOULDING ASSEMBLY
Refer to PROCEDURE - Step 15
- REMOVE REAR DOOR WINDOW FRAME FRONT MOULDING
Refer to PROCEDURE - Step 7
- REMOVE REAR DOOR WINDOW FRAME UPPER MOULDING
Refer to PROCEDURE - Step 8
- REMOVE REAR DOOR WINDOW FRAME REAR MOULDING
Refer to PROCEDURE - Step 9
- REMOVE REAR DOOR LOWER OUTSIDE STRIPE
Refer to PROCEDURE - Step 9
- REMOVE REAR DOOR OUTSIDE STRIPE
Refer to PROCEDURE - Step 10
- REMOVE REAR DOOR UPPER OUTSIDE STRIPE
Refer to PROCEDURE - Step 11
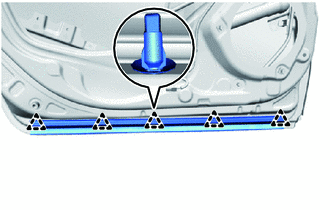
- REMOVE NO. 2 REAR DOOR WEATHERSTRIP
- Using a clip remover, disengage the clips to remove the No. 2 rear door weatherstrip.
 Courtesy of © TOYOTA, LICENSE AGREEMENT TMS1002 Courtesy of © TOYOTA, LICENSE AGREEMENT TMS1002
|
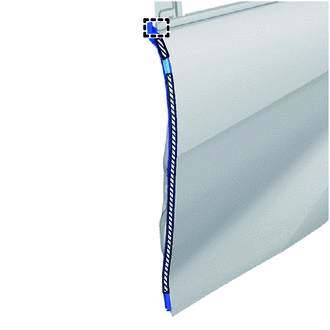
- REMOVE NO. 3 REAR DOOR WEATHERSTRIP
- Remove the double-side tape.
 Courtesy of © TOYOTA, LICENSE AGREEMENT TMS1002 Courtesy of © TOYOTA, LICENSE AGREEMENT TMS1002
|
|
Double-side Tape |
NOTE:
Remove any remaining double-side tape from the rear door panel.
- Disengage the guide to remove the No. 3 rear door weatherstrip.
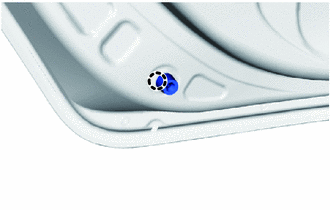
- REMOVE REAR DOOR PANEL CUSHION
- Disengage the claw to remove the rear door panel cushion.
 Courtesy of © TOYOTA, LICENSE AGREEMENT TMS1002 Courtesy of © TOYOTA, LICENSE AGREEMENT TMS1002
|
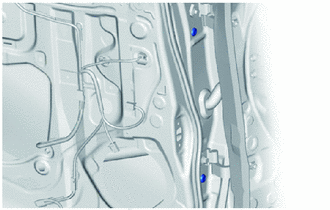
- REMOVE HOLE PLUG
- Remove the 2 hole plugs.
 Courtesy of © TOYOTA, LICENSE AGREEMENT TMS1002 Courtesy of © TOYOTA, LICENSE AGREEMENT TMS1002
|