- REMOVE HOOD TO RADIATOR GRILLE SEAL
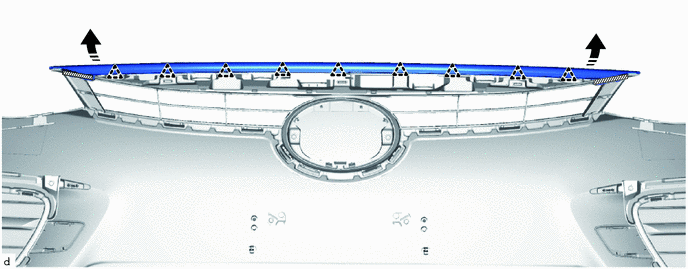
- Remove the double-sided tape from both ends of the hood to radiator grille seal, and disengage the clips as shown in the illustration to remove the hood to radiator grille seal.
 Courtesy of © TOYOTA, LICENSE AGREEMENT TMS1002 Courtesy of © TOYOTA, LICENSE AGREEMENT TMS1002
|
 |
Double-sided Tape |
- |
- |
 |
Remove in this Direction |
- |
- |
- REMOVE RADIATOR GRILLE SUB-ASSEMBLY
- Disengage the claws to remove the radiator grille sub-assembly.
 Courtesy of © TOYOTA, LICENSE AGREEMENT TMS1002 Courtesy of © TOYOTA, LICENSE AGREEMENT TMS1002
|
- REMOVE RADIATOR GRILLE EMBLEM ASSEMBLY
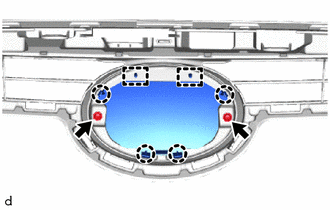
- Remove the 2 screws.
 Courtesy of © TOYOTA, LICENSE AGREEMENT TMS1002 Courtesy of © TOYOTA, LICENSE AGREEMENT TMS1002
|
- Disengage the claws and guides to remove the radiator grille emblem assembly.
- REMOVE CLEARANCE LIGHT ASSEMBLY LH
Refer to REMOVAL [06/2015 - ]
- REMOVE CLEARANCE LIGHT ASSEMBLY RH
HINT:
Use the same procedure as for the LH side.
- REMOVE NO. 1 ULTRASONIC SENSOR
Refer to PROCEDURE - Step 2
- REMOVE NO. 1 ULTRASONIC SENSOR RETAINER
Refer to PROCEDURE - Step 3
- REMOVE NO. 3 MOTOR COMPONENT WIRE
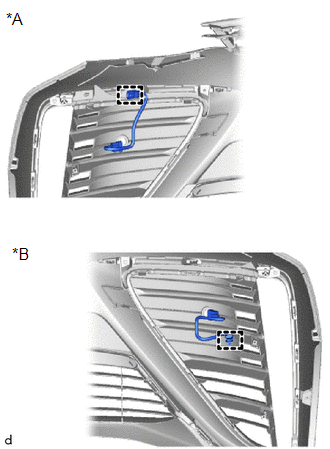
- Disengage the clamps to remove the 2 No. 3 motor compartment wires.
 Courtesy of © TOYOTA, LICENSE AGREEMENT TMS1002 Courtesy of © TOYOTA, LICENSE AGREEMENT TMS1002
|
| *A |
for LH Side |
| *B |
for RH Side |
- REMOVE LOWER RADIATOR SIDE GRILLE LH
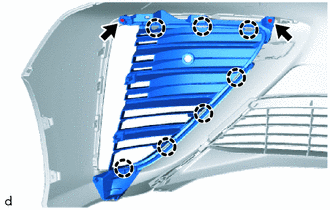
- Remove the 2 screws.
 Courtesy of © TOYOTA, LICENSE AGREEMENT TMS1002 Courtesy of © TOYOTA, LICENSE AGREEMENT TMS1002
|
- Disengage the claws to remove the lower radiator side grille LH.
- REMOVE LOWER RADIATOR SIDE GRILLE RH
HINT:
Use the same procedure as for the LH side.
- REMOVE FRONT BUMPER SIDE MOULDING LH
- Remove the 2 screws.
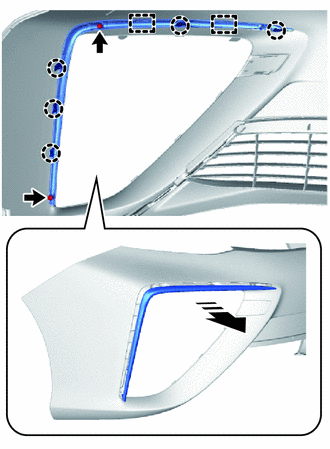 Courtesy of © TOYOTA, LICENSE AGREEMENT TMS1002 Courtesy of © TOYOTA, LICENSE AGREEMENT TMS1002
|
|
Remove in this Direction |
- Disengage the claws and guides to remove the front bumper side moulding LH as shown in the illustration.
- REMOVE FRONT BUMPER SIDE MOULDING RH
HINT:
Use the same procedure as for the LH side.
- REMOVE LOWER RADIATOR GRILLE SUB-ASSEMBLY
- Remove the 2 screws.
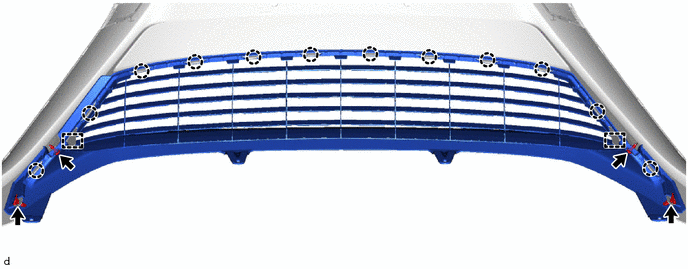 Courtesy of © TOYOTA, LICENSE AGREEMENT TMS1002 Courtesy of © TOYOTA, LICENSE AGREEMENT TMS1002
|
- Remove the 2 outside moulding retainers.
- Disengage the claws and guides to remove the lower radiator grille sub-assembly.
- REMOVE FRONT BUMPER EXTENSION MOUNTING BRACKET
- Remove the 2 screws.
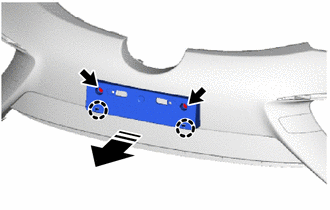 Courtesy of © TOYOTA, LICENSE AGREEMENT TMS1002 Courtesy of © TOYOTA, LICENSE AGREEMENT TMS1002
|
|
Remove in this Direction |
- Disengage the claws to remove the front bumper extension mounting bracket as shown in the illustration.
- REMOVE FRONT FENDER LINER RETAINER
- Disengage the claws to remove the 2 front fender liner retainers.
 Courtesy of © TOYOTA, LICENSE AGREEMENT TMS1002 Courtesy of © TOYOTA, LICENSE AGREEMENT TMS1002
|
HINT:
Use the same procedure for the RH and LH sides.
- REMOVE FRONT BUMPER HOLE COVER LH
- Disengage the claws as shown in the illustration.
 Courtesy of © TOYOTA, LICENSE AGREEMENT TMS1002 Courtesy of © TOYOTA, LICENSE AGREEMENT TMS1002
|
|
Remove in this Direction |
- Disengage the hook to remove the front bumper hole cover LH.
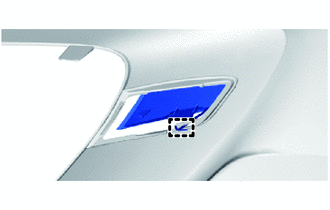 Courtesy of © TOYOTA, LICENSE AGREEMENT TMS1002 Courtesy of © TOYOTA, LICENSE AGREEMENT TMS1002
|
- REMOVE FRONT BUMPER HOLE COVER RH
HINT:
Use the same procedure as for the LH side.
- REMOVE RADIATOR GRILLE BRACKET
- Remove the 2 clips.
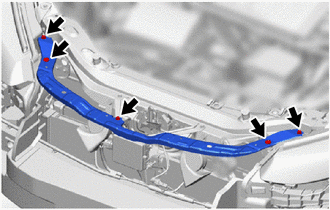 Courtesy of © TOYOTA, LICENSE AGREEMENT TMS1002 Courtesy of © TOYOTA, LICENSE AGREEMENT TMS1002
|
- Remove the 3 bolts and radiator grille bracket.
- REMOVE FRONT BUMPER ENERGY ABSORBER
- Disengage the guides to remove the front bumper energy absorber as shown in the illustration.
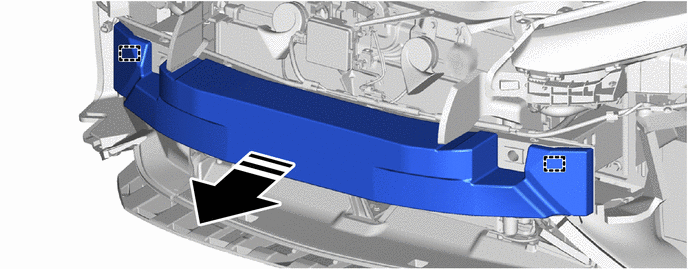 Courtesy of © TOYOTA, LICENSE AGREEMENT TMS1002 Courtesy of © TOYOTA, LICENSE AGREEMENT TMS1002
|
|
Remove in this Direction |
- |
- |
- REMOVE FRONT BUMPER REINFORCEMENT SUB-ASSEMBLY
- Using a clip remover, disengage the clamps to separate the motor compartment main wire.
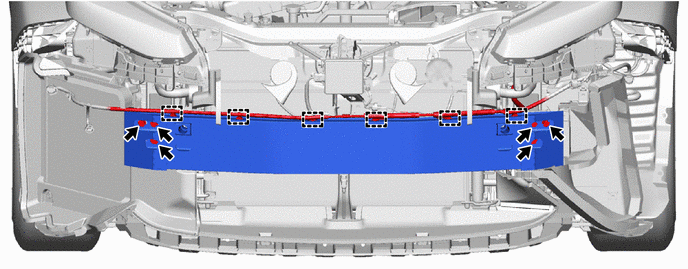 Courtesy of © TOYOTA, LICENSE AGREEMENT TMS1002 Courtesy of © TOYOTA, LICENSE AGREEMENT TMS1002
|
- Remove the 6 bolts and front bumper reinforcement sub-assembly.
- REMOVE FRONT SIDE MEMBER BRACKET SUB-ASSEMBLY LH
- Remove the 4 bolts.
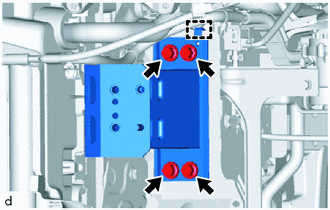 Courtesy of © TOYOTA, LICENSE AGREEMENT TMS1002 Courtesy of © TOYOTA, LICENSE AGREEMENT TMS1002
|
- Disengage the hook to remove the front side member bracket sub-assembly LH.
- REMOVE FRONT SIDE MEMBER BRACKET SUB-ASSEMBLY RH
HINT:
Use the same procedure as for the LH side.
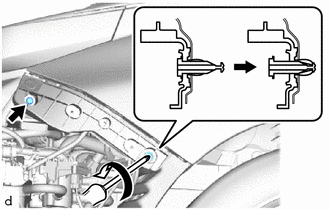
- REMOVE FRONT BUMPER SIDE SUPPORT LH
- Remove the bolt.
 Courtesy of © TOYOTA, LICENSE AGREEMENT TMS1002 Courtesy of © TOYOTA, LICENSE AGREEMENT TMS1002
|
 |
Turn |
- Using a screwdriver, disengage the clip as shown in the illustration.
HINT:
The clip cannot be completely removed.
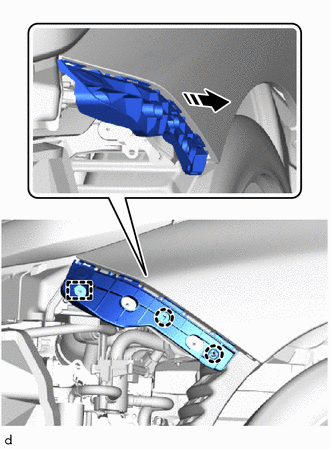
- Using a clip remover, disengage the claws and guide to remove the front bumper side support LH.
 Courtesy of © TOYOTA, LICENSE AGREEMENT TMS1002 Courtesy of © TOYOTA, LICENSE AGREEMENT TMS1002
|
|
Remove in this Direction |
- REMOVE FRONT BUMPER SIDE SUPPORT RH
HINT:
Use the same procedure as for the LH side.
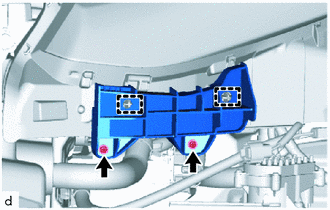
- REMOVE FRONT BUMPER BRACKET LH
- Remove the 2 screws.
- Disengage the guides to remove the front bumper bracket LH.
 Courtesy of © TOYOTA, LICENSE AGREEMENT TMS1002 Courtesy of © TOYOTA, LICENSE AGREEMENT TMS1002
|
- REMOVE FRONT BUMPER BRACKET RH
HINT:
Use the same procedure as for the LH side.
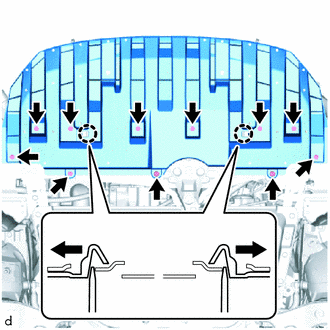
- REMOVE LOWER FRONT BUMPER ABSORBER
- Remove the 8 bolts and 3 clips.
 Courtesy of © TOYOTA, LICENSE AGREEMENT TMS1002 Courtesy of © TOYOTA, LICENSE AGREEMENT TMS1002
|
|
Push |
- Using a screwdriver, disengage the claws to remove the lower front bumper absorber.