- PRECAUTION
NOTE:
After turning the power switch off, waiting time may be required before disconnecting the cable from the auxiliary battery terminal. Therefore, make sure to read the disconnecting the cable from the auxiliary battery terminal notice before proceeding with work.
Refer to PRECAUTION [06/2015 - ]
- REMOVE LUGGAGE TRIM SERVICE HOLE COVER
Refer to PROCEDURE - Step 2
- DISCONNECT CABLE FROM NEGATIVE AUXILIARY BATTERY TERMINAL
Refer to PROCEDURE - Step 3
- REMOVE REAR DOOR INSIDE HANDLE BEZEL PLUG
- Using a moulding remover A, disengage the claws to remove the rear door inside handle bezel plug.
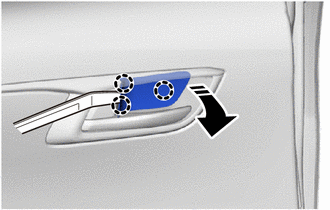 Courtesy of © TOYOTA, LICENSE AGREEMENT TMS1002 Courtesy of © TOYOTA, LICENSE AGREEMENT TMS1002
|
 |
Remove in this Direction |
- REMOVE REAR DOOR ARMREST COVER
- Using a moulding remover A, disengage the claw and guides to remove the rear door armrest cover.
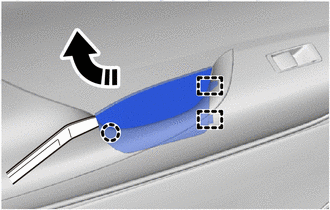 Courtesy of © TOYOTA, LICENSE AGREEMENT TMS1002 Courtesy of © TOYOTA, LICENSE AGREEMENT TMS1002
|
|
Remove in this Direction |
- REMOVE NO. 1 REAR DOOR STIFFENER CUSHION
- Remove the No. 1 rear door stiffener cushion.
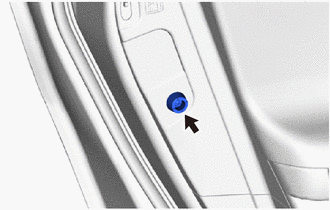 Courtesy of © TOYOTA, LICENSE AGREEMENT TMS1002 Courtesy of © TOYOTA, LICENSE AGREEMENT TMS1002
|
- REMOVE COURTESY LIGHT ASSEMBLY
Refer to PROCEDURE - Step 1
- REMOVE REAR DOOR TRIM BOARD SUB-ASSEMBLY
- Remove the 3 screws.
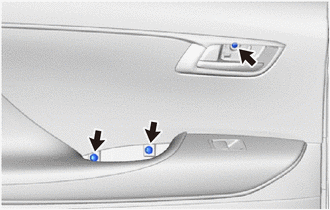 Courtesy of © TOYOTA, LICENSE AGREEMENT TMS1002 Courtesy of © TOYOTA, LICENSE AGREEMENT TMS1002
|
- Disengage the clips as shown in the illustration.
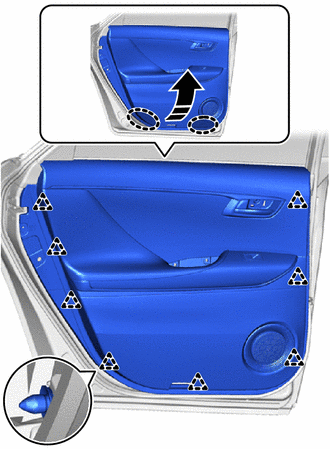 Courtesy of © TOYOTA, LICENSE AGREEMENT TMS1002 Courtesy of © TOYOTA, LICENSE AGREEMENT TMS1002
|
 |
Place Hands Here |
|
Remove in this Direction |
- Disengage the clamps to remove rear door trim board sub-assembly as shown in the illustration.
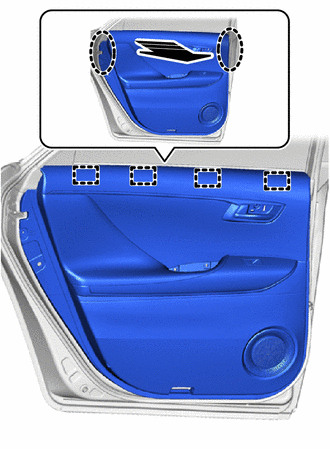 Courtesy of © TOYOTA, LICENSE AGREEMENT TMS1002 Courtesy of © TOYOTA, LICENSE AGREEMENT TMS1002
|
|
Place Hands Here |
|
Remove in this Direction |
- Disconnect the connector.
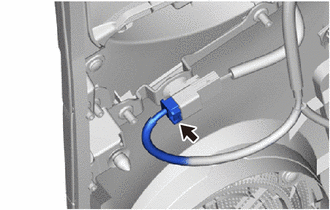 Courtesy of © TOYOTA, LICENSE AGREEMENT TMS1002 Courtesy of © TOYOTA, LICENSE AGREEMENT TMS1002
|
- Disengage the guides.
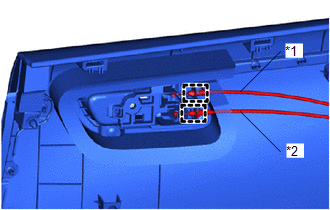 Courtesy of © TOYOTA, LICENSE AGREEMENT TMS1002 Courtesy of © TOYOTA, LICENSE AGREEMENT TMS1002
|
| *1 |
Rear Door Inside Locking Cable Assembly |
| *2 |
Rear Door Lock Remote Control Cable Assembly |
- Disconnect the rear door lock remote control cable assembly and rear door inside locking cable assembly to remove the rear door trim board sub-assembly.
- REMOVE REAR DOOR INSIDE HANDLE SUB-ASSEMBLY
- Using a screwdriver with its tip wrapped with protective tape, disengage the claws to remove the rear door inside handle sub-assembly.
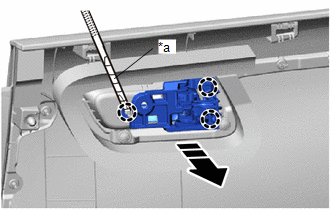 Courtesy of © TOYOTA, LICENSE AGREEMENT TMS1002 Courtesy of © TOYOTA, LICENSE AGREEMENT TMS1002
|
| *a |
Protective Tape |
|
Remove in this Direction |
- REMOVE REAR POWER WINDOW REGULATOR SWITCH ASSEMBLY
Refer to PROCEDURE - Step 6
- REMOVE REAR DOOR WIRE
- Using a clip remover, disengage the clamp to remove the rear door wire.
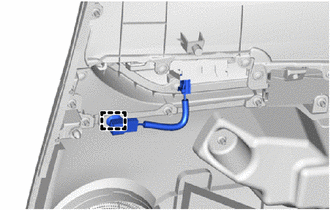 Courtesy of © TOYOTA, LICENSE AGREEMENT TMS1002 Courtesy of © TOYOTA, LICENSE AGREEMENT TMS1002
|
- REMOVE REAR DOOR GLASS INNER WEATHERSTRIP
- Remove the rear door glass inner weatherstrip as shown in the illustration.
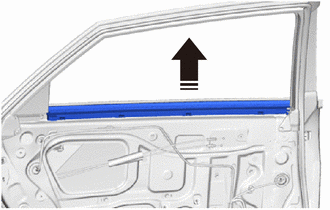 Courtesy of © TOYOTA, LICENSE AGREEMENT TMS1002 Courtesy of © TOYOTA, LICENSE AGREEMENT TMS1002
|
|
Remove in this Direction |
- REMOVE REAR SPEAKER ASSEMBLY
Refer to PROCEDURE - Step 6
- REMOVE REAR DOOR SERVICE HOLE COVER
- Using a clip remover, disengage the clamps to separate the wire harness.
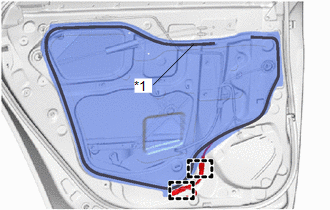 Courtesy of © TOYOTA, LICENSE AGREEMENT TMS1002 Courtesy of © TOYOTA, LICENSE AGREEMENT TMS1002
|
- Remove the rear door service hole cover.
NOTE:
Remove any remaining butyl tape from the rear door panel.
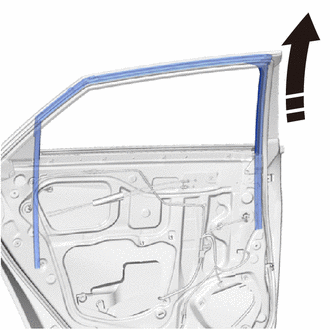
- REMOVE REAR DOOR GLASS RUN
- Remove the rear door glass run as shown in the illustration.
 Courtesy of © TOYOTA, LICENSE AGREEMENT TMS1002 Courtesy of © TOYOTA, LICENSE AGREEMENT TMS1002
|
|
Remove in this Direction |
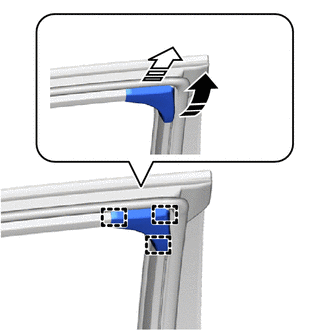
- REMOVE REAR DOOR FRAME GARNISH
- Disengage the guides to remove the rear door frame garnish as shown in the illustration.
 Courtesy of © TOYOTA, LICENSE AGREEMENT TMS1002 Courtesy of © TOYOTA, LICENSE AGREEMENT TMS1002
|
|
Remove in this Direction (1) |
 |
Remove in this Direction (2) |
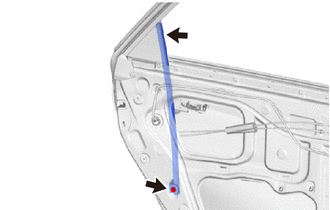
- REMOVE REAR DOOR WINDOW REAR LOWER FRAME SUB-ASSEMBLY
- Remove the screw.
 Courtesy of © TOYOTA, LICENSE AGREEMENT TMS1002 Courtesy of © TOYOTA, LICENSE AGREEMENT TMS1002
|
- Remove the bolt and rear door window rear lower frame sub-assembly.
- REMOVE REAR DOOR GLASS SUB-ASSEMBLY
- Connect the rear power window regulator switch assembly.
- Connect the cable to the auxiliary battery negative (-) terminal.
- More the rear door window regulator sub-assembly LH so that the door glass bolts can be seen.
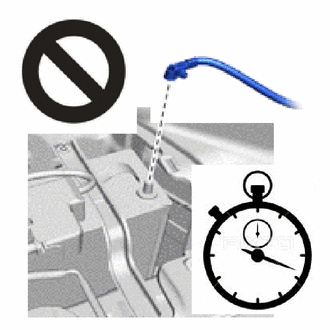
- Disconnect the cable from the auxiliary battery negative (-) terminal.
WARNING:
- Wait at least 90 seconds after disconnecting the cable from the auxiliary battery negative (-) terminal to disable the SRS system.
 Courtesy of © TOYOTA, LICENSE AGREEMENT TMS1002 Courtesy of © TOYOTA, LICENSE AGREEMENT TMS1002
|
- If the airbag deploys for any reason, it may cause a serious accident.
- Disconnect the rear power window regulator switch assembly.
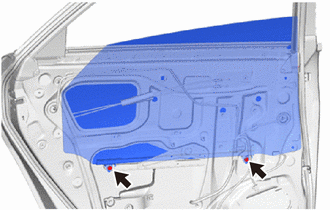
- Remove the 2 bolts.
 Courtesy of © TOYOTA, LICENSE AGREEMENT TMS1002 Courtesy of © TOYOTA, LICENSE AGREEMENT TMS1002
|
NOTE:
After the bolts are removed, do not allow the rear door glass sub-assembly to fall.
- Remove the rear door glass sub-assembly as shown in the illustration.
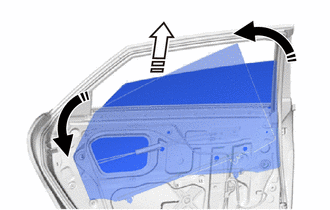 Courtesy of © TOYOTA, LICENSE AGREEMENT TMS1002 Courtesy of © TOYOTA, LICENSE AGREEMENT TMS1002
|
|
Remove in this Direction (1) |
|
Remove in this Direction (2) |
NOTE:
Do not damage the rear door glass sub-assembly.
- REMOVE REAR DOOR WINDOW REGULATOR SUB-ASSEMBLY
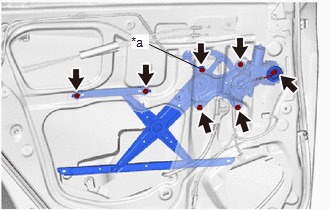
- Disconnect the connector.
 Courtesy of © TOYOTA, LICENSE AGREEMENT TMS1002 Courtesy of © TOYOTA, LICENSE AGREEMENT TMS1002
|
- Loosen the temporary bolt.
NOTE:
Do not remove the temporary bolt. If the temporary bolt is removed, the rear door window regulator sub-assembly may fall and cause damage.
- Remove the 5 bolts and rear door window regulator sub-assembly.
- Remove the temporary bolt from the rear door window regulator sub-assembly.
- REMOVE REAR DOOR CUSHION
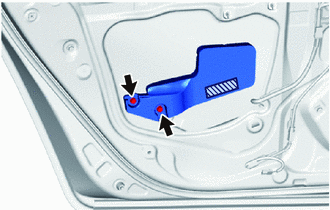
- Remove the 2 bolts.
 Courtesy of © TOYOTA, LICENSE AGREEMENT TMS1002 Courtesy of © TOYOTA, LICENSE AGREEMENT TMS1002
|
 |
Double-side Tape |
- Remove the double-side tape and rear door cushion.
NOTE:
Remove any remaining double-side tape from the rear door panel.
- REMOVE REAR DOOR REAR GUIDE SEAL
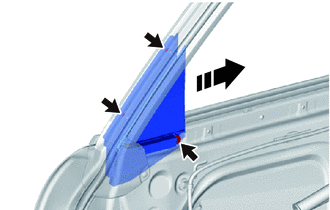
- Raise up the rear door weatherstrip and then remove the screw.
- Remove the 3 screws.
 Courtesy of © TOYOTA, LICENSE AGREEMENT TMS1002 Courtesy of © TOYOTA, LICENSE AGREEMENT TMS1002
|
|
Remove in this Direction |
- Remove the rear door rear guide seal as shown in the illustration.
- REMOVE REAR DOOR LOCK ASSEMBLY
Refer to PROCEDURE - Step 14
- REMOVE REAR DOOR OUTSIDE HANDLE COVER
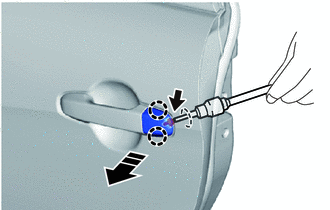
- Using a T30 "TORX" socket wrench, loosen the screw.
 Courtesy of © TOYOTA, LICENSE AGREEMENT TMS1002 Courtesy of © TOYOTA, LICENSE AGREEMENT TMS1002
|
|
Remove in this Direction |
- Disengage the claws to remove the rear door outside handle cover as shown in the illustration.
- REMOVE REAR DOOR OUTSIDE HANDLE ASSEMBLY
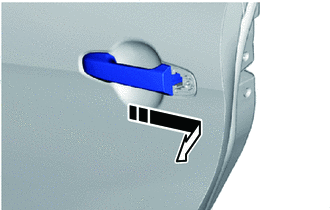
- Remove the rear door outside handle assembly as shown in the illustration.
 Courtesy of © TOYOTA, LICENSE AGREEMENT TMS1002 Courtesy of © TOYOTA, LICENSE AGREEMENT TMS1002
|
|
Remove in this Direction |
- REMOVE REAR DOOR FRONT OUTSIDE HANDLE PAD
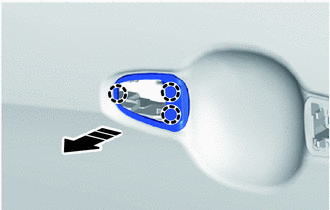
- Disengage the claws to remove the rear door front outside handle pad.
 Courtesy of © TOYOTA, LICENSE AGREEMENT TMS1002 Courtesy of © TOYOTA, LICENSE AGREEMENT TMS1002
|
|
Remove in this Direction |
- REMOVE REAR DOOR REAR OUTSIDE HANDLE PAD
- Disengage the claws to remove the rear door rear outside handle pad.
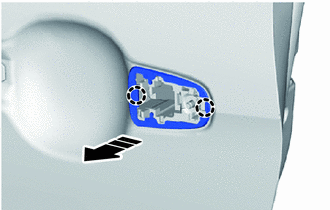 Courtesy of © TOYOTA, LICENSE AGREEMENT TMS1002 Courtesy of © TOYOTA, LICENSE AGREEMENT TMS1002
|
|
Remove in this Direction |
- REMOVE REAR DOOR OUTSIDE HANDLE FRAME SUB-ASSEMBLY
- Using a T30 "TORX" socket wrench, loosen the screw.
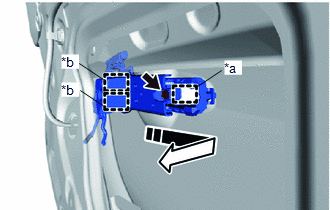 Courtesy of © TOYOTA, LICENSE AGREEMENT TMS1002 Courtesy of © TOYOTA, LICENSE AGREEMENT TMS1002
|
| *a |
Grommet |
| *b |
Guide |
|
Remove in this Direction |
- Disengage the grommet and guides to remove the rear door outside handle frame sub-assembly as shown in the illustration.
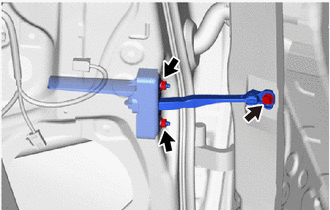
- REMOVE REAR DOOR CHECK ASSEMBLY
- Remove the bolt, 2 nuts and the rear door check assembly.
 Courtesy of © TOYOTA, LICENSE AGREEMENT TMS1002 Courtesy of © TOYOTA, LICENSE AGREEMENT TMS1002
|
- REMOVE REAR DOOR WEATHERSTRIP
- Using a clip remover, remove the 2 clips.
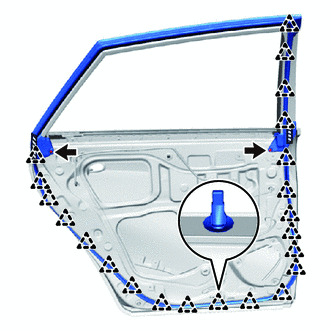 Courtesy of © TOYOTA, LICENSE AGREEMENT TMS1002 Courtesy of © TOYOTA, LICENSE AGREEMENT TMS1002
|
|
Double-side Tape |
- Using a clip remover, disengage the clips.
- Remove the double-side tape and rear door weatherstrip.
NOTE:
Remove any remaining double-side tape from the rear door panel.
- REMOVE REAR DOOR BELT MOULDING ASSEMBLY
Refer to PROCEDURE - Step 15
- REMOVE REAR DOOR WINDOW FRAME FRONT MOULDING
Refer to PROCEDURE - Step 6
- REMOVE REAR DOOR WINDOW FRAME UPPER MOULDING
Refer to PROCEDURE - Step 7
- REMOVE REAR DOOR WINDOW FRAME REAR MOULDING
Refer to PROCEDURE - Step 8
- REMOVE REAR DOOR LOWER OUTSIDE STRIPE
Refer to PROCEDURE - Step 9
- REMOVE REAR DOOR OUTSIDE STRIPE
Refer to PROCEDURE - Step 10
- REMOVE REAR DOOR UPPER OUTSIDE STRIPE
Refer to PROCEDURE - Step 11
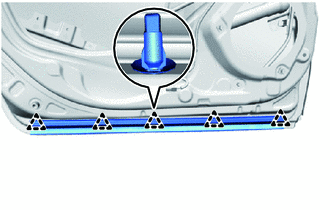
- REMOVE NO. 2 REAR DOOR WEATHERSTRIP
- Using a clip remover, disengage the clips to remove the No. 2 rear door weatherstrip.
 Courtesy of © TOYOTA, LICENSE AGREEMENT TMS1002 Courtesy of © TOYOTA, LICENSE AGREEMENT TMS1002
|
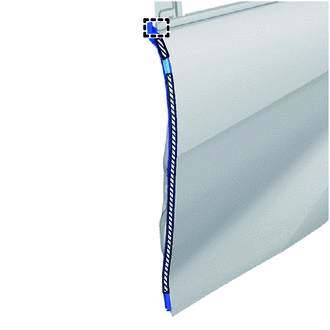
- REMOVE NO. 3 REAR DOOR WEATHERSTRIP
- Remove the double-side tape.
 Courtesy of © TOYOTA, LICENSE AGREEMENT TMS1002 Courtesy of © TOYOTA, LICENSE AGREEMENT TMS1002
|
|
Double-side Tape |
NOTE:
Remove any remaining double-side tape from the rear door panel.
- Disengage the guide to remove the No. 3 rear door weatherstrip.
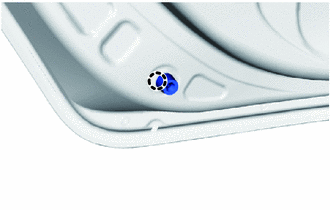
- REMOVE REAR DOOR PANEL CUSHION
- Disengage the claw to remove the rear door panel cushion.
 Courtesy of © TOYOTA, LICENSE AGREEMENT TMS1002 Courtesy of © TOYOTA, LICENSE AGREEMENT TMS1002
|
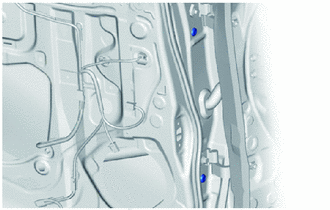
- REMOVE HOLE PLUG
- Remove the 2 hole plugs.
 Courtesy of © TOYOTA, LICENSE AGREEMENT TMS1002 Courtesy of © TOYOTA, LICENSE AGREEMENT TMS1002
|