- PRECAUTION
Refer to PRECAUTION [11/2015 -]
- DISCONNECT FRONT DOOR OPENING TRIM WEATHERSTRIP LH
- Disconnect the front door opening trim weatherstrip LH.
- REMOVE FRONT PILLAR GARNISH LH
Refer to PROCEDURE - Step 17 [11/2015 - 12/2018]
, or refer to PROCEDURE - Step 20 [12/2018 - 07/2020]
, or refer to PROCEDURE - Step 22 [07/2020 -]
- REMOVE NO. 1 INSTRUMENT PANEL SPEAKER PANEL SUB-ASSEMBLY
- Disengage the 2 clips and 3 claws as shown in the illustration.
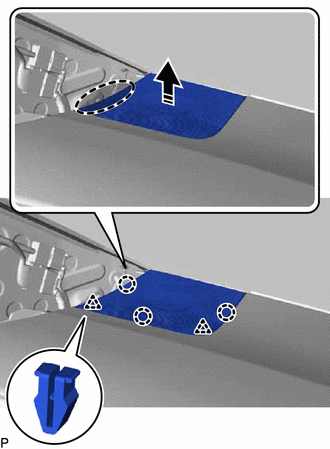 Courtesy of © TOYOTA, LICENSE AGREEMENT TMS1002 Courtesy of © TOYOTA, LICENSE AGREEMENT TMS1002
|
 |
Place Hand Here |
 |
Remove in this Direction |
- Disengage the 2 guides to remove the No. 1 instrument panel speaker panel sub-assembly as shown in the illustration.
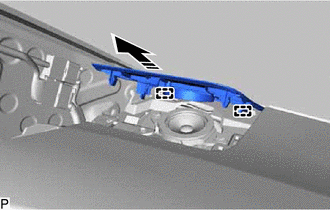 Courtesy of © TOYOTA, LICENSE AGREEMENT TMS1002 Courtesy of © TOYOTA, LICENSE AGREEMENT TMS1002
|
|
Remove in this Direction |
- REMOVE FRONT NO. 2 SPEAKER ASSEMBLY (for LH Side)
Refer to PROCEDURE - Step 4
- DISCONNECT FRONT DOOR OPENING TRIM WEATHERSTRIP RH
- Disconnect the front door opening trim weatherstrip RH.
- REMOVE FRONT PILLAR GARNISH RH
HINT:
Use the same procedure as for the LH side.
- REMOVE NO. 2 INSTRUMENT PANEL SPEAKER PANEL SUB-ASSEMBLY
- Disengage the 2 clips and 3 claws as shown in the illustration.
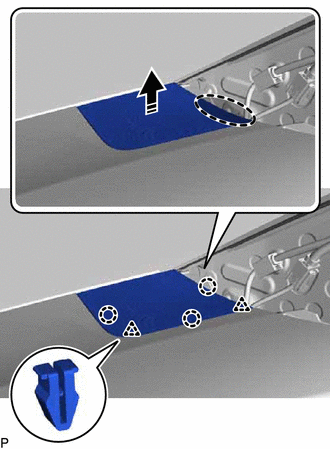 Courtesy of © TOYOTA, LICENSE AGREEMENT TMS1002 Courtesy of © TOYOTA, LICENSE AGREEMENT TMS1002
|
|
Place Hand Here |
|
Remove in this Direction |
- Disengage the 2 guides to remove the No. 2 instrument panel speaker panel sub-assembly as shown in the illustration.
 Courtesy of © TOYOTA, LICENSE AGREEMENT TMS1002 Courtesy of © TOYOTA, LICENSE AGREEMENT TMS1002
|
|
Remove in this Direction |
- REMOVE FRONT NO. 2 SPEAKER ASSEMBLY (for RH Side)
HINT:
Use the same procedure as for the LH side.
- REMOVE INSTRUMENT CLUSTER FINISH PANEL END (w/ Headup Display)
- Disengage the 5 claws as shown in the illustration.
 Courtesy of © TOYOTA, LICENSE AGREEMENT TMS1002 Courtesy of © TOYOTA, LICENSE AGREEMENT TMS1002
|
|
Place Hand Here |
|
Remove in this Direction |
- Disengage the 2 guides to remove the instrument cluster finish panel end as shown in the illustration.
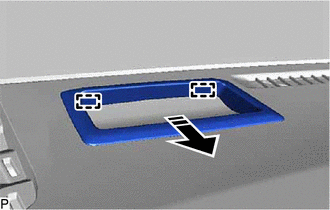 Courtesy of © TOYOTA, LICENSE AGREEMENT TMS1002 Courtesy of © TOYOTA, LICENSE AGREEMENT TMS1002
|
|
Remove in this Direction |
- REMOVE INSTRUMENT CLUSTER FINISH PANEL ASSEMBLY
Refer to PROCEDURE - Step 9 [11/2015 - 12/2018]
, or refer to PROCEDURE - Step 9 [12/2018 - 07/2020]
, or refer to PROCEDURE - Step 9 [07/2020 -]
- REMOVE UPPER INSTRUMENT PANEL ASSEMBLY
- Disconnect each connector.
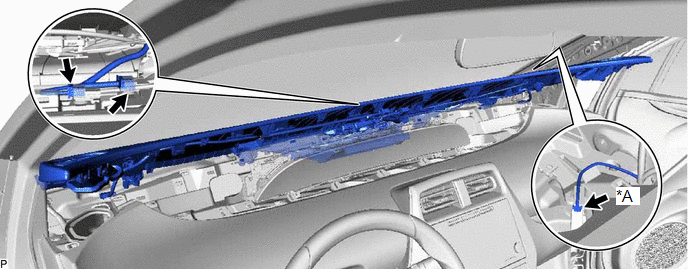 Courtesy of © TOYOTA, LICENSE AGREEMENT TMS1002 Courtesy of © TOYOTA, LICENSE AGREEMENT TMS1002
|
| *A |
w/ Navigation Antenna |
- |
- |
- Remove the upper instrument panel assembly as shown in the illustration.
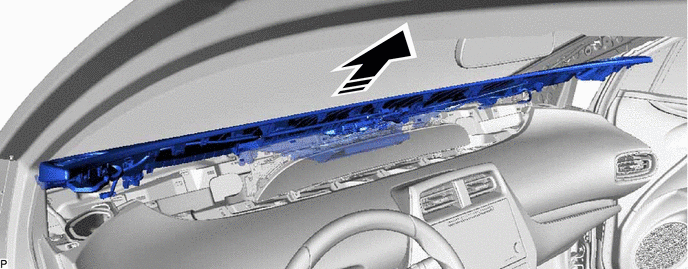 Courtesy of © TOYOTA, LICENSE AGREEMENT TMS1002 Courtesy of © TOYOTA, LICENSE AGREEMENT TMS1002
|
|
Remove in this Direction |
- |
- |
NOTE:
- Do not damage the upper instrument panel assembly.
- Do not allow the wire harnesses to interfere with the surrounding parts.