Installation [04/2018 - 08/2020]: Procedure
WARNING: This page is about a different car, the 2022 Toyota Avalon, 2021 Toyota Avalon, 2020 Toyota Avalon, and 2019 Toyota Avalon. However, it is still accessible from the selected car via links, so may be relevant.
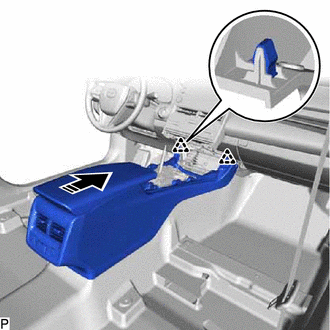
- INSTALL CONSOLE ASSEMBLY
- Engage the 2 clips as shown in the illustration.
 Courtesy of © TOYOTA, LICENSE AGREEMENT TMS1002 Courtesy of © TOYOTA, LICENSE AGREEMENT TMS1002
|
 |
Install in this Direction |
- Install the console box assembly with the 4 bolts and 2 screws.
- Connect the 2 connectors.
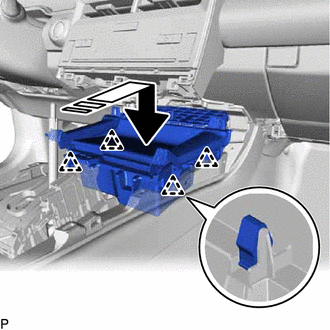
- INSTALL UPPER FRONT CONSOLE PANEL SUB-ASSEMBLY
- Engage the clamp and connect the connector.
- Engage the 4 clips as shown in the illustration to install the upper front console panel sub-assembly.
 Courtesy of © TOYOTA, LICENSE AGREEMENT TMS1002 Courtesy of © TOYOTA, LICENSE AGREEMENT TMS1002
|
|
Install in this Direction |
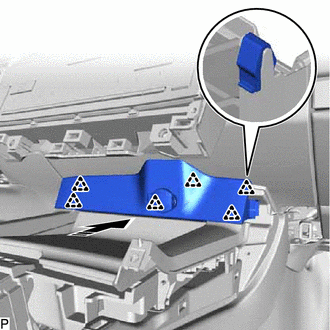
- INSTALL CONSOLE BOX BEZEL
- Connect the connector.
- Engage the 6 clips as shown in the illustration to install the console box bezel.
 Courtesy of © TOYOTA, LICENSE AGREEMENT TMS1002 Courtesy of © TOYOTA, LICENSE AGREEMENT TMS1002
|
|
Install in this Direction |
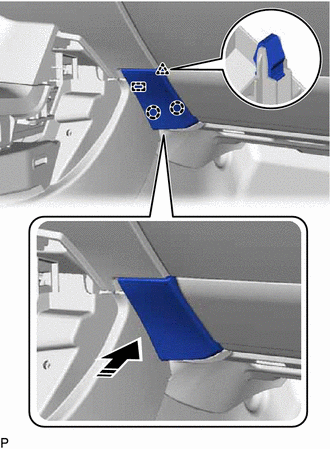
- INSTALL INSTRUMENT PANEL FINISH PANEL END LH
- Engage the guide, 2 claws and clip as shown in the illustration to install the instrument panel finish panel end LH.
 Courtesy of © TOYOTA, LICENSE AGREEMENT TMS1002 Courtesy of © TOYOTA, LICENSE AGREEMENT TMS1002
|
|
Install in this Direction |
- INSTALL REAR UPPER CONSOLE PANEL SUB-ASSEMBLY
- Connect the 2 connectors.
- Engage the 7 clips as shown in the illustration to install the rear upper console panel sub-assembly.
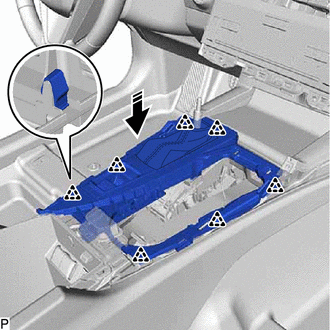 Courtesy of © TOYOTA, LICENSE AGREEMENT TMS1002 Courtesy of © TOYOTA, LICENSE AGREEMENT TMS1002
|
|
Install in this Direction |
- INSTALL SHIFT LEVER KNOB SUB-ASSEMBLY
for Gasoline Model: Refer to PROCEDURE - Step 1
for HV Model: Refer to PROCEDURE - Step 1
- INSTALL CENTER INSTRUMENT CLUSTER FINISH PANEL SUB-ASSEMBLY
- Engage the 2 guides and 2 clips as shown in the illustration.
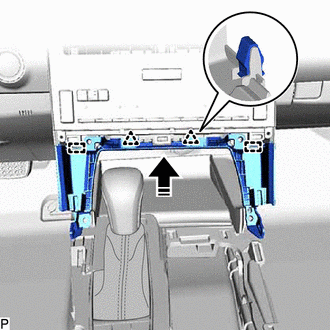 Courtesy of © TOYOTA, LICENSE AGREEMENT TMS1002 Courtesy of © TOYOTA, LICENSE AGREEMENT TMS1002
|
|
Install in this Direction |
- Install the center instrument cluster finish panel sub-assembly with the 4 screws.
- INSTALL CONSOLE BOX POCKET SUB-ASSEMBLY
- Engage the 12 clips as shown in the illustration to install the console box pocket sub-assembly.
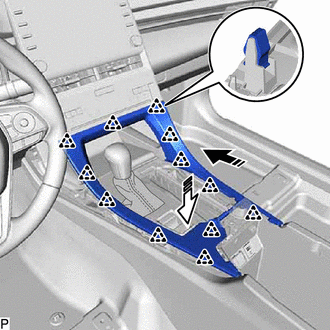 Courtesy of © TOYOTA, LICENSE AGREEMENT TMS1002 Courtesy of © TOYOTA, LICENSE AGREEMENT TMS1002
|
|
Install in this Direction (1) |
 |
Install in this Direction (2) |
- INSTALL FRONT CONSOLE UPPER PANEL GARNISH
- Engage the 2 clamps and connect the 4 connectors.
- Engage the 6 clips as shown in the illustration to install the front console upper panel garnish.
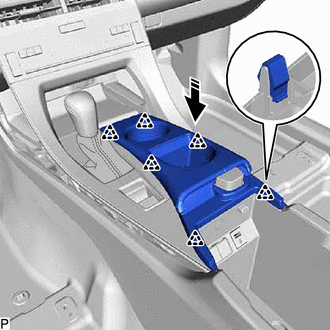 Courtesy of © TOYOTA, LICENSE AGREEMENT TMS1002 Courtesy of © TOYOTA, LICENSE AGREEMENT TMS1002
|
|
Install in this Direction |
- INSTALL LOWER INSTRUMENT PANEL FINISH PANEL RH
- Engage the 8 clips as shown in the illustration to install the lower instrument panel finish panel RH.
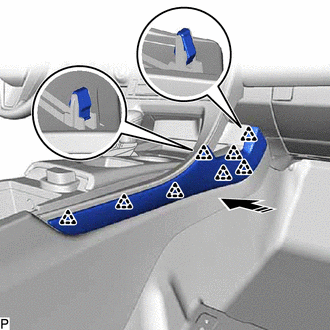 Courtesy of © TOYOTA, LICENSE AGREEMENT TMS1002 Courtesy of © TOYOTA, LICENSE AGREEMENT TMS1002
|
|
Install in this Direction |
- INSTALL LOWER INSTRUMENT PANEL FINISH PANEL LH
- Engage the 9 clips as shown in the illustration to install the lower instrument panel finish panel LH.
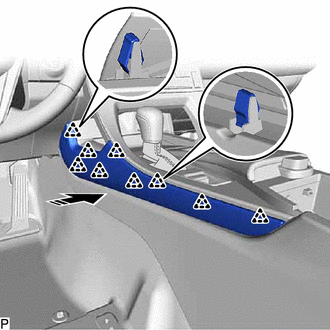 Courtesy of © TOYOTA, LICENSE AGREEMENT TMS1002 Courtesy of © TOYOTA, LICENSE AGREEMENT TMS1002
|
|
Install in this Direction |
- INSTALL CONSOLE BOX CARPET
- Install the console box carpet.
- INSTALL CONSOLE BOX POCKET
- Install the console box pocket.