Parking Brake Cable: Removal
- REMOVE REAR WHEEL
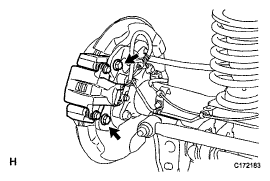
- DISCONNECT REAR DISC BRAKE CYLINDER ASSEMBLY LH
- Remove the 2 bolts and disconnect the rear disc brake cylinder.
NOTE:
- Do not disconnect the flexible hose from the disc brake cylinder.
- Do not twist or bend the flexible hose.
- Hang the disc brake cylinder with a piece of wire.
 Courtesy of © TOYOTA, LICENSE AGREEMENT TMS1002
- REMOVE REAR DISC
(See
REMOVAL
)
- REMOVE PARKING BRAKE SHOE RETURN SPRING
(See DISASSEMBLY
)
- REMOVE NO. 1 PARKING BRAKE SHOE ASSEMBLY LH
(See DISASSEMBLY
)
- REMOVE NO. 2 PARKING BRAKE SHOE ASSEMBLY LH
(See DISASSEMBLY
)
- REMOVE PARKING BRAKE SHOE LEVER SUBASSEMBLY LH
(See DISASSEMBLY
)
- DISCONNECT NO. 3 PARKING BRAKE CABLE ASSEMBLY
(See DISASSEMBLY
)
- RECOVER REFRIGERANT FROM REFRIGERATION SYSTEM (w/ Cool Box)
(See
REPLACEMENT
)
- REMOVE FRONT SEAT ASSEMBLY LH (w/ Cool Box)
- Remove the front seat assembly LH (See
REMOVAL
).
- REMOVE NO. 2 INSTRUMENT PANEL FINISH PANEL CUSHION
(See
REMOVAL
)
- REMOVE LOWER INSTRUMENT PANEL PAD SUBASSEMBLY LH
(See
REMOVAL
)
- REMOVE NO. 1 INSTRUMENT PANEL FINISH PANEL CUSHION
(See
REMOVAL
)
- REMOVE LOWER INSTRUMENT PANEL PAD SUBASSEMBLY RH
(See
REMOVAL
)
- REMOVE SHIFT LEVER KNOB SUB-ASSEMBLY
(See
REMOVAL
)
- REMOVE LOWER CENTER INSTRUMENT CLUSTER FINISH PANEL SUB-ASSEMBLY
(See
REMOVAL
)
- REMOVE REAR UPPER CONSOLE PANEL SUBASSEMBLY
(See
REMOVAL
)
- REMOVE CONSOLE CUP HOLDER BOX SUBASSEMBLY
(See
REMOVAL
)
- REMOVE UPPER CONSOLE PANEL SUB-ASSEMBLY
(See
REMOVAL
)
- REMOVE NO. 1 COOLER COVER (w/ Cool Box)
(See
REMOVAL
)
- REMOVE REAR CONSOLE END PANEL SUBASSEMBLY
(See
REMOVAL
)
- REMOVE REAR CONSOLE BOX SUB-ASSEMBLY (w/ o Cool Box)
(See
REMOVAL
)
- REMOVE COOLING BOX ASSEMBLY (w/ Cool Box)
(See
REMOVAL
)
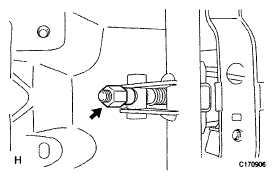
- REMOVE NO. 2 PARKING BRAKE CABLE ASSEMBLY
- Loosen the adjusting nut.
 Courtesy of © TOYOTA, LICENSE AGREEMENT TMS1002
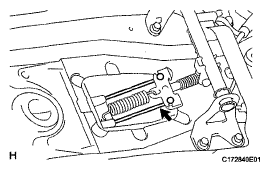
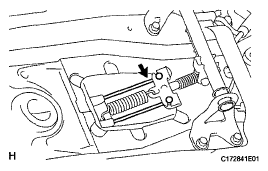
- Disconnect the No. 2 parking brake cable from the No. 1 parking brake pull rod.
 Courtesy of © TOYOTA, LICENSE AGREEMENT TMS1002
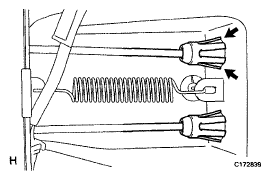
- Pinch the claws of the No. 2 parking brake cable and push the cable outside of the vehicle slightly.
- Incline the fuel tank (See
REMOVAL
).
 Courtesy of © TOYOTA, LICENSE AGREEMENT TMS1002
- Remove the 6 bolts and No. 2 parking brake cable.
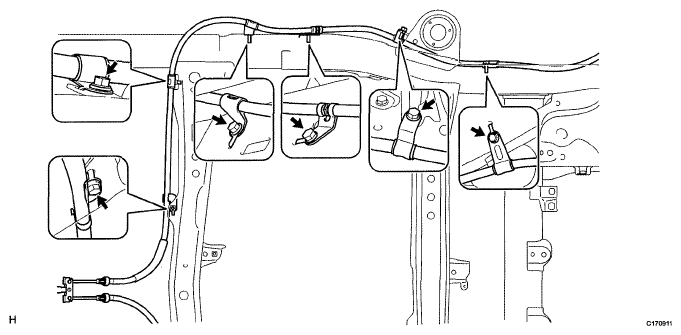 Courtesy of © TOYOTA, LICENSE AGREEMENT TMS1002
- Remove the No. 2 parking brake cable clamp from the No. 2 parking brake cable.
- REMOVE NO. 3 PARKING BRAKE CABLE ASSEMBLY
- Loosen the adjusting nut.
Courtesy of © TOYOTA, LICENSE AGREEMENT TMS1002
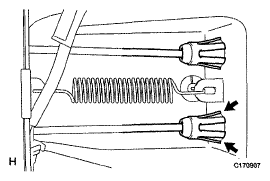
- Disconnect the No. 3 parking brake cable from the No. 1 parking brake pull rod.
 Courtesy of © TOYOTA, LICENSE AGREEMENT TMS1002
- Pinch the claws of the No. 3 parking brake cable and push the cable outside of the vehicle slightly.
- Remove the 6 bolts and No. 3 parking brake cable.
 Courtesy of © TOYOTA, LICENSE AGREEMENT TMS1002
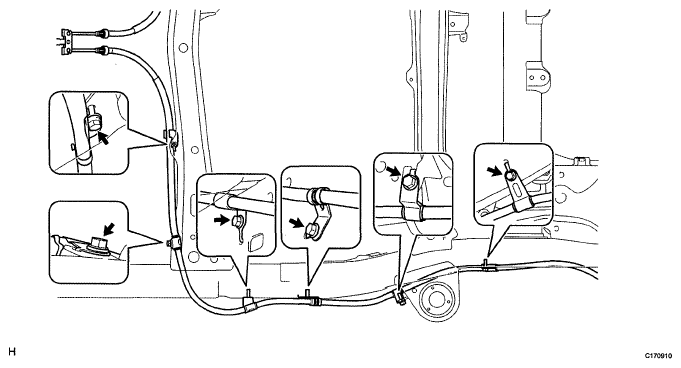 Courtesy of © TOYOTA, LICENSE AGREEMENT TMS1002
- Remove the No. 3 parking brake cable clamp from the No. 3 parking brake cable.