Air Conditioning Unit: Disassembly
- REMOVE IMMOBILISER CODE ECU (w/ Smart Key System)
(See
REMOVAL
)
- REMOVE TRANSPONDER KEY ECU (w/o Smart Key System)
(See
REMOVAL
)
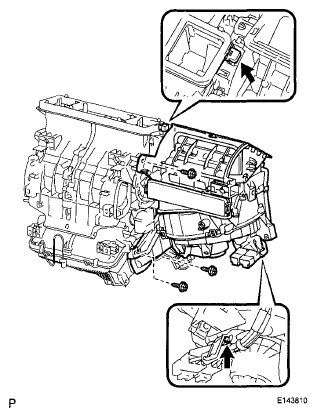 Courtesy of © TOYOTA, LICENSE AGREEMENT TMS1002
- REMOVE AIR OUTLET CONTROL SERVO MOTOR (for Automatic Air Conditioning System)
- Disconnect the connector.
- Remove the 3 screws and the air outlet control servo motor.
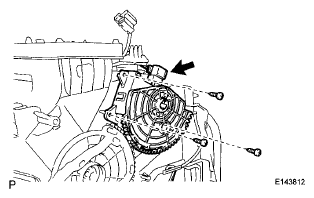 Courtesy of © TOYOTA, LICENSE AGREEMENT TMS1002
- REMOVE AIR MIX CONTROL SERVO MOTOR (for TMC Made with Automatic Air Conditioning System)
- Disconnect the connector.
- Remove the 3 screws and the air mix control servo motor.
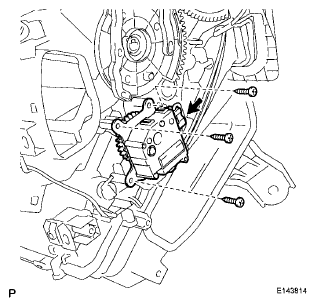 Courtesy of © TOYOTA, LICENSE AGREEMENT TMS1002
- REMOVE AIR MIX CONTROL SERVO MOTOR (for TMMC, NUMMI Made with Automatic Air Conditioning System)
- Disconnect the connector.
- Remove the 2 screws and the air mix control servo motor.
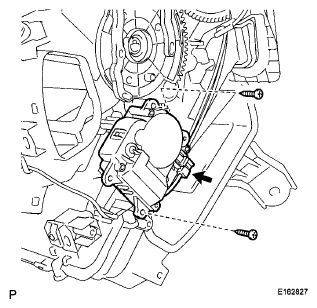 Courtesy of © TOYOTA, LICENSE AGREEMENT TMS1002
- REMOVE NO. 2 HEATER CONTROL CABLE SUB-ASSEMBLY (for Manual Air Conditioning System)
- Using a screwdriver with the tip taped, disengage the claw and remove the No. 2 heater control cable sub-assembly.
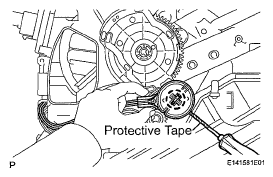 Courtesy of © TOYOTA, LICENSE AGREEMENT TMS1002
- REMOVE AIR MIX DAMPER CONTROL CABLE SUB-ASSEMBLY (for Manual Air Conditioning System)
- Using a screwdriver with the tip taped, disengage the claw and remove the air mix damper control cable sub-assembly.
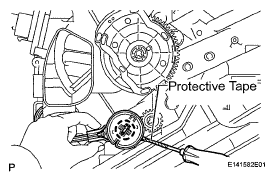 Courtesy of © TOYOTA, LICENSE AGREEMENT TMS1002
- REMOVE QUICK HEATER ASSEMBLY (w/ PTC Heater)
- Disengage each clamp.
- Remove the 2 screws.
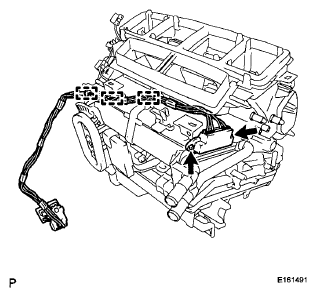 Courtesy of © TOYOTA, LICENSE AGREEMENT TMS1002
- Remove the quick heater assembly as shown in the illustration.
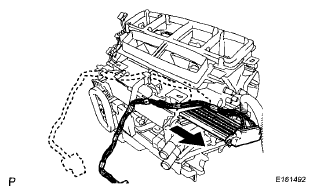 Courtesy of © TOYOTA, LICENSE AGREEMENT TMS1002
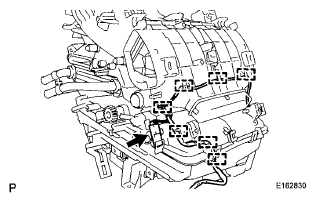
- REMOVE AIR CONDITIONING HARNESS ASSEMBLY (for Automatic Air Conditioning System)
- Disconnect the connector.
- Disengage each clamp and remove the air conditioning harness.
 Courtesy of © TOYOTA, LICENSE AGREEMENT TMS1002
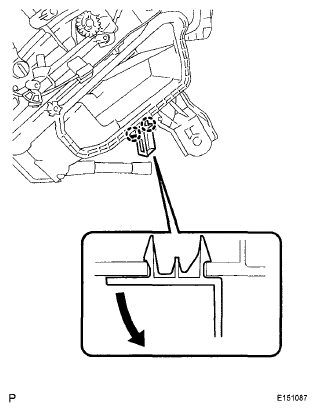
- REMOVE CONSOLE MOUNTING BRACKET RH
- Disengage the 2 claws and remove the console mounting bracket RH as shown in the illustration.
 Courtesy of © TOYOTA, LICENSE AGREEMENT TMS1002
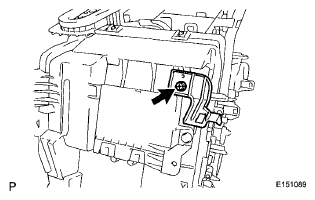
- REMOVE CONSOLE MOUNTING BRACKET LH
- Remove the screw and the console mounting bracket LH.
 Courtesy of © TOYOTA, LICENSE AGREEMENT TMS1002
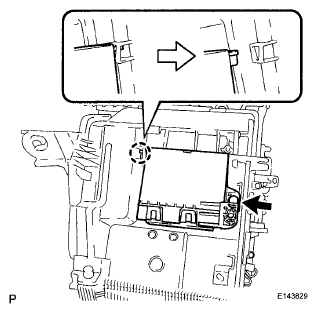
- REMOVE AIR CONDITIONING AMPLIFIER ASSEMBLY
- Remove the screw.
- Disengage the claw and remove the air conditioning amplifier assembly as shown in the illustration.
 Courtesy of © TOYOTA, LICENSE AGREEMENT TMS1002
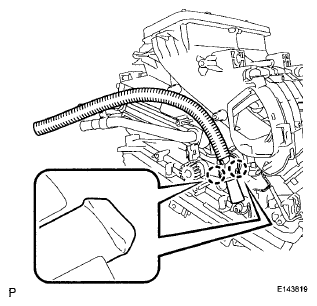
- REMOVE AIR CONDITIONING DUCT SUB-ASSEMBLY (for Automatic Air Conditioning System)
- Disengage the 2 claws and remove the air conditioning duct sub-assembly.
 Courtesy of © TOYOTA, LICENSE AGREEMENT TMS1002
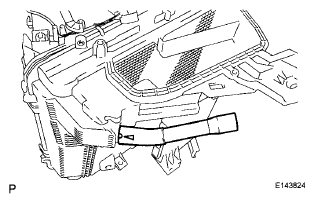
- REMOVE DRAIN COOLER HOSE
- Remove the drain cooler hose from the air conditioning radiator assembly.
 Courtesy of © TOYOTA, LICENSE AGREEMENT TMS1002
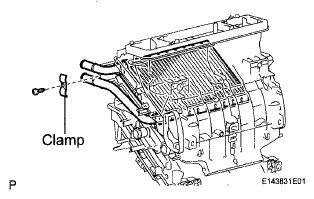
- REMOVE HEATER RADIATOR UNIT SUB-ASSEMBLY
- Remove the screw and the clamp.
- Remove the heater radiator unit sub-assembly from the air conditioning unit assembly.
 Courtesy of © TOYOTA, LICENSE AGREEMENT TMS1002
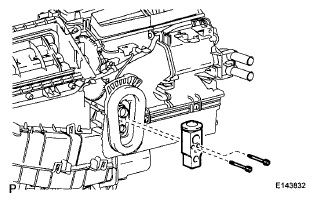
- REMOVE COOLER EXPANSION VALVE
- Using a 4 mm hexagon wrench, remove the 2 hexagon bolts and cooler expansion valve.
 Courtesy of © TOYOTA, LICENSE AGREEMENT TMS1002
- REMOVE NO. 1 COOLER EVAPORATOR SUB-ASSEMBLY
- Remove the 4 screws.
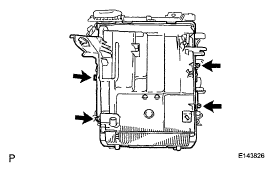 Courtesy of © TOYOTA, LICENSE AGREEMENT TMS1002
- Disengage the 4 claws and remove the lower heater case.
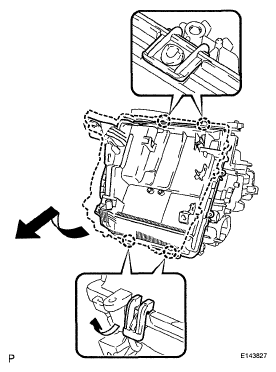 Courtesy of © TOYOTA, LICENSE AGREEMENT TMS1002
- Disengage the clamp, and remove the No. 1 cooler evaporator sub-assembly together with the No. 1 cooler thermistor.
- Remove the 2 O-rings.
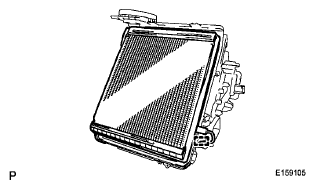 Courtesy of © TOYOTA, LICENSE AGREEMENT TMS1002
- REMOVE NO. 1 COOLER THERMISTOR
- Remove the No. 1 cooler thermistor from the No. 1 cooler evaporator sub-assembly.
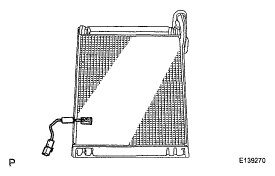 Courtesy of © TOYOTA, LICENSE AGREEMENT TMS1002