Rear Console Box: Installation
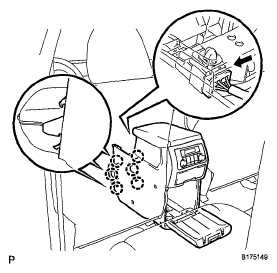
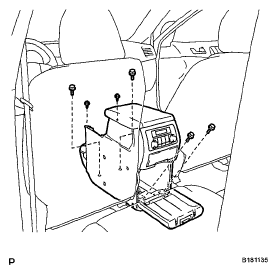
- INSTALL CONSOLE BOX ASSEMBLY (w/ Rear Air Conditioning System)
- Engage the 6 claws.
- Connect the connector.
 Courtesy of © TOYOTA, LICENSE AGREEMENT TMS1002
- Install the console box assembly with the 4 bolts and 2 screws.
 Courtesy of © TOYOTA, LICENSE AGREEMENT TMS1002
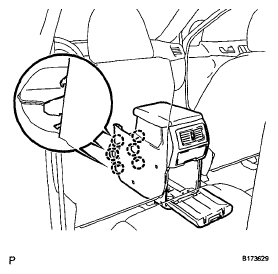
- INSTALL CONSOLE BOX ASSEMBLY (w/o Rear Air Conditioning System)
- Engage the 6 claws.
 Courtesy of © TOYOTA, LICENSE AGREEMENT TMS1002
- Install the console box assembly with the 4 bolts and 2 screws.
 Courtesy of © TOYOTA, LICENSE AGREEMENT TMS1002
- INSTALL LOWER REAR CONSOLE BOX
- Install the lower rear console box.
- INSTALL NO. 2 CONSOLE BOX DUCT (w/o Rear Air Conditioning System)
(See INSTALLATION
)
- INSTALL UPPER CONSOLE PANEL SUB-ASSEMBLY
(See INSTALLATION
)
- INSTALL CENTER INSTRUMENT CLUSTER FINISH PANEL ASSEMBLY (w/o Smart Key System)
(See INSTALLATION
)
- INSTALL CENTER INSTRUMENT CLUSTER FINISH PANEL ASSEMBLY (w/ Smart Key System)
(See INSTALLATION
)