EV Charger
WARNING: This page is about a different variant/trim than selected.
- Remove the charger cooling blower. Refer to HYBRID ELECTRIC VEHICLE>ELECTRIC VEHICLE CHARGER>REMOVAL>COOLING BLOWER .
- Remove the duct - outlet charger INN.
- Remove the clip and remove the duct - outlet charger INN.
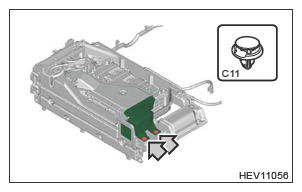 Courtesy of SUBARU OF AMERICA, INC. Courtesy of SUBARU OF AMERICA, INC.
|
- Remove the plate - charger rear.
- Remove the bolt and remove the plate - charger rear.
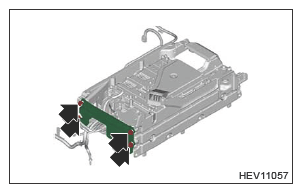 Courtesy of SUBARU OF AMERICA, INC. Courtesy of SUBARU OF AMERICA, INC.
|
- Remove the plate - charger side.
- Remove the bolt and remove the plate - charger side.
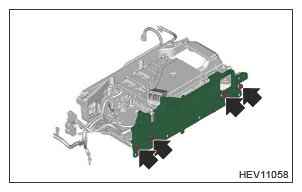 Courtesy of SUBARU OF AMERICA, INC. Courtesy of SUBARU OF AMERICA, INC.
|
- Remove the HV battery charger wire No. 1.
- Remove the bolts and disconnect the ground terminal.
- Release the claws and then remove the cable clip.
- Disconnect the connector and remove the HV battery charger wire No. 1.
CAUTION:
Apply tape or similar item (that will not leave adhesive residue) to close the opening after the cable was disconnected so that foreign matter, water drops, or other substance does not enter.
- Use protective tape to wrap a flat tip screwdriver of an appropriate size for the insertion opening, and disengage lock (a).
- Press the tab (b) to disconnect the connector.
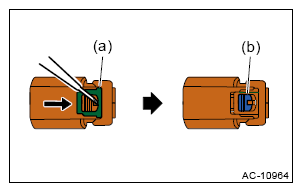 Courtesy of SUBARU OF AMERICA, INC. Courtesy of SUBARU OF AMERICA, INC.
|
- Remove the HV battery charger wire No. 1.
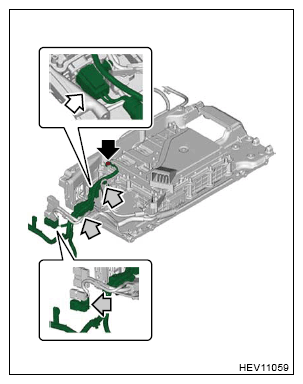 Courtesy of SUBARU OF AMERICA, INC. Courtesy of SUBARU OF AMERICA, INC.
|
- Remove the HV battery charger wire No. 2.
- Release the claws and then remove the cable clip.
- Disconnect the claws and hooks and remove the cable protector.
- Disconnect the connector and remove the HV battery charger wire No. 2.
CAUTION:
Apply tape or similar item (that will not leave adhesive residue) to close the opening after the cable was disconnected so that foreign matter, water drops, or other substance does not enter.
- Use protective tape to wrap a flat tip screwdriver of an appropriate size for the insertion opening, and disengage lock (a).
- Press the tab (b) to disconnect the connector.
Courtesy of SUBARU OF AMERICA, INC.
|
- Remove the HV battery charger wire No. 2.
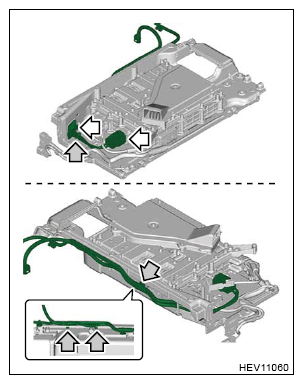 Courtesy of SUBARU OF AMERICA, INC. Courtesy of SUBARU OF AMERICA, INC.
|
- Remove the charger harness.
- Remove the bolts and disconnect the ground terminal.
- Release the claws and then remove the harness clip.
- Disconnect the connector and remove the charger harness.
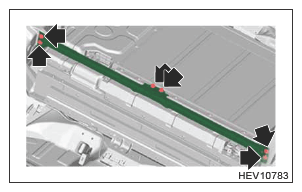 Courtesy of SUBARU OF AMERICA, INC. Courtesy of SUBARU OF AMERICA, INC.
|
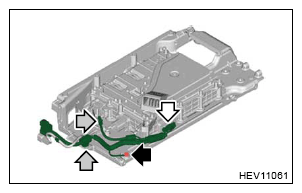 Courtesy of SUBARU OF AMERICA, INC. Courtesy of SUBARU OF AMERICA, INC.
|
- Remove the bracket - harness.
- Remove the bolts, and then remove the bracket - harness
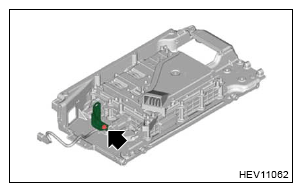 Courtesy of SUBARU OF AMERICA, INC. Courtesy of SUBARU OF AMERICA, INC.
|
- Remove the EV charger.
- Remove the bolt and remove the EV charger from the frame - charger.
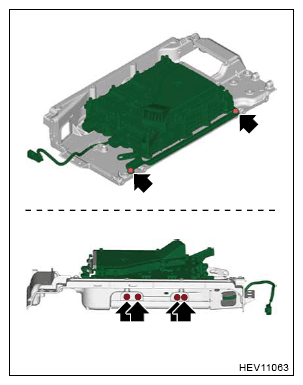 Courtesy of SUBARU OF AMERICA, INC. Courtesy of SUBARU OF AMERICA, INC.
|
- Remove the bolts, and then remove the bracket - EV charger.
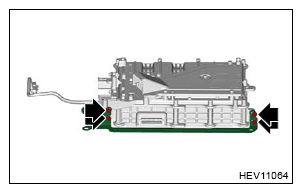 Courtesy of SUBARU OF AMERICA, INC. Courtesy of SUBARU OF AMERICA, INC.
|