Installing Main Wire Harness In Passenger Compartment
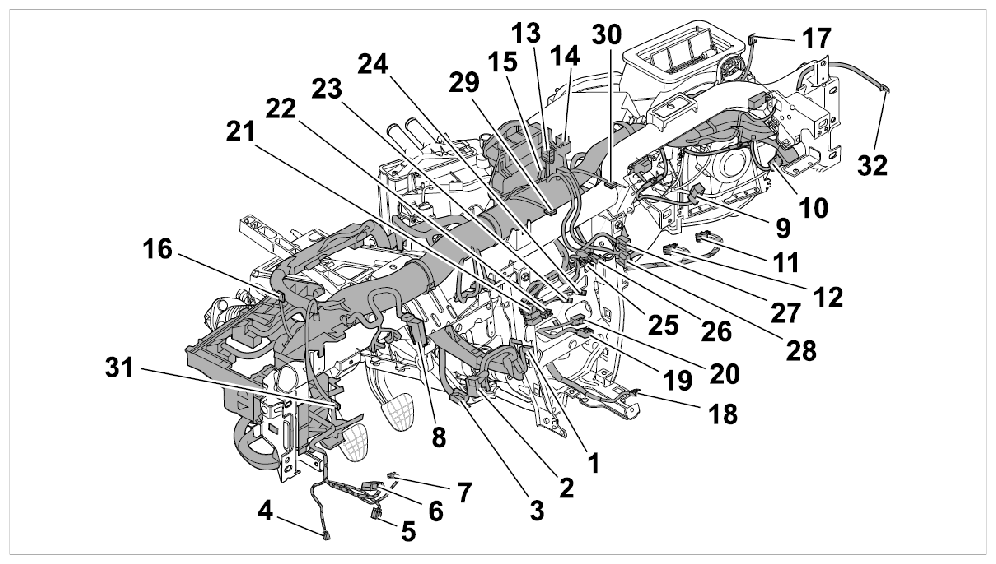 Courtesy of PORSCHE CARS NORTH AMERICA, INC.
- 1-3
- Connector for steering column switch
- 4
- Connector for main light switch
- 5
- Connector for ignition lock
- 6
- Connector for diagnostic box
- 7
- Connector for footwell light, left
- 8
- Connector for instrument cluster
- 9-10
- Connector for passenger's airbag, stage 1 and stage 2
- 11
- Connector for footwell light, right
- 12
- Plug connection for glove box
- 13
- Connector for stopwatch
- 14
- Connector for sun sensor
- 15
- Connector for center speaker
- 16-17
- Connector for loudspeaker, left and right
- 18
- Connector for switch console
- 19-20
- Connector for climate control
- 21-26
- Connector for PCM
- 27
- Connector for central locking
- 28
- Connector for hazard warning light switch
- 29-30
- Plug connection for illumination of center nozzle
- 31-32
- Plug connection for illumination of left and right nozzle
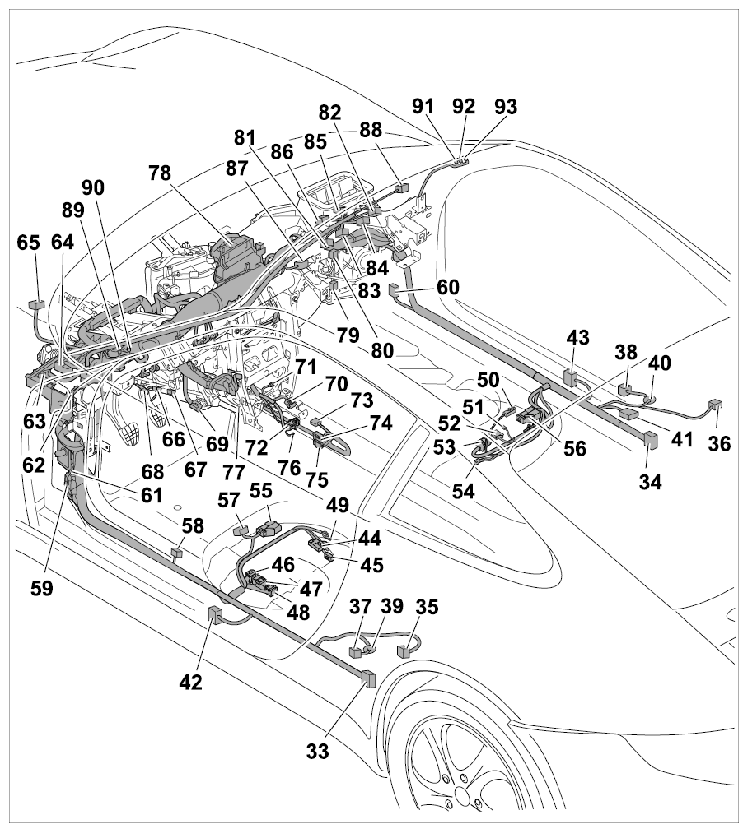 Courtesy of PORSCHE CARS NORTH AMERICA, INC.
- 33-34
- Plug connection between main wire harness and rear wire harness, left and right
- 35-36
- Connector for loudspeaker, rear left and right
- 37-38
- Connector for front seat-belt pretensioner, left and right
- 39-40
- Rubber sleeve
- 41
- Connector for Tiptronic control unit
- 42-43
- Connector for airbag sensor, center left and right
- 44-45
- Connector for ParkAssist control unit
- 46-48
- Connector for control unit for rear convenience systems
- 49
- Ground point under driver's seat
- 50-53
- Connector for telephone control unit
- 54
- Ground point under passenger's seat
- 55-56
- Connector for front seat, left and right
- 57
- Connector for driver's seat with memory
- 58
- Connector for door sill button module
- 59-60
- Plug connection between main wire harness and wire harness for door, left and right
- 61
- Fuse box
- 62
- Relay carrier
- 63-64
- Connector for vehicle electrical system control unit
- 65
- Connector for gateway control unit
- 66-67
- Connector for KESSY/PAS control unit
- 68
- Connector for brake light switch
- 69
- Connector for pedal sensor
- 70
- Plug connection between main wire harness and wire harness for center console
- 71
- Plug connection for telephone handset
- 72
- Connector for airbag triggering unit
- 73
- Connector for parking-brake lever contact switch
- 74-75
- Tiptronic position switch
- 76
- Ground point under unit carrier
- 77
- Connector for tilt sensor control unit
- 78
- Power distributor
- 79-80
- Plug connection between main wire harness and wire harness for heater/air-conditioning unit
- 81-82
- Connector for garage door opener control unit
- 83
- Connector for sunroof switch
- 84
- Connector for interior light
- 85
- Connector for sunroof motor
- 86
- Plug connection for rain sensor
- 87-88
- Plug connection for make-up mirror, left and right
- 89-93
- Connector for antenna unit, left and right
- Fasten main wire harness at center dashboard bracket.
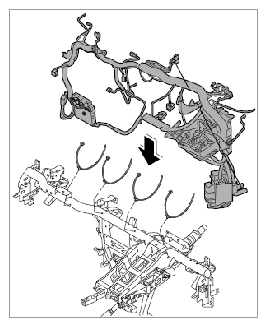 Courtesy of PORSCHE CARS NORTH AMERICA, INC.
- 1.1. Lay main wire harness and fasten with four new tie-wraps.
- Fasten main wire harness at right dashboard bracket.
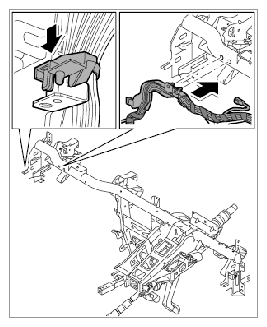 Courtesy of PORSCHE CARS NORTH AMERICA, INC.
- 2.1. Clip in main wire harness on both cable guides.
- Fasten main wire harness at left dashboard bracket.
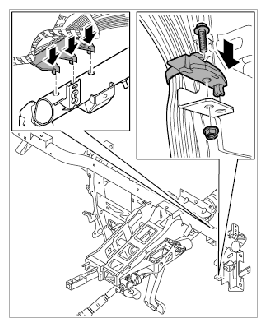 Courtesy of PORSCHE CARS NORTH AMERICA, INC.
- 3.1. Clip in main wire harness on cable guide.
- 3.2. Insert fastening screw and tighten fastening nut. → Tightening torque: 3.5 Nm (2.5 ft. lb.)
- Fasten holder for relay carrier.
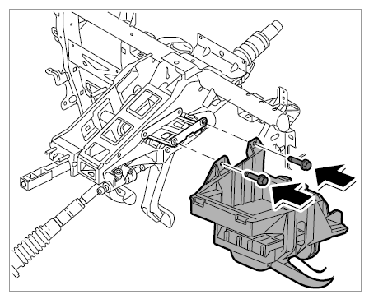 Courtesy of PORSCHE CARS NORTH AMERICA, INC.
- 4.1. Position holder for relay carrier and tighten with the two fastening screws to the dashboard bracket. → Tightening torque: 3.5 Nm (2.5 ft. lb.)
- Clip in cable guide on dashboard bracket.
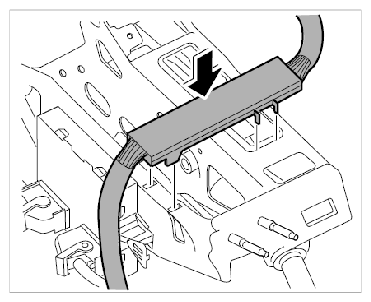 Courtesy of PORSCHE CARS NORTH AMERICA, INC.
- Clip in length compensation at the steering column.
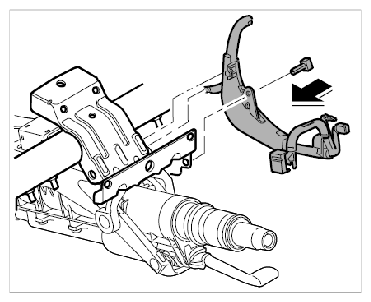 Courtesy of PORSCHE CARS NORTH AMERICA, INC.
- 6.1. Position length compensation at the steering column and fasten with the expansion rivet.
- Fasten ground points on dashboard bracket.
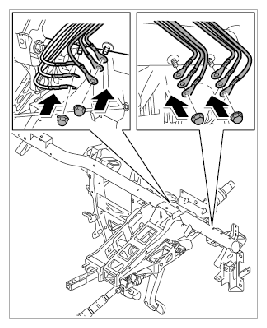 Courtesy of PORSCHE CARS NORTH AMERICA, INC.
- 7.1. Fit ground straps and tighten with fastening nuts. → Tightening torque: 9 Nm (6.5 ft. lb.)
- Push on connector for antenna amplifier, left and right -89 to 93-
. → 918419 REMOVING AND INSTALLING ANTENNA AMPLIFIER
- section on "Installing"
- Remove protective film of adhesive strip on main wire harness -area A-
and affix main wire harness to A-pillar.
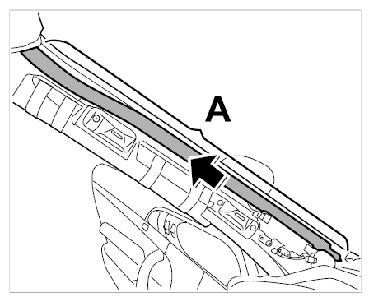 Courtesy of PORSCHE CARS NORTH AMERICA, INC.
- Clip in main wire harness at front of roof frame.
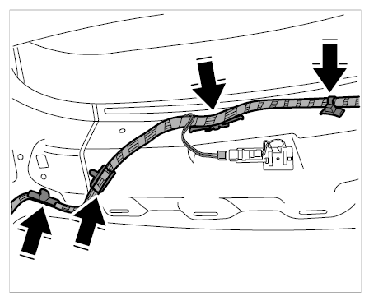 Courtesy of PORSCHE CARS NORTH AMERICA, INC.
- Clip in cable duct at front of roof frame.
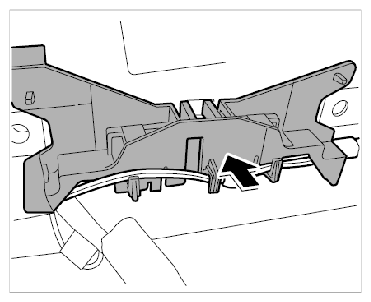 Courtesy of PORSCHE CARS NORTH AMERICA, INC.
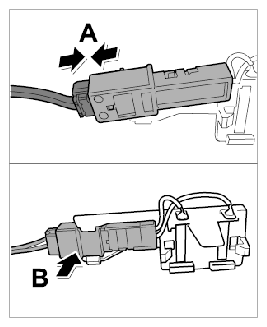
- Connect plug connection of make-up mirror, left and right -87 and 88-
.
 Courtesy of PORSCHE CARS NORTH AMERICA, INC.
- 12.1. Connect plug connection -arrows A-
until it engages securely.
- 12.2. Clip plug connection into console -arrow B-
.
- Connect plug connection -86-
until it engages securely. → 921219 REMOVING AND INSTALLING RAIN SENSOR
- section on "Installing"
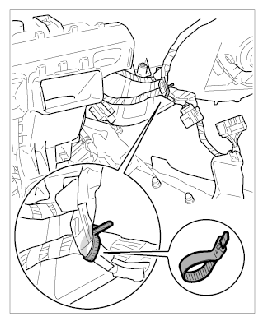
- Connect plug connections between main wire harness and wire harness for heater/air-conditioning unit -79 and 80-
.
 Courtesy of PORSCHE CARS NORTH AMERICA, INC.
- 14.1. Lay main wire harness to heater/air-conditioning unit wire harness and fix with a tie-wrap.
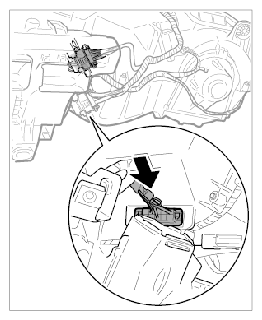
- 14.2. Push in upper electric plug connection at heater/air-conditioning unit until it engages securely.
 Courtesy of PORSCHE CARS NORTH AMERICA, INC.
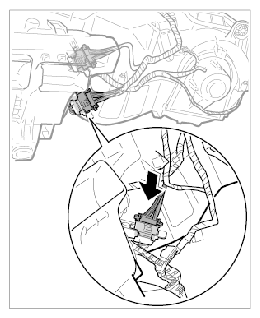
- 14.3. Push in lower electric plug connection at heater/air-conditioning unit until it is felt to engage.
 Courtesy of PORSCHE CARS NORTH AMERICA, INC.
- Push on connector for tilt sensor control unit -77-
until it engages securely. → 966319 TILT SENSOR CONTROL UNIT
- section on "Removing"
- Fasten ground point under the unit carrier -76-
.
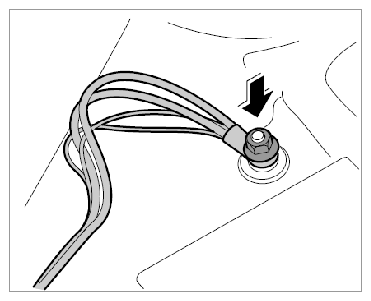 Courtesy of PORSCHE CARS NORTH AMERICA, INC.
- 16.1. Connect ground straps and tighten with the fastening nut. → Tightening torque: 9 Nm (6.5 ft. lb.)
- Push on connector for pedal sensor -69-
until it engages securely. → WM 208019 REMOVING AND INSTALLING ACCELERATOR PEDAL (ALL MODELS) - section on "Installing"
- Push on connector for brake light switch -68-
until it engages securely. → 943619 REMOVING AND INSTALLING BRAKE LIGHT SWITCH
- section on "Installing".
- Push on connectors of KESSY/PAS control unit -66 and 67-
until they engage securely. → 966619 REMOVING AND INSTALLING KESSY CONTROL UNIT
- section on "Installing"
- Push on connector on Gateway control unit -65-
until it engages securely. → 903519 REMOVING AND INSTALLING GATEWAY CONTROL UNIT
- section on "Installing"
- Push together plug connection between main wire harness and wire harness for door at the left and right -59 and 60-
until they engage securely. → 973219 REMOVING AND INSTALLING WIRE HARNESS FOR DOOR - section on "Locking"
- Clip in wire harness at door sill.
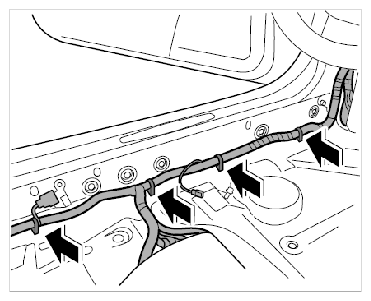 Courtesy of PORSCHE CARS NORTH AMERICA, INC.
- Fasten ground point under the passenger seat -54-
.
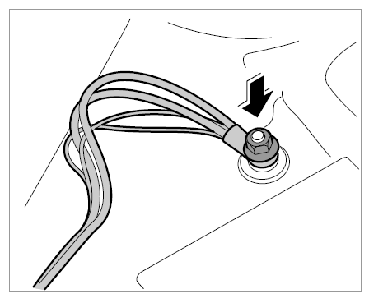 Courtesy of PORSCHE CARS NORTH AMERICA, INC.
- 23.1. Connect ground straps and tighten with the fastening nut. → Tightening torque: 9 Nm (6.5 ft. lb.)
- Push on connectors for telephone control unit -50 to 53-
until they engage securely. → 919019 REMOVING AND INSTALLING CONTROL UNIT FOR TELEPHONE
- section on "Installing"
- 24.1. Clip in wire harness for telephone control unit.
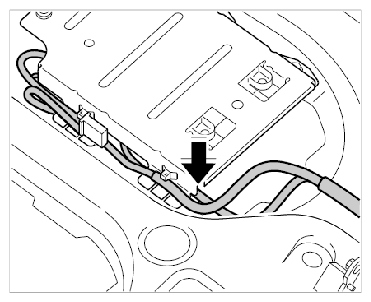 Courtesy of PORSCHE CARS NORTH AMERICA, INC.
- Clip in wire harness under driver's seat.
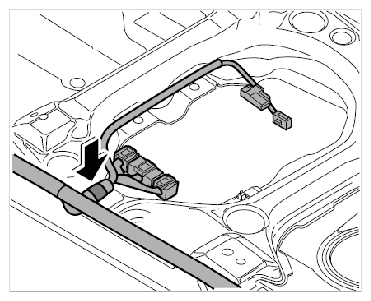 Courtesy of PORSCHE CARS NORTH AMERICA, INC.
- Fasten ground point under the driver's seat -49-
.
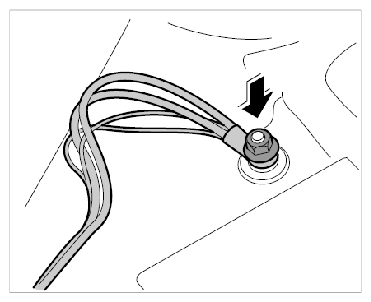 Courtesy of PORSCHE CARS NORTH AMERICA, INC.
- 26.1. Connect ground straps and tighten with the fastening nut. → Tightening torque: 9 Nm (6.5 ft. lb.)
- Push on connectors on control unit for rear convenience systems -46 to 48-
until they engage securely. → Installing Control Unit For Rear Convenience Systems
- section on "Installing".
- Push on connectors on ParkAssist control unit -44 and 45-
until they engage securely. → 917419 REMOVING AND INSTALLING PARKASSIST CONTROL UNIT
- section on "Installing"
- Push on connectors for center airbag sensor at the left and right -42 and 43-
until they engage securely. → Installing Airbag Sensor
- section on "Installing"
- Push on connector on Tiptronic control unit -41-
until it engages securely and lock it. → 373019 REMOVING AND INSTALLING TRANSMISSION CONTROL UNIT
- section on "Installing"
- 30.1. Clip in wire harness for Tiptronic control unit.
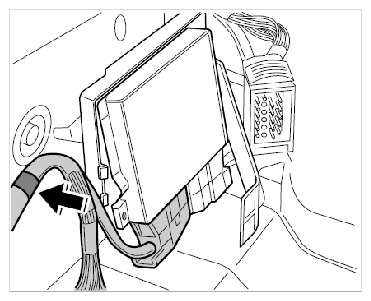 Courtesy of PORSCHE CARS NORTH AMERICA, INC.
- Fit rubber sleeves -39 and 40-
and push on connector for front seat-belt pretensioners at the left and right -37 and 38-
. → Installing Front Three-Point Belt
- section on "Installing"
- Connect plug connection between main wire harness and rear wire harness at the left and right -33 and 34-
and lock it.
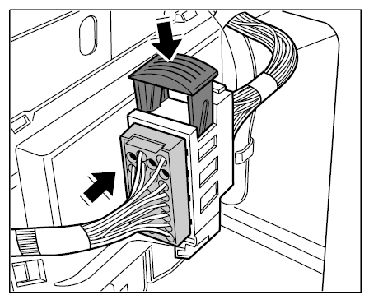 Courtesy of PORSCHE CARS NORTH AMERICA, INC.