Instrument Panel (IP) - Trim Pad Replacement
Instrument Panel Trim Pad Replacement
Removal Procedure
1. Disconnect the battery negative cable. Refer to Battery Negative Cable Disconnection and Connection (LA1 3.4L, V6) in Engine Electrical.
Caution: Refer to SIR Caution in Cautions and Notices.
2. Disable the SIR system. Refer to Disabling the SIR System in SIR.
3. Remove the covers from the right and the left access hole on the instrument panel (I/P). Refer to Instrument Panel Outer Trim Cover Replacement (Instrument Panel (IP) - Outer Trim Cover Replacement).
4. Remove the I/P insulators. Refer to Instrument Panel Insulator Panel Replacement - Right Side (Closeout/Insulator Panel Replacement - Right) and to Instrument Panel Insulator Panel Replacement - Left Side (Service and Repair).
5. Remove the data link connector. Refer to Data Link Connector Replacement in Data Link Communications.
6. Remove the side upper garnish moldings from the windshield. Refer to Windshield Pillar Garnish Molding Replacement (Windshield Pillar Garnish Molding Replacement) in Interior Trim.
7. Remove the upper trim panel from the I/P. Refer to Instrument Panel Upper Trim Pad Replacement (Service and Repair).
8. Remove the front floor console. Refer to Front Floor Console Replacement (Front Floor Console Replacement).
9. Remove the knee bolster panel. Refer to Knee Bolster Replacement (Service and Repair).
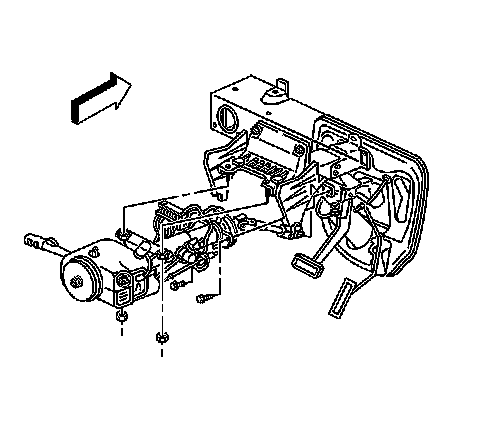
10. Remove the bolts from the lower steering column.
11. Remove the nuts from the upper steering column.
12. Lower the steering column.
13. Remove the hood release handle. Refer to Hood Primary Latch Release Cable Handle Replacement (Service and Repair) in Body Front End.
14. Remove the I/P accessory trim plate. Refer to Instrument Panel Accessory Trim Plate Replacement (Instrument Panel (IP) - Accessory Trim Plate Replacement).
15. Remove the I/P cluster trim plate bezel. Refer to Instrument Panel Cluster Trim Plate Bezel Replacement (Instrument Panel Cluster (IPC) - Trim Plate Bezel Replacement).
16. Remove the I/P cluster. Refer to Instrument Cluster Replacement (Instrument Panel Cluster (IPC) - Replacement).
17. Remove the radio. Refer to Radio Replacement in Entertainment.
18. Remove the heater A/C control. Refer to HVAC Control Module Replacement in HVAC Systems - Manual.
19. Remove the I/P compartment. Refer to Instrument Panel Compartment Replacement (Instrument Panel Compartment - Replacement).
20. Remove the I/P compartment lamp switch. Refer to Instrument Panel Compartment Lamp Switch Replacement (Instrument Panel Compartment - Lamp Switch Replacement).
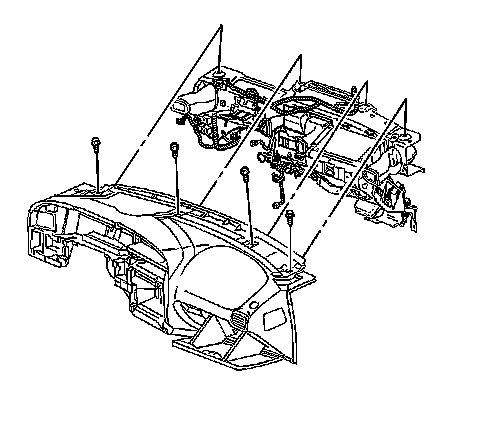
21. Remove the I/P trim pad mounting screws.
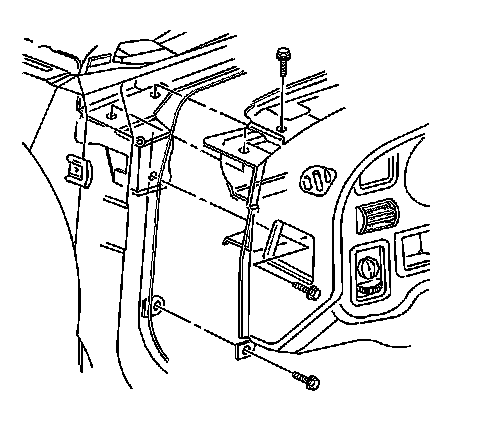
22. Reposition the I/P wiring harness.
23. Remove the I/P trim pad.
Installation Procedure
1. Align the I/P trim pad to the vehicle.
2. Reposition the I/P wiring harness.
Notice: Refer to Fastener Notice in Cautions and Notices.
3. Install the trim pad mounting bolts at the cluster pocket.
Tighten the mounting bolts to 5 Nm (44 lb in).
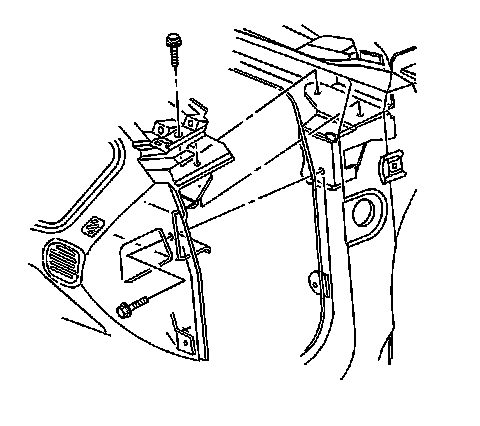
4. Install the trim pad mounting bolts at the windshield.
Tighten the mounting bolts to 5 Nm (44 lb in).
5. Install the trim pad mounting bolts to the compartment.
Tighten the mounting bolts to 2 Nm (18 lb in).
6. Install the I/P compartment lamp switch. Refer to Instrument Panel Compartment Lamp Switch Replacement (Instrument Panel Compartment - Lamp Switch Replacement).
7. Install the I/P compartment. Refer to Instrument Panel Compartment Replacement (Instrument Panel Compartment - Replacement).
8. Install the I/P cluster. Refer to Instrument Cluster Replacement (Instrument Panel Cluster (IPC) - Replacement).
9. Install the heater A/C control. Refer to HVAC Control Module Replacement in HVAC Systems - Manual.
10. Install the radio. Refer to Radio Replacement in Entertainment.
11. Install the I/P cluster trim plate bezel. Refer to Instrument Panel Cluster Trim Plate Bezel Replacement (Instrument Panel Cluster (IPC) - Trim Plate Bezel Replacement).
12. Install the I/P accessory trim plate. Refer to Instrument Panel Accessory Trim Plate Replacement (Instrument Panel (IP) - Accessory Trim Plate Replacement).
13. Install the hood release handle. Refer to Hood Primary Latch Release Cable Handle Replacement (Service and Repair) in Body Front End.
14. Raise the steering column.
15. Install the nuts to the upper steering column.
Tighten the nuts to 25 Nm (18 lb ft).
16. Install the bolts to the lower steering column.
Tighten the bolts to 25 Nm (18 lb ft).
17. Install the knee bolster panel. Refer to Knee Bolster Replacement (Service and Repair).
18. Install the front floor console. Refer to Front Floor Console Replacement (Front Floor Console Replacement).
19. Install the I/P upper trim panel. Refer to Instrument Panel Upper Trim Pad Replacement (Service and Repair).
20. Install the windshield side upper garnish moldings. Refer to Windshield Pillar Garnish Molding Replacement (Windshield Pillar Garnish Molding Replacement) in Interior Trim.
21. Install the I/P insulators. Refer to Instrument Panel Insulator Panel Replacement - Right Side (Closeout/Insulator Panel Replacement - Right) and to Instrument Panel Insulator Panel Replacement - Left Side (Service and Repair).
22. Install the data link connector. Refer to Data Link Connector Replacement in Data Link Communications.
23. Install the I/P access hole covers. Refer to Instrument Panel Outer Trim Cover Replacement (Instrument Panel (IP) - Outer Trim Cover Replacement).
24. Enable the SIR system. Refer to Enabling the SIR System in SIR.
25. Connect the battery negative cable. Refer to Battery Negative Cable Disconnection and Connection (LA1 3.4L, V6) in Engine Electrical.