Side Roof Paneling Installation And Weld In - Ar65.10-P-1020-03RG
 |
000 588 04 39 00 Rivet press tool |
|
WS60.00-P-0440B |
|
000 588 12 84 00 Welder |
|
WS00.00-P-0318K |
Model 190.3
GAP DIMENSIONS
| Number |
Designation |
Model 190.3 |
| BE60.00-P-1011-01EA |
Gap dimension, sidewall panel to E-line trim strip |
Dimension "K" |
mm |
1 (±0, 5) |
| See |
|
AR60.00-P-0700-01RG |
GAP DIMENSIONS
| Number |
Designation |
Model 190.3 |
| BE60.00-P-1014-01EA |
Gap dimension, sidewall panel to roof trim strip |
Dimension "N" |
mm |
2, 5 (±1) |
| See |
|
AR60.00-P-0700-01RG |
GAP DIMENSIONS
| Number |
Designation |
Model 190.3 |
| BE60.00-P-1016-01EA |
Gap dimension, sidewall panel to E-line trim strip |
Dimension "P" |
mm |
1 (±0, 5) |
| See |
|
AR60.00-P-0700-01RG |
GAP DIMENSIONS
| Number |
Designation |
Model 190.3 |
| BE60.00-P-1019-01EA |
Gap dimension, roof to roof trim strip |
Dimension "S" |
mm |
3 (±0, 5) |
| See |
|
AR60.00-P-0700-01RG |
GAP DIMENSIONS
| Number |
Designation |
Model 190.3 |
| BE60.00-P-1020-01EA |
Gap dimension, side wall paneling to tailgate/trunk lid/rear spoiler |
Dimension "T" |
mm |
3, 5 (±0, 5) |
| See |
|
AR60.00-P-0700-01RG |
 Courtesy of MERCEDES-BENZ USA
 REPAIR MATERIALS
| Number |
Designation |
Order number |
| BR00.45-Z-1012-13A |
Blind rivet Y2 6.5x12.5 (clamping range 2 mm to 5 mm, draw-off strength min. 19 kN) |
A 004 990 16 97 |
| BR00.45-Z-1052-13A |
Flow-form rivet structure 5.0 mm up to 6.1 mm clamping range (S48) |
A 000 991 27 33 |
| BR00.45-Z-1053-13A |
Flow-form rivet structure 6.0 mm up to 7.2 mm clamping range (S58) |
A 000 991 28 33 |
| BR00.45-Z-1162-02A |
Parts kit for 2-component adhesive for body |
A 012 989 17 71 |
 Further information can be found in the superordinate service document. Comply with safety information in superordinate customer service document.
The following operation steps are shown on the left side of the vehicle. In case of damage, these steps must be similarly performed on the right side of the vehicle. Replace self-pierce rivets installed in vehicle by high-strength rivets according to clamping range.
- Insert backing strip between side roof paneling (1) and rear fender and center.
To weld side roof paneling (1) and rear fender, use a backing strip.
- Install and fit side roof paneling (1).
- Install and fit lock striker, door and tailgate.
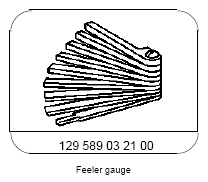
- Check gaps using
 feeler gauge and adjust.
- Check weld seam gaps.
Check all weld seam gaps before start of welding. The weld seam gap may not be greater than 1 mm, where required use a body weld.
- Fix side roof paneling (1) in place.
- Remove liftgate, door and lock striker.
 Courtesy of MERCEDES-BENZ USA Courtesy of MERCEDES-BENZ USA
|
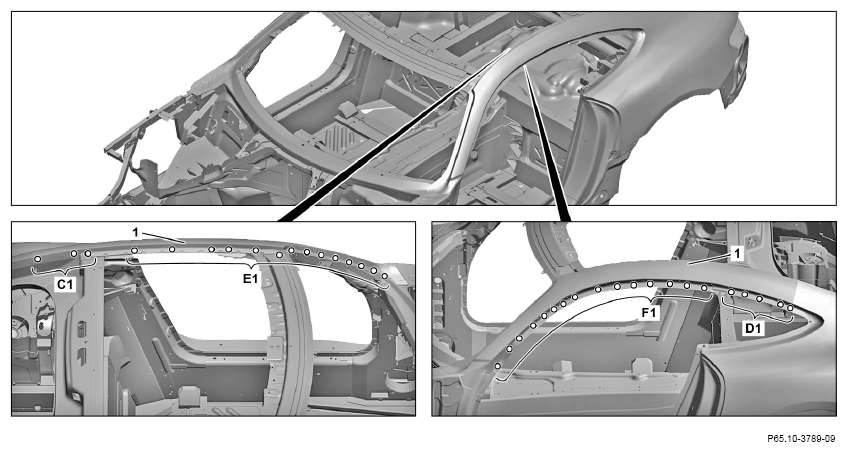
- Drill rivet holes of side roof paneling (1) with ø 6.7 mm bit (area C1).
Transfer present positions for rivet connections from vehicle to new part. In the case of new part to new part connections, adapt these and drill together.
- Prepare side roof paneling (1) with rivet press tool (areas D1, E1 and F1).
Transfer present positions for rivet connections from vehicle to new part. In the case of new part to new part connections, adapt these and prepare together.
- Remove side roof paneling (1).
Do not remove weld puddle back-up.
- Deburr rivet holes on side roof paneling (1) and body on both sides (area C1).
Observe pretreatment of bonding surfaces and weld joints.
- Remove shavings using wet/dry vacuum cleaner.
 Courtesy of MERCEDES-BENZ USA Courtesy of MERCEDES-BENZ USA
|
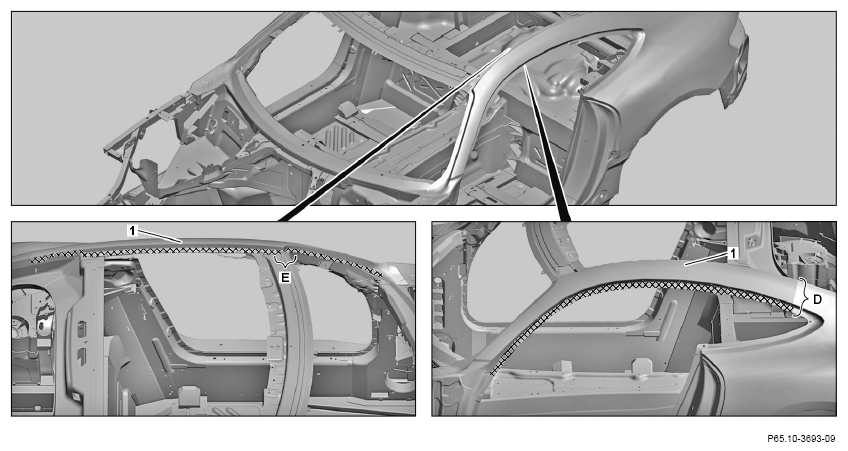
- On side roof paneling (1), apply the 2-component adhesive (cross-hatched areas).
Observe manufacturer's specification for drying and processing time of 2-component adhesive.
- Install side roof paneling (1) and fix in place.
Ensure that welding bath support is seated correctly (area D). Ensure that it is correctly seated at joint (area E).
 Courtesy of MERCEDES-BENZ USA Courtesy of MERCEDES-BENZ USA
|
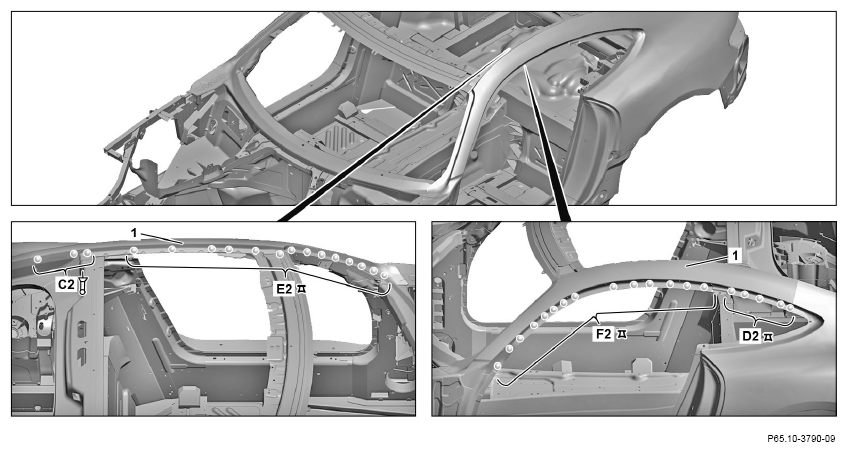
- Rivet side roof paneling (1) with rivet press tool and flow-form rivets or flow-form rivets (areas D2, E2, and F2).
Use flow form rivet structure 5.0 mm to 6.1 mm clamping range (S48) or flow form rivet structure 6.0 mm to 7.2 mm clamping range (S58).
- Rivet side roof paneling (1) with rivet press tool and blind rivet C2).
Use 6.5x12.5 blind rivets (clamping range from 2 mm to 5 mm, min. draw-off strength 19 kN).
 Courtesy of MERCEDES-BENZ USA Courtesy of MERCEDES-BENZ USA
|
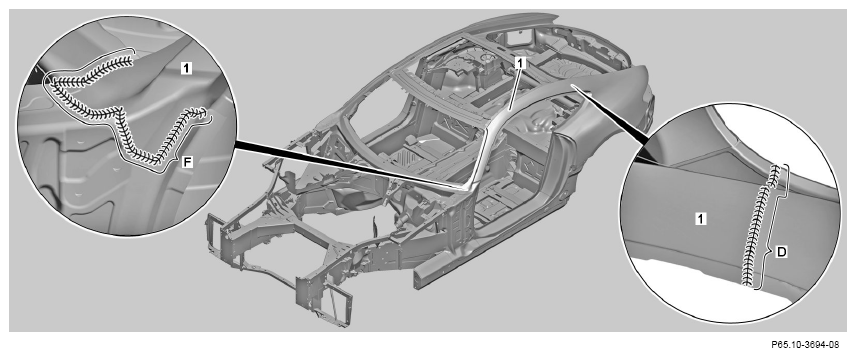
- Tack weld side roof paneling (1) with welder (
 ) (areas D and F).
When MIG welding (
) prepare welds by grinding down to bare metal with stainless steel brush. Weld seams must
be tack welded at start, end and every approx. 4 cm.
- Weld side roof paneling (1) with welder (
 ) (areas D and F).
When MIG welding (
), prepare welds by grinding down to bare metal with stainless steel brush directly before welding. Tack weld seams at start, end and approx. every 4 cm. Weld seam gap should not be greater than 1 mm; if required, create a pre-seam.
- Level welds at side roof paneling (1) and restore surface (areas D and F).
- Remove shavings using wet/dry vacuum cleaner.