Removal [11/2021 - ]: Procedure
WARNING: This page is about a different car, the 2024 Lexus IS 500, 2023 Lexus IS 500, and 2022 Lexus IS 500. However, it is still accessible from the selected car via links, so may be relevant.
- REMOVE STARTER ASSEMBLY
Refer to REMOVAL [11/2021 - ]
- REMOVE ENGINE MOUNTING DAMPER
Refer to PROCEDURE - Step 2
- REMOVE NO. 2 EXHAUST MANIFOLD HEAT INSULATOR
Refer to PROCEDURE - Step 3
- REMOVE EXHAUST MANIFOLD SUB-ASSEMBLY LH (TWC: Front Catalyst)
Refer to PROCEDURE - Step 4
- REMOVE EXHAUST MANIFOLD TO HEAD GASKET
Refer to PROCEDURE - Step 5
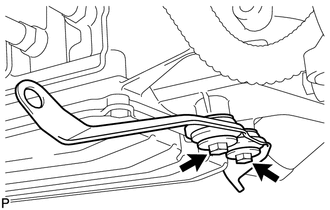
- REMOVE NO. 1 EXHAUST PIPE SUPPORT BRACKET SUB-ASSEMBLY
- Remove the 2 bolts and No. 1 exhaust pipe support bracket sub-assembly.
 Courtesy of © TOYOTA, LICENSE AGREEMENT TMS1002 Courtesy of © TOYOTA, LICENSE AGREEMENT TMS1002
|
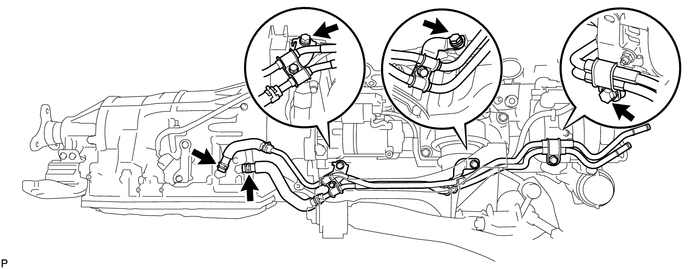
- REMOVE OIL COOLER TUBE
- Slide the 2 clips and disconnect the 2 oil cooler hoses from the automatic transmission assembly.
 Courtesy of © TOYOTA, LICENSE AGREEMENT TMS1002 Courtesy of © TOYOTA, LICENSE AGREEMENT TMS1002
|
HINT:
Use a container to catch any ATF which flows out of the 2 oil cooler hoses.
- Remove the 3 bolts and oil cooler tube from the No. 2 flexible hose clamp and engine assembly.
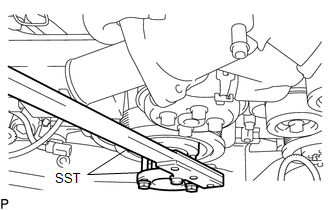
- REMOVE DRIVE PLATE AND TORQUE CONVERTER ASSEMBLY SETTING BOLT
- Using SST, hold the crankshaft pulley.
- SST: 09213-38010
- SST: 09330-00021
 Courtesy of © TOYOTA, LICENSE AGREEMENT TMS1002 Courtesy of © TOYOTA, LICENSE AGREEMENT TMS1002
|
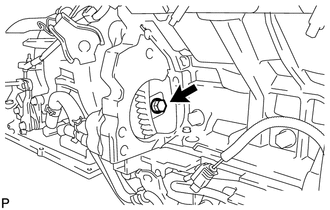
- Remove the 6 drive plate and torque converter assembly setting bolts.
 Courtesy of © TOYOTA, LICENSE AGREEMENT TMS1002 Courtesy of © TOYOTA, LICENSE AGREEMENT TMS1002
|
HINT:
There will be one black colored bolt.
- REMOVE REAR ENGINE MOUNTING MEMBER
- Remove the 4 nuts and rear engine mounting member from the rear engine mounting insulator assembly.
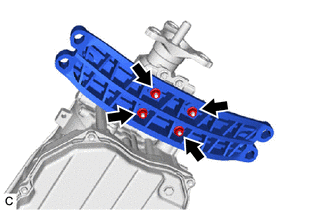 Courtesy of © TOYOTA, LICENSE AGREEMENT TMS1002 Courtesy of © TOYOTA, LICENSE AGREEMENT TMS1002
|
- REMOVE REAR ENGINE MOUNTING INSULATOR ASSEMBLY
- Remove the 4 bolts and rear engine mounting insulator assembly from the automatic transmission assembly.
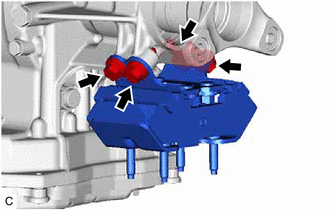 Courtesy of © TOYOTA, LICENSE AGREEMENT TMS1002 Courtesy of © TOYOTA, LICENSE AGREEMENT TMS1002
|
- REMOVE FLOOR SHIFT GEAR SHIFTING ROD SUB-ASSEMBLY
- Remove the clip.
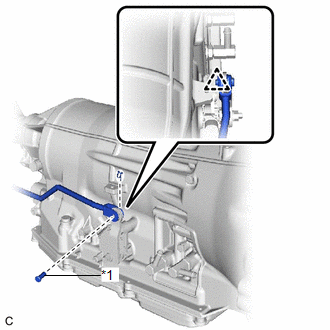 Courtesy of © TOYOTA, LICENSE AGREEMENT TMS1002 Courtesy of © TOYOTA, LICENSE AGREEMENT TMS1002
|
Remove the pin and floor shift gear shifting rod sub-assembly from the transmission control shaft lever RH.
- DISCONNECT WIRE HARNESS
- Disconnect the park/neutral position switch assembly connector.
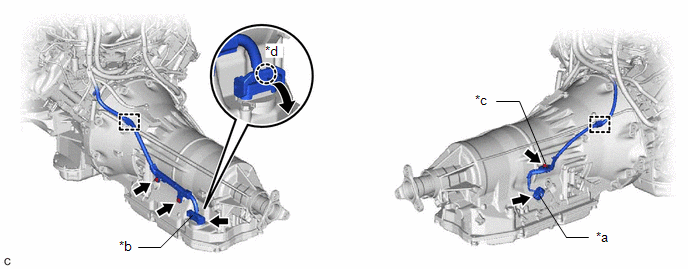 Courtesy of © TOYOTA, LICENSE AGREEMENT TMS1002 Courtesy of © TOYOTA, LICENSE AGREEMENT TMS1002
|
| *a |
Park/Neutral Position Switch Assembly Connector |
*b |
Transmission Wire Connector |
| *c |
Nut |
*d |
Claw |
- Disconnect the transmission wire connector.
HINT:
Disengage the claw, pull down the lever, and then disconnect the transmission wire connector.
- Disengage the 2 clamps.
- Remove the nut and 2 bolts.
- Disconnect the wire harness from the automatic transmission assembly.
- REMOVE AUTOMATIC TRANSMISSION ASSEMBLY
- Disconnect the breather plug hose from the transmission breather assembly.
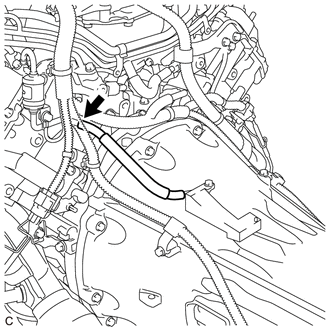 Courtesy of © TOYOTA, LICENSE AGREEMENT TMS1002 Courtesy of © TOYOTA, LICENSE AGREEMENT TMS1002
|
- Remove the 10 bolts and automatic transmission assembly from the engine assembly.
NOTE:
- To prevent damage to the 2 knock pins, do not pry between the automatic transmission assembly and engine assembly.
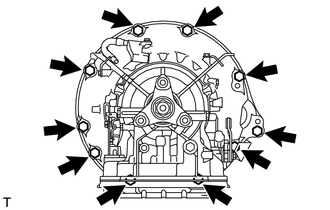 Courtesy of © TOYOTA, LICENSE AGREEMENT TMS1002 Courtesy of © TOYOTA, LICENSE AGREEMENT TMS1002
|
- REMOVE TORQUE CONVERTER ASSEMBLY
- Put matchmarks on the automatic transmission case sub-assembly and the torque converter assembly.
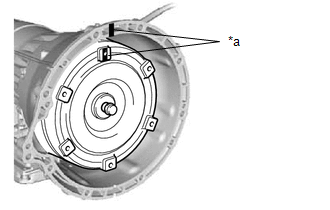 Courtesy of © TOYOTA, LICENSE AGREEMENT TMS1002 Courtesy of © TOYOTA, LICENSE AGREEMENT TMS1002
|
- Remove the torque converter assembly from the automatic transmission assembly.
- REMOVE TRANSMISSION BREATHER ASSEMBLY
- Remove the bolt and disconnect the ground wire from transmission breather assembly.
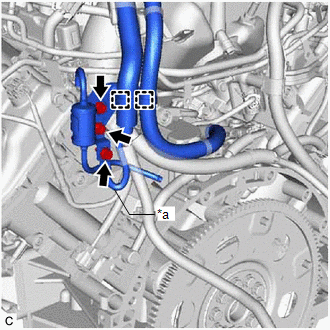 Courtesy of © TOYOTA, LICENSE AGREEMENT TMS1002 Courtesy of © TOYOTA, LICENSE AGREEMENT TMS1002
|
- Disengage the 2 clamps to disconnect the wire harness from transmission breather assembly.
- Remove the 2 bolts and transmission breather assembly from the engine assembly.
- REMOVE NO. 2 EARTH WIRE
- Remove the bolt and No. 2 earth wire from the automatic transmission assembly.
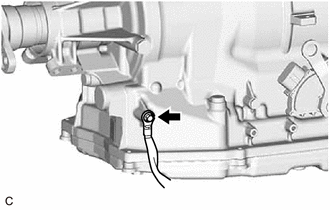 Courtesy of © TOYOTA, LICENSE AGREEMENT TMS1002 Courtesy of © TOYOTA, LICENSE AGREEMENT TMS1002
|
- INSPECT TORQUE CONVERTER ASSEMBLY
Refer to INSPECTION [11/2021 - ]