Installation
SUSPENSION CONTROL: HEIGHT CONTROL DRYER: INSTALLATION
1. INSTALL HEIGHT CONTROL DRYER ASSEMBLY
(a) Install a new O-ring.
(b) Install the height control dryer with the bolt.
Torque : 6.4 Nm (65 kgf-cm, 57 in-lbf)
(c) Connect the No. 2 height control tube Suspension Control System (w/ Air Suspension).
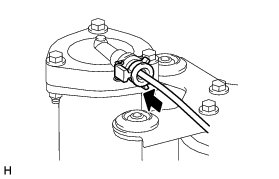
HINT
For the connection procedure of the tube (type 2), refer to Precaution of the Suspension Control System section.
2. INSTALL HEIGHT CONTROL COMPRESSOR ASSEMBLY
(a) Install the height control compressor to the bracket with the 3 bolts.
Torque : 5.9 Nm (60 kgf-cm, 52 in-lbf)
(b) Connect the connector.
(c) Attach the clamp.
(d) Attach the 3 clamps.
(e) Connect the connector.
(f) Attach the No. 2 height control tube.
3. CONNECT NO. 2 HEIGHT CONTROL TUBE Installation
4. INSTALL HEIGHT CONTROL FILTER Installation
5. CHECK CONNECTION OF TUBES FOR AIR LEAK
(a) Check the connections of the tubes for air leakage Suspension Control System (w/ Air Suspension).
6. INSTALL REAR BUMPER PROTECTOR SUB-ASSEMBLY LH Reassembly
7. INSTALL HEIGHT CONTROL COMPRESSOR COVER Installation
8. INSTALL REAR BUMPER PROTECTOR LH Installation
9. INSTALL REAR QUARTER PANEL MUDGUARD SUB-ASSEMBLY LH Installation
10. INSTALL REAR WHEEL LH Installation
11. CONNECT CABLE TO NEGATIVE BATTERY TERMINAL
NOTICE:
When disconnecting the cable, some systems need to be initialized after the cable is reconnected Repair Instruction - Initialization.