Reassembly
EXTERIOR PANELS / TRIM: REAR BUMPER: REASSEMBLY
HINT
A bolt without a torque specification is shown in the standard bolt chart Standard Bolt - Specified Torque For Standard Bolts.
1. INSTALL REAR BUMPER PAD
HINT
When installing the rear bumper pad, heat the rear bumper cover surface using a heat light.
Standard:

NOTICE:
Do not heat the rear bumper cover excessively.
(a) When using a new rear bumper cover:
(1) Clean the rear bumper cover surface.
(2) Using a heat light, heat the rear bumper cover surface.
(b) When reusing the rear bumper cover:
(1) Using a heat light, heat the rear bumper cover surface.
(2) Remove the double-sided tape from the rear bumper cover.
(3) Wipe off any tape adhesive residue with cleaner.
(c) Install a new rear bumper pad.
(1) Remove the peeling paper from the face of a new rear bumper pad.
HINT
After removing the peeling paper, keep the exposed adhesive free from foreign matter.
(2) Align the rear bumper pad with the mark-off line of the rear bumper.
(3) Install the 4 rear bumper pads.
2. INSTALL BACK UP LIGHT ASSEMBLY LH Installation
3. INSTALL BACK UP LIGHT ASSEMBLY RH
HINT
Use the same procedure described for the LH side.
4. INSTALL REAR BUMPER PROTECTOR SUB-ASSEMBLY LH
(a) Attach the guide.
(b) Install the rear bumper protector with the screw.
5. INSTALL REAR BUMPER PROTECTOR SUB-ASSEMBLY RH
HINT
Use the same procedure described for the LH side.
6. INSTALL NO. 1 ULTRASONIC SENSOR RETAINER (w/ Intuitive Parking Assist System) Installation
7. INSTALL NO. 2 ULTRASONIC SENSOR RETAINER (w/ Intuitive Parking Assist System) Installation
8. INSTALL NO. 1 ULTRASONIC SENSOR (w/ Intuitive Parking Assist System) Installation
9. INSTALL ULTRASONIC SENSOR CLIP (w/ Intuitive Parking Assist System) Installation
10. INSTALL NO. 5 FLOOR WIRE (w/ Intuitive Parking Assist System)
(a) Attach the 6 clamps to install the No. 5 floor wire.
(b) Connect the 3 connectors.
11. INSTALL NO. 5 FLOOR WIRE (w/o Intuitive Parking Assist System)
(a) Attach the 4 clamps to install the No. 5 floor wire.
(b) Connect the 2 connectors.
12. INSTALL NO. 4 FLOOR WIRE (w/ Intuitive Parking Assist System)
HINT
Use the same procedure described for the No. 5 floor wire.
13. INSTALL NO. 4 FLOOR WIRE (w/o Intuitive Parking Assist System)
HINT
Use the same procedure described for the No. 5 floor wire.
14. INSTALL REAR BUMPER CENTER BRACKET
(a) Attach the 4 claws to install the rear bumper center bracket.
(b) Install the 2 outside moulding retainers and 2 retainers.
15. INSTALL REAR BUMPER ENERGY ABSORBER
HINT
When installing the rear bumper energy absorber, heat the rear bumper cover surface using a heat light.
Standard:

NOTICE:
Do not heat the rear bumper cover excessively.
(a) When using a new rear bumper cover:
(1) Clean the rear bumper cover surface.
(2) Using a heat light, heat the rear bumper cover surface.
(b) When reusing the rear bumper cover:
(1) Using a heat light, heat the rear bumper cover surface.
(2) Remove the double-sided tape from the rear bumper cover.
(3) Wipe off any tape adhesive residue with cleaner.
(c) When reusing the rear bumper energy absorber:
(1) Remove the double-sided tape from the rear bumper energy absorber.
(2) Wipe off any tape adhesive residue with cleaner.
(3) Install new double-sided tape as shown in the illustration.
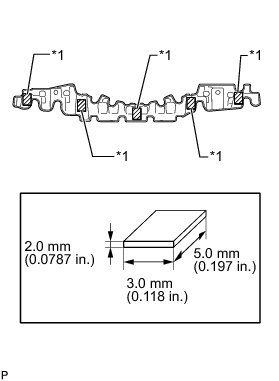
(d) Install the rear bumper energy absorber.
(1) Remove the peeling paper from the face of the rear bumper energy absorber.
HINT
After removing the peeling paper, keep the exposed adhesive free from foreign matter.
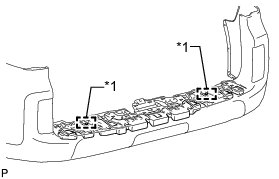
(2) Attach the 2 guides to install the rear bumper energy absorber to the rear bumper cover as shown in the illustration.
HINT
Press the rear bumper energy absorber firmly to install it.
Text in Illustration

16. INSTALL NO. 1 REAR BUMPER PLATE
(a) Attach the 19 claws to install the No. 1 rear bumper plate.