4X2
4x2

1. Disconnect and isolate the negative battery cable.
2. Install the engine support fixture 8534.
3. Raise and support the vehicle.
4. Remove the front wheel assemblies.
5. Remove the skid plate (if equipped) Front Lower Control Arm - Removal
9. Disconnect the LH tie rod Tie Rod End - Removal
10. Disconnect the LH lower ball joint Front Suspension Lower Ball Joint - Removal
11. Disconnect the LH strut clevis Removal
12. Remove the LH front axle Half Shaft - Removal
13. Remove the front axle brace bolts.
14. Remove the front prop shaft Drive Shaft - Removal
15. Drain the front axle.
16. Using a transmission jack, support the front axle.
17. Remove the axle bracket bolts.
18. With the RH axle still in place, remove front differential.
19. Remove the transmission oil cooler line bracket.
20. Remove the engine to transmission stiffening bracket.
21. Position the engine support fixture 8534 on the fender lip and align the slots in the brackets with the fender mounting holes.
22. Secure the brackets to the fender using four M6 X 1.0 X 25 MM flanged cap screws.
23. Tighten the thumbscrews to secure the sleeves to the support tube.
24. Secure the support tube in an upright position.
25. Assemble the flat washer, thrust bearing, hook and T-handle.
26. Using the M10 X 1.75 mm flanged nut supplied with the support fixture, secure the chain to the front engine lifting stud.
27. Loosen the engine mounts.
28. Remove the oil pan bolts.
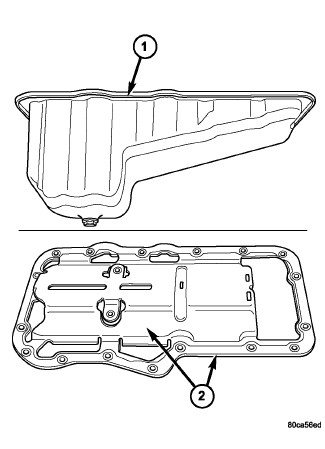
29. Separate the oil pan (1) from engine.
30. Move oil pan to one side, remove oil sump bolt and windage tray bolts.
NOTE: Do not pry on oil pan or oil pan gasket. Gasket is integral to engine windage tray and does not come out with oil pan.
31. Move the oil pan and windage tray (2) toward front of vehicle and remove.