Cylinder Head Installation
- Clean the cylinder head and the engine block surface.
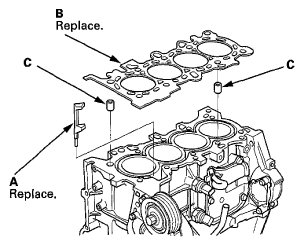
- Install a new coolant separator (A) in the engine block whenever the engine block is replaced.
 Courtesy of AMERICAN HONDA MOTOR CO., INC.
- Install the new cylinder head gasket (B) and the dowel pins (C) on the engine block. Always use a new cylinder head gasket.
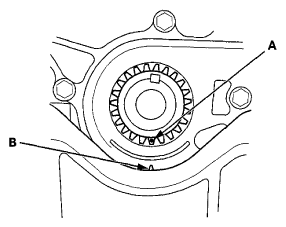
- Set the crankshaft to top dead center (TDC). Align the TDC mark (A) on the crankshaft sprocket with the pointer (B) on the oil pump.
 Courtesy of AMERICAN HONDA MOTOR CO., INC.
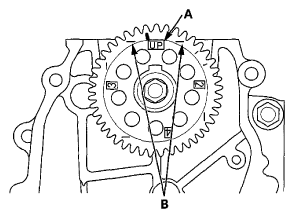
- Set the camshaft TDC. The "UP" mark (A) on the camshaft sprocket should be at the top, and the TDC grooves (B) on the camshaft sprocket should line up with the top edge of the head.
 Courtesy of AMERICAN HONDA MOTOR CO., INC.
- Install the cylinder head on the engine block.
- Apply new engine oil to the threads and flange of all cylinder head bolts.
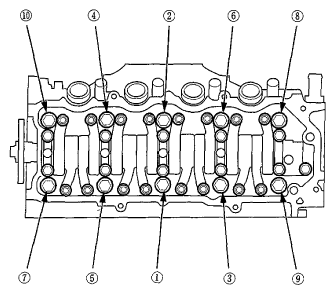
- Torque the cylinder head bolts in sequence to 29 N.m (3.0 kgf.m, 22 lbf.ft) with a beam-type torque wrench if possible. When using a preset-click-type torque wrench, be sure to tighten slowly and do not overtighten. If a bolt makes any noise while you are torquing it, loosen the bolt and retighten it from the first step.
 Courtesy of AMERICAN HONDA MOTOR CO., INC.
- Tighten all cylinder head bolts an additional 130°.
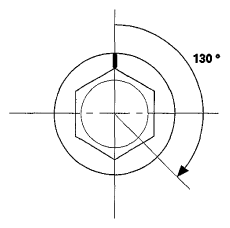 Courtesy of AMERICAN HONDA MOTOR CO., INC.
- Install the cam chain (see CAM CHAIN INSTALLATION
).
- Install the cylinder head cover (see CYLINDER HEAD COVER INSTALLATION
).
- Connect the upper radiator hose (A), the water bypass hose (B), and the heater hose (C).
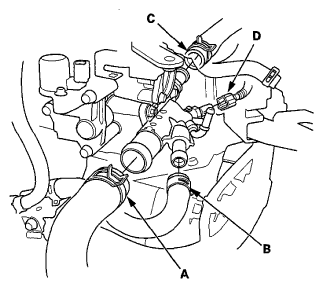 Courtesy of AMERICAN HONDA MOTOR CO., INC.
- Connect the ECT sensor 1 connector (D).
- Install the harness holder (A).
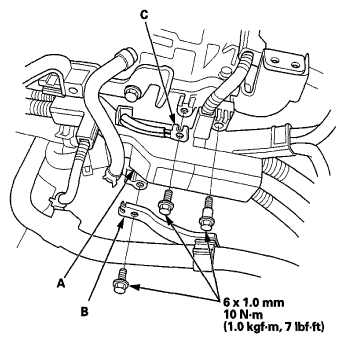 Courtesy of AMERICAN HONDA MOTOR CO., INC.
- Install the heater hose bracket (B) and the ground cable (C).
- Connect the oil pressure switch connector (A) and the knock sensor connector (B).
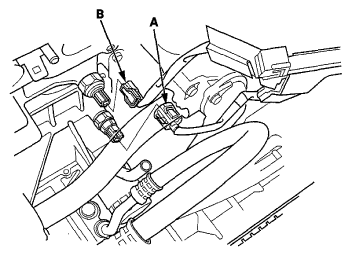 Courtesy of AMERICAN HONDA MOTOR CO., INC.
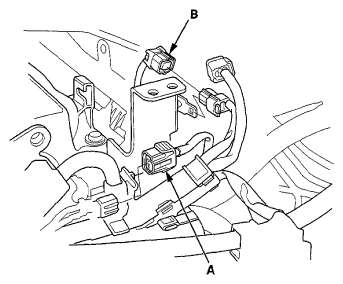
- Connect the CMP sensor connector (A) and the secondary HO2S connector (B).
 Courtesy of AMERICAN HONDA MOTOR CO., INC.
- Install the warm-up TWC (see
WARM UP TWC REMOVAL/INSTALLATION
).
- Install the four ignition coils (see
IGNITION COIL AND SPARK PLUG REMOVAL/INSTALLATION
).
- Install the injectors (see
INJECTOR REPLACEMENT
).
- Install the intake manifold/chamber assembly (see
INSTALLATION
).
- Install the throttle body (see
THROTTLE BODY REMOVAL/INSTALLATION
).
- After installation, check that all tubes, hoses, and connectors are installed correctly.
- Do the 12 volt battery installation procedure (see
12 VOLT BATTERY REMOVAL AND INSTALLATION
).
- Inspect for fuel leaks. Turn the ignition switch to ON (II) (do not operate the starter) so the fuel pump runs for about 2 seconds and pressurizes the fuel line. Repeat this operation three times, then check for fuel leakage at any point in the fuel line.
- Refill the radiator with engine coolant, and bleed the air from the cooling system (see
COOLANT REPLACEMENT
).
- Do the CKP pattern clear/CKP pattern learn procedure (see
CKP PATTERN CLEAR/CKP PATTERN LEARN
).
- Inspect the idle speed (see
IDLE SPEED INSPECTION
).
- Inspect the ignition timing (see
IGNITION TIMING INSPECTION
).