Timing Chains: Installation
- Install spacers, camshaft sprockets and retaining bolts (if removed). Ensure components are installed in original location. Tighten bolts to specification. See TORQUE SPECIFICATIONS table at end of article.
- Install Camshaft Positioners (T91P-6256-A) on flat areas of camshaft if not previously installed. See Figure.
CAUTION:
Install crankshaft sprockets with hubs facing each other, and tapered part of sprocket away from cylinder block. Refer to Fig 1.
- Install left crankshaft sprocket. If Copper links are not visible on timing chain, fold timing chain in half and mark each end link for timing purposes. See Fig 1. These links will be referred to as Copper links when installing.
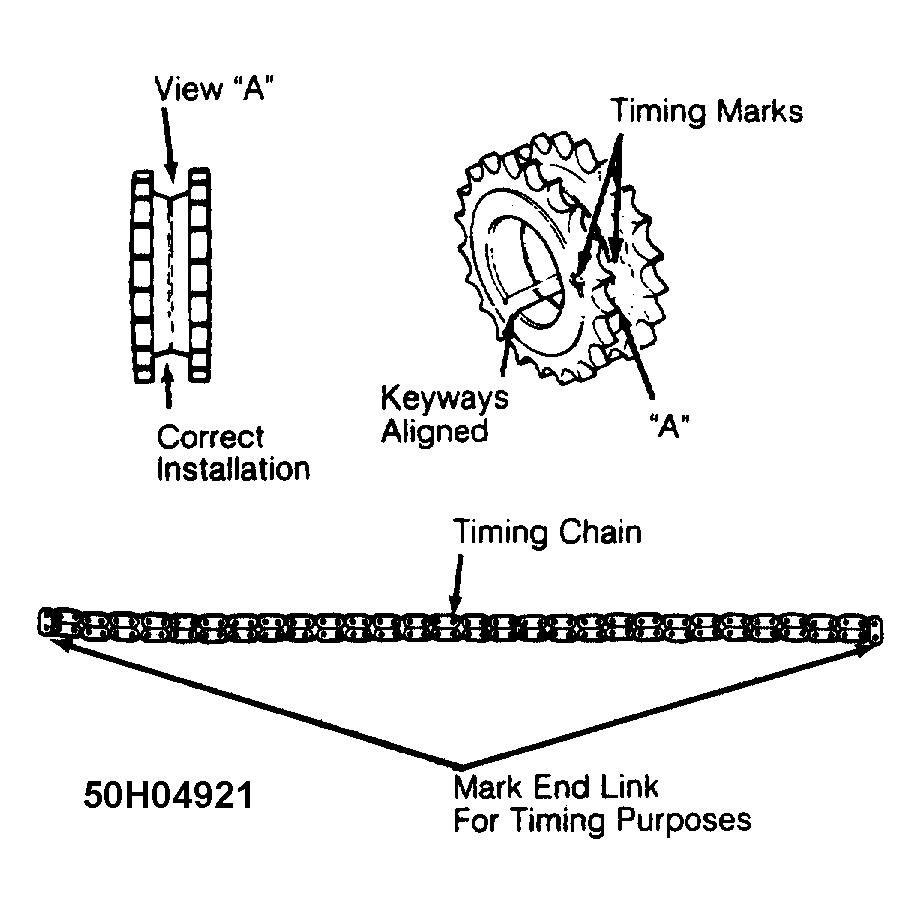 Courtesy of FORD MOTOR CO.
- Rotate crankshaft so No. 1 cylinder is at TDC. This positions crankshaft keyway 45 degrees from vertical position. See Figure. Crankshaft keyway will point toward camshaft.
- Install left timing chain on camshaft and crankshaft sprockets so Copper link aligns with timing mark sprockets. Refer to Figure. Install right crankshaft sprocket. Ensure sprocket is properly installed, with tapered part of sprocket away from cylinder block. See Fig 1.
- Install right timing chain on camshaft and crankshaft sprockets so Copper link aligns with timing mark sprockets. Refer to Figure. Lubricate tensioner arms with engine oil and install.
- Chain tensioners must bled down so tensioner plunger is compressed in housing before installing. Place chain tensioner in soft-jawed vise. Using small pick, hold ratchet lock mechanism away from ratchet stem. See Fig 2. Slowly close vise to depress tensioner plunger.
- When tensioner plunger is compressed in housing, continue to hold ratchet lock mechanism and install lock pin in hole on tensioner housing. See Fig 2. Ensure ratchet stem is even with tensioner housing before installing lock pin.
 Courtesy of FORD MOTOR CO.
- Install both chain tensioners and retaining bolts on cylinder block. Install both chain guides. Tighten bolts to specification. See TORQUE SPECIFICATIONS table at end of article.
- Remove lock pins from both chain tensioners. Ensure all timing marks align. See Figure.
- To install remaining components, reverse removal procedure. Before installing camshaft cover, apply silicone sealant at front cover-to-cylinder block areas.
- When installing fuel lines, install new "O" rings on fuel lines. Use only specified fuel resistant "O" rings (Brown in color). Lightly coat "O" rings with clean engine oil before installing. Clean fittings and replace garter spring (if necessary).