Drive Axle Overview, With 88 Mm Diameter Outer CV Joint And 100 Mm Diameter Inner CV Joint: Notes
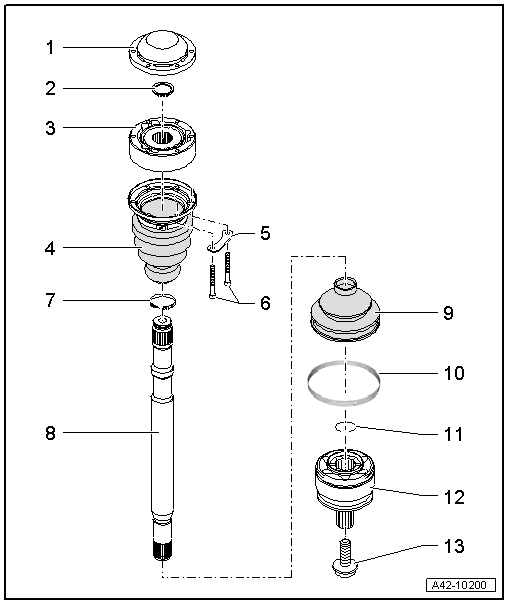 Courtesy of AUDI OF AMERICA, LLC
- Cover
- Drive the cover off carefully using a drift.
- Always replace.
- The adhesive surfaces on the cover/inner CV joint must be free of grease when installing.
- Before mounting on the CV joint, coat the sealing surface with sealant. Refer To INNER CV JOINT, 100 MM DIAMETER OR 108 MM DIAMETER .
- Securing Ring
- Remove and install with commercially-available circlip pliers.
- Always replace.
- Inner CV Joint
- Inner CV Boot with a Cap
- Without ventilation bore.
- Carefully drive off cap with drift.
- Always replace.
- In case of damage, check inner CV joint. Refer To INNER CV JOINT, CHECKING .
- Before mounting on the CV joint, coat the sealing surface with sealant INNER CV JOINT, 100 MM DIAMETER OR 108 MM DIAMETER .
- Align cover to bolt holes.
- The adhesive surfaces on the protective boot/inner CV joint must be free of grease when installing.
- The protective boot/drive axle sealing surfaces must be free of grease when installing.
- Before tightening clamp, briefly raise CV boot to allow pressure to equalize.
- Backing Plate
- Bolt
- 20 Nm + 90° turn
- Always Replace If Removed.
- Clamp
- Drive Axle
- CV Boot for Outer CV Joint
- Without ventilation bore.
- Check for tears and chafing; replace if necessary.
- In case of damage, check outer CV joint. Refer To OUTER CV JOINT, CHECKING .
- The protective boot/outer CV joint sealing surfaces must be free of grease when installing.
- The protective boot/drive axle sealing surfaces must be free of grease when installing.
- Before tightening clamp, briefly raise CV boot to allow pressure to equalize.
- Clamp
- Securing Ring
- Always replace.
- Allocation Parts Information..
- Insert before mounting in ring groove (not visible with joint installed).
- Before installing CV joint, align sealing ring in center with opening facing upward.
- Outer CV Joint
- Exterior diameter: 88 mm
- Replace only as complete unit.
- Checking, Refer To OUTER CV JOINT, CHECKING .
- Driving off, Refer To OUTER CV JOINT, 88 MM DIAMETER OR 100 MM DIAMETER .
- Installing: Drive onto shaft using plastic hammer until compressed circlip seats.
- Circlip must lie in joint chamfer when guiding in, guide with pliers if necessary.
- Grease quantity and type. Refer To INNER CV JOINT, 100 MM DIAMETER OR 108 MM DIAMETER .
- The protective boot/outer CV joint sealing surfaces must be free of grease when installing.
- When installing joint on axle shaft, splines on axle shaft must be lightly coated with grease used in joint.
- Bolt