Overview - Fuel Tank, Hybrid
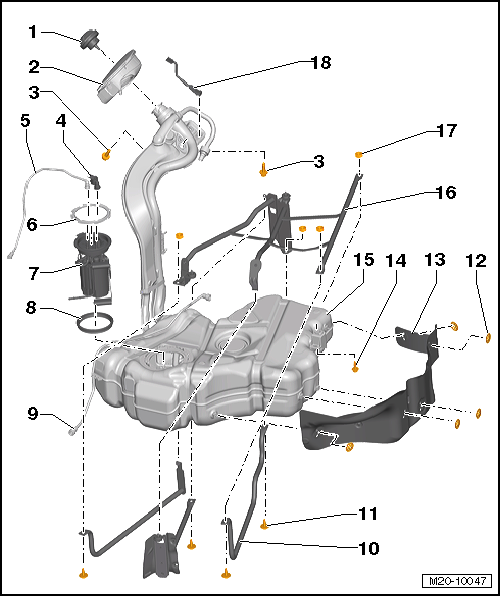 Courtesy of VOLKSWAGEN GROUP OF AMERICA, INC.
- Cap
- Replace the seal if damaged.
- Fuel Filler Door Unit
- Screw
- EVAP Canister System Pressure Sensor -G804-
- Fuel Supply Line
- Black
- Attached to the side of the fuel tank
- To disconnect, press the release button on the connecting piece
- Connector Couplings, Disconnecting. Refer to CONNECTOR COUPLINGS .
- The connector couplings must >>audibly<< engage when locking.
- Check for secure fit
- Pull on the connector coupling to check for secure fit.
- Locking Ring
- 110 Nm ± 5 Nm
- Make sure it is secure
- Fuel Delivery Unit
- Seal
- Replace after removing
- Install the dry seal into the opening in the fuel tank
- Coat the inside of seal with fuel only before installing the fuel delivery unit.
- Breather Line
- To the EVAP Canister
- Attached to the side of the fuel tank
- To disconnect, press the release button on the connecting piece
- Connector Couplings, Disconnecting. Refer to CONNECTOR COUPLINGS .
- The connector couplings must >>audibly<< engage when locking.
- Check for secure fit
- Pull on the connector coupling to check for secure fit.
- Mounting Strap
- Lower Section
- Note the installation position
- Bolt
- 23 Nm
- Replace after removing
- Lock Washer
- Heat Shield
- Bolt
- 23 Nm
- Replace after removing
- Fuel Tank
- Mounting Strap
- Upper part
- Note the installation position
- Nuts
- 23 Nm
- Replace after removing
- Connects upper and lower sections
- Ground (GND) Connection