Removal [08/2021 - ]: Procedure
WARNING: This page is about a different car, the 2022 Toyota Avalon, 2021 Toyota Avalon, 2020 Toyota Avalon, and 2019 Toyota Avalon. However, it is still accessible from the selected car via links, so may be relevant.
- REMOVE REAR WHEEL
Refer to PROCEDURE - Step 1
- REMOVE NO. 2 FLOOR UNDER COVER (for Gasoline Model 2WD)
- for LH Side:
See step 2
- REMOVE NO. 1 FLOOR UNDER COVER (for Gasoline Model 2WD)
- for RH Side:
See step 3
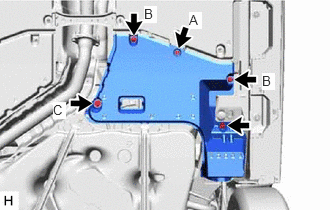
- REMOVE NO. 2 FLOOR UNDER COVER (for HV Model)
- for LH Side:
 Courtesy of © TOYOTA, LICENSE AGREEMENT TMS1002 Courtesy of © TOYOTA, LICENSE AGREEMENT TMS1002
|
- Remove the bolt and clip (A).
- Disengage the 2 grommets (B) and clip (C) to remove the No. 2 floor under cover.
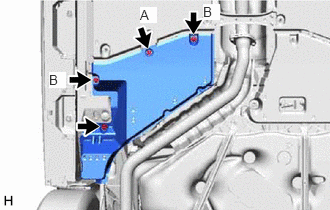
- REMOVE NO. 1 FLOOR UNDER COVER (for HV Model)
- for RH Side:
 Courtesy of © TOYOTA, LICENSE AGREEMENT TMS1002 Courtesy of © TOYOTA, LICENSE AGREEMENT TMS1002
|
- Remove the bolt and clip (A).
- Disengage the 2 grommets (B) to remove the No. 1 floor under cover.
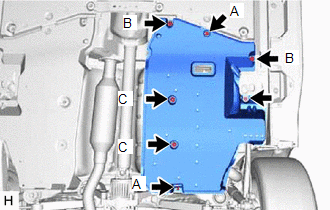
- REMOVE NO. 2 FLOOR UNDER COVER (for Gasoline Model AWD)
- for LH Side:
- Remove the bolt and 2 clips (A).
 Courtesy of © TOYOTA, LICENSE AGREEMENT TMS1002 Courtesy of © TOYOTA, LICENSE AGREEMENT TMS1002
|
- Disengage the 2 grommets (B) and 2 clips (C) to remove the No. 2 floor under cover.
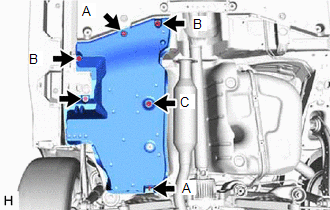
- REMOVE NO. 1 FLOOR UNDER COVER (for Gasoline Model AWD)
- for RH Side:
- Remove the bolt and 2 clips (A).
 Courtesy of © TOYOTA, LICENSE AGREEMENT TMS1002 Courtesy of © TOYOTA, LICENSE AGREEMENT TMS1002
|
- Disengage the 2 grommets (B) and clip (C) to remove the No. 1 floor under cover.
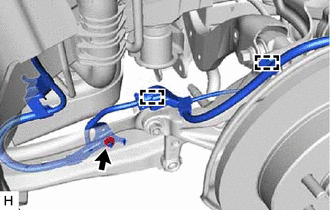
- SEPARATE NO. 2 PARKING BRAKE WIRE ASSEMBLY (w/o AVS)
- Disengage the 2 clamps.
 Courtesy of © TOYOTA, LICENSE AGREEMENT TMS1002 Courtesy of © TOYOTA, LICENSE AGREEMENT TMS1002
|
- Remove the nut and separate the No. 2 parking brake wire assembly from the rear trailing arm assembly.
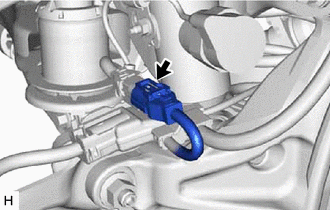
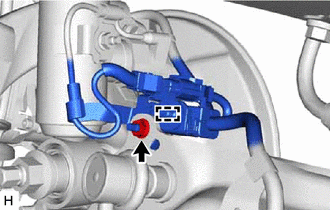
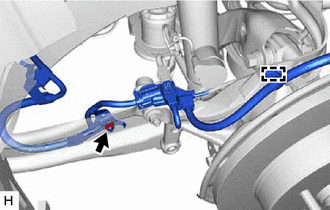
- SEPARATE NO. 2 PARKING BRAKE WIRE ASSEMBLY (w/ AVS)
- Disconnect the connector.
 Courtesy of © TOYOTA, LICENSE AGREEMENT TMS1002 Courtesy of © TOYOTA, LICENSE AGREEMENT TMS1002
|
- Remove the nut and disengage the clamp.
 Courtesy of © TOYOTA, LICENSE AGREEMENT TMS1002 Courtesy of © TOYOTA, LICENSE AGREEMENT TMS1002
|
- Disengage the clamp.
 Courtesy of © TOYOTA, LICENSE AGREEMENT TMS1002 Courtesy of © TOYOTA, LICENSE AGREEMENT TMS1002
|
- Remove the nut and separate the No. 2 parking brake wire assembly from the rear trailing arm assembly.
- REMOVE REAR STABILIZER LINK ASSEMBLY (for 2WD)
See step 5
- REMOVE REAR TRAILING ARM ASSEMBLY
- Using a transmission jack and a wooden block, support the rear No. 2 suspension arm assembly.
NOTE:
- When jacking up the rear No. 2 suspension arm assembly, be sure to jack it up slowly.
- Make sure to perform this operation with the vehicle kept as low as possible.
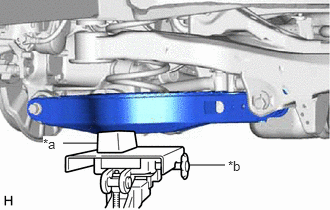 Courtesy of © TOYOTA, LICENSE AGREEMENT TMS1002 Courtesy of © TOYOTA, LICENSE AGREEMENT TMS1002
|
| *a |
Wooden Block |
| *b |
Transmission Jack |
- for 2WD:
- Remove the 2 bolts and separate the rear trailing arm assembly from the rear axle carrier sub-assembly.
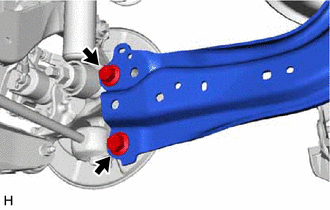 Courtesy of © TOYOTA, LICENSE AGREEMENT TMS1002 Courtesy of © TOYOTA, LICENSE AGREEMENT TMS1002
|
- for AWD:
- Remove the 3 bolts, nut and separate the rear trailing arm assembly from the rear axle carrier sub-assembly.
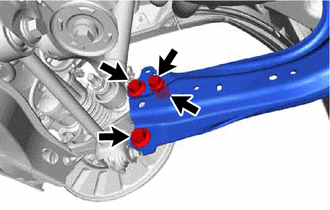 Courtesy of © TOYOTA, LICENSE AGREEMENT TMS1002 Courtesy of © TOYOTA, LICENSE AGREEMENT TMS1002
|
- Remove the 4 bolts and rear trailing arm assembly.
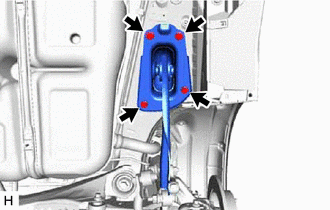 Courtesy of © TOYOTA, LICENSE AGREEMENT TMS1002 Courtesy of © TOYOTA, LICENSE AGREEMENT TMS1002
|
- REMOVE REAR SUSPENSION ARM COVER
- Secure the rear trailing arm assembly in a vise using aluminum plates.
NOTE:
Do not overtighten the vise.
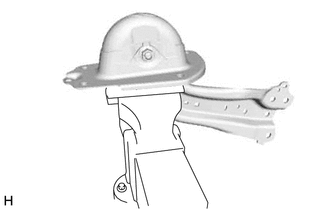 Courtesy of © TOYOTA, LICENSE AGREEMENT TMS1002 Courtesy of © TOYOTA, LICENSE AGREEMENT TMS1002
|
- Disengage the 4 claws and remove the rear suspension arm cover.
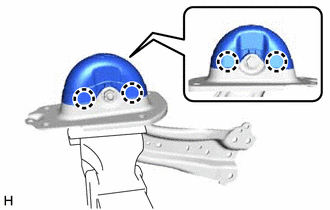 Courtesy of © TOYOTA, LICENSE AGREEMENT TMS1002 Courtesy of © TOYOTA, LICENSE AGREEMENT TMS1002
|
- REMOVE REAR SUSPENSION ARM BRACKET
- Remove the bolt, nut and rear suspension arm bracket from the rear trailing arm assembly.
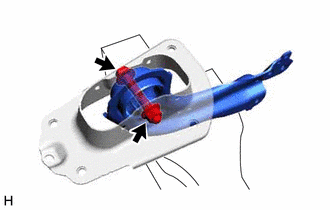 Courtesy of © TOYOTA, LICENSE AGREEMENT TMS1002 Courtesy of © TOYOTA, LICENSE AGREEMENT TMS1002
|