- REMOVE MILLIMETER WAVE RADAR SENSOR ASSEMBLY (w/ Pre-collision System)
Refer to PROCEDURE - Step 2
- REMOVE FRONT BUMPER EXTENSION MOUNTING BRACKET (for Bar Type Radiator Grille)
- Remove the 2 screws.
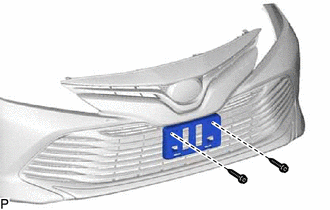 Courtesy of © TOYOTA, LICENSE AGREEMENT TMS1002 Courtesy of © TOYOTA, LICENSE AGREEMENT TMS1002
|
- Disengage the 2 guides to remove the front bumper extension mounting bracket as shown in the illustration.
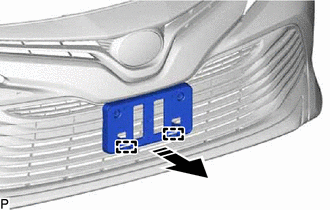 Courtesy of © TOYOTA, LICENSE AGREEMENT TMS1002 Courtesy of © TOYOTA, LICENSE AGREEMENT TMS1002
|
 |
Remove in this Direction |
- REMOVE FRONT BUMPER EXTENSION MOUNTING BRACKET (for Mesh Type Radiator Grille)
- Remove the 2 screws.
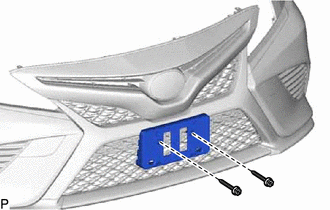 Courtesy of © TOYOTA, LICENSE AGREEMENT TMS1002 Courtesy of © TOYOTA, LICENSE AGREEMENT TMS1002
|
- Disengage the 2 guides to remove the front bumper extension mounting bracket as shown in the illustration.
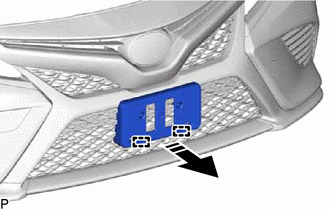 Courtesy of © TOYOTA, LICENSE AGREEMENT TMS1002 Courtesy of © TOYOTA, LICENSE AGREEMENT TMS1002
|
|
Remove in this Direction |
- REMOVE FRONT BUMPER PAD LH (for Bar Type Radiator Grille)
- Disengage the 2 claws and guide to remove the front bumper pad LH.
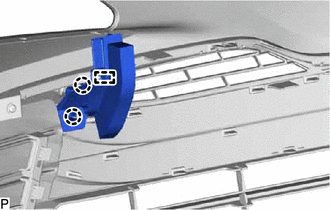 Courtesy of © TOYOTA, LICENSE AGREEMENT TMS1002 Courtesy of © TOYOTA, LICENSE AGREEMENT TMS1002
|
- REMOVE FRONT BUMPER PAD RH (for Bar Type Radiator Grille)
HINT:
Use the same procedure as for the LH side.
- REMOVE FRONT BUMPER PAD LH (for Mesh Type Radiator Grille)
- Disengage the 2 claws and guide to remove the front bumper pad LH.
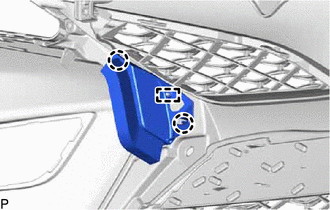 Courtesy of © TOYOTA, LICENSE AGREEMENT TMS1002 Courtesy of © TOYOTA, LICENSE AGREEMENT TMS1002
|
- REMOVE FRONT BUMPER PAD RH (for Mesh Type Radiator Grille)
HINT:
Use the same procedure as for the LH side.
- REMOVE FRONT BUMPER HOLE COVER LH (for Bar Type Radiator Grille)
- Disengage the 2 claws as shown in the illustration.
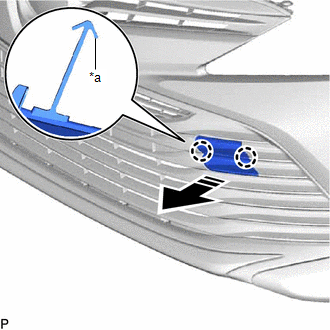 Courtesy of © TOYOTA, LICENSE AGREEMENT TMS1002 Courtesy of © TOYOTA, LICENSE AGREEMENT TMS1002
|
| *a |
Hook |
|
Remove in this Direction |
- Disengage the hook to remove the front bumper hole cover LH.
- REMOVE FRONT BUMPER HOLE COVER LH (for Mesh Type Radiator Grille)
- Disengage the 5 claws as shown in the illustration.
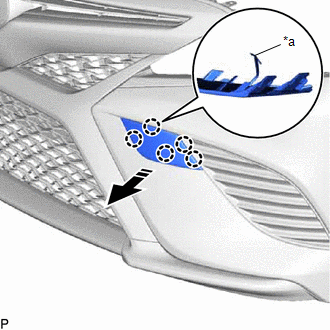 Courtesy of © TOYOTA, LICENSE AGREEMENT TMS1002 Courtesy of © TOYOTA, LICENSE AGREEMENT TMS1002
|
| *a |
Hook |
|
Remove in this Direction |
- Disengage the hook to remove the front bumper hole cover LH.
- REMOVE FRONT BUMPER HOLE COVER RH (for Mesh Type Radiator Grille)
HINT:
Use the same procedure as for the LH side.
- REMOVE HOOD TO FRONT END PANEL SEAL
- Disengage the 6 clips.
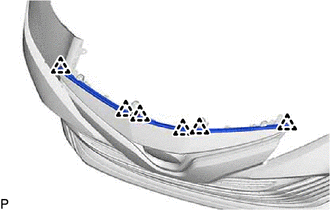 Courtesy of © TOYOTA, LICENSE AGREEMENT TMS1002 Courtesy of © TOYOTA, LICENSE AGREEMENT TMS1002
|
- Separate the double-sided tape and disengage the guide to remove the hood to front end panel seal.
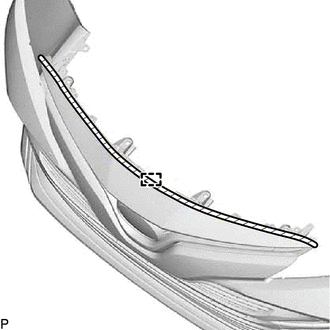 Courtesy of © TOYOTA, LICENSE AGREEMENT TMS1002 Courtesy of © TOYOTA, LICENSE AGREEMENT TMS1002
|
 |
Double-sided Tape |
- REMOVE RADIATOR GRILLE EMBLEM ASSEMBLY
- Remove the 2 screws.
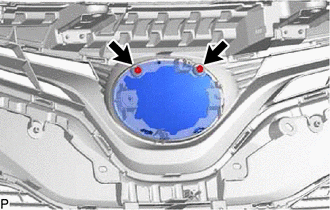 Courtesy of © TOYOTA, LICENSE AGREEMENT TMS1002 Courtesy of © TOYOTA, LICENSE AGREEMENT TMS1002
|
- Disengage the 2 claws and guide to remove the radiator grille emblem assembly.
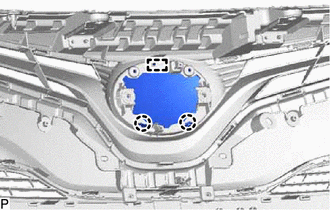 Courtesy of © TOYOTA, LICENSE AGREEMENT TMS1002 Courtesy of © TOYOTA, LICENSE AGREEMENT TMS1002
|
- REMOVE RADIATOR GRILLE SIDE MOULDING LH (for Bar Type Radiator Grille)
- Remove the screw.
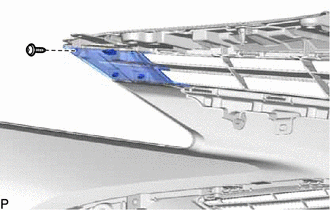 Courtesy of © TOYOTA, LICENSE AGREEMENT TMS1002 Courtesy of © TOYOTA, LICENSE AGREEMENT TMS1002
|
- Disengage the 3 claws to remove the radiator grille side moulding LH as shown in the illustration.
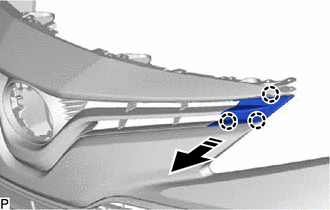 Courtesy of © TOYOTA, LICENSE AGREEMENT TMS1002 Courtesy of © TOYOTA, LICENSE AGREEMENT TMS1002
|
|
Remove in this Direction |
- REMOVE RADIATOR GRILLE SIDE MOULDING RH (for Bar Type Radiator Grille)
HINT:
Use the same procedure as for the LH side.
- REMOVE RADIATOR GRILLE (for Bar Type Radiator Grille)
- Remove the 2 clips.
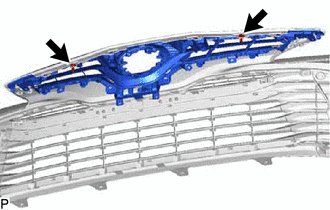 Courtesy of © TOYOTA, LICENSE AGREEMENT TMS1002 Courtesy of © TOYOTA, LICENSE AGREEMENT TMS1002
|
- Remove the 6 screws and radiator grille.
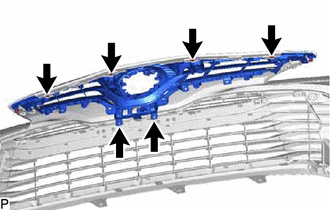 Courtesy of © TOYOTA, LICENSE AGREEMENT TMS1002 Courtesy of © TOYOTA, LICENSE AGREEMENT TMS1002
|
- REMOVE RADIATOR GRILLE (for Mesh Type Radiator Grille)
- Remove the 2 clips.
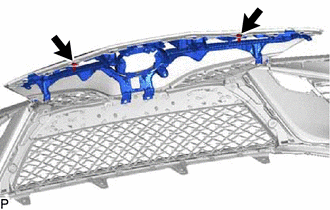 Courtesy of © TOYOTA, LICENSE AGREEMENT TMS1002 Courtesy of © TOYOTA, LICENSE AGREEMENT TMS1002
|
- Remove the 10 screws and radiator grille.
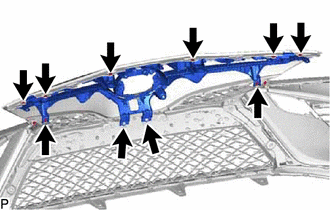 Courtesy of © TOYOTA, LICENSE AGREEMENT TMS1002 Courtesy of © TOYOTA, LICENSE AGREEMENT TMS1002
|
- REMOVE LOWER RADIATOR GRILLE MOULDING (for Mesh Type Radiator Grille)
- Remove the 2 screws.
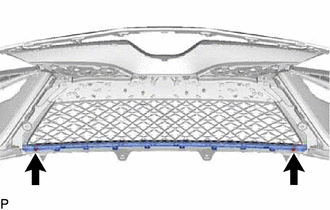 Courtesy of © TOYOTA, LICENSE AGREEMENT TMS1002 Courtesy of © TOYOTA, LICENSE AGREEMENT TMS1002
|
- Disengage the 16 claws to remove the lower radiator grille moulding.
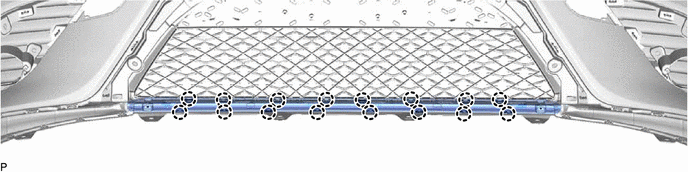 Courtesy of © TOYOTA, LICENSE AGREEMENT TMS1002 Courtesy of © TOYOTA, LICENSE AGREEMENT TMS1002
|
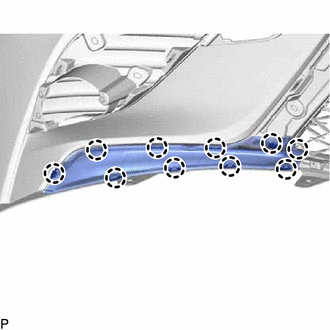
- REMOVE LOWER RADIATOR GRILLE MOULDING LH (for Mesh Type Radiator Grille)
- Disengage the 10 claws to remove the lower radiator grille moulding LH.
 Courtesy of © TOYOTA, LICENSE AGREEMENT TMS1002 Courtesy of © TOYOTA, LICENSE AGREEMENT TMS1002
|
- REMOVE LOWER RADIATOR GRILLE MOULDING RH (for Mesh Type Radiator Grille)
HINT:
Use the same procedure as for the LH side.
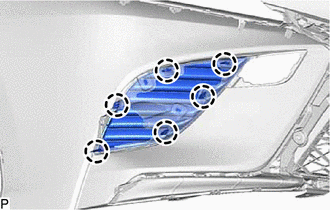
- REMOVE FOG LIGHT COVER LH (for Mesh Type Radiator Grille)
- Disengage the 6 claws to remove the fog light cover LH.
 Courtesy of © TOYOTA, LICENSE AGREEMENT TMS1002 Courtesy of © TOYOTA, LICENSE AGREEMENT TMS1002
|
- REMOVE FOG LIGHT COVER RH (for Mesh Type Radiator Grille)
HINT:
Use the same procedure as for the LH side.
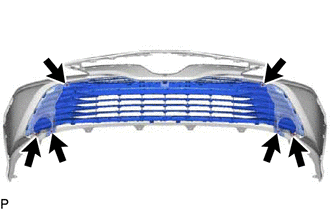
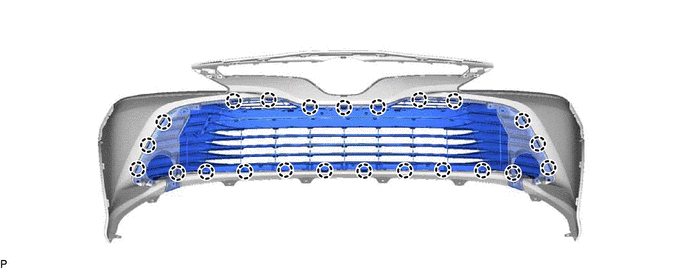
- REMOVE LOWER RADIATOR GRILLE SUB-ASSEMBLY (for Bar Type Radiator Grille)
- Remove the 6 screws.
 Courtesy of © TOYOTA, LICENSE AGREEMENT TMS1002 Courtesy of © TOYOTA, LICENSE AGREEMENT TMS1002
|
- Disengage the 23 claws to remove the lower radiator grille sub-assembly.
 Courtesy of © TOYOTA, LICENSE AGREEMENT TMS1002 Courtesy of © TOYOTA, LICENSE AGREEMENT TMS1002
|
- REMOVE LOWER RADIATOR GRILLE SUB-ASSEMBLY (for Mesh Type Radiator Grille)
- Remove the 2 screws.
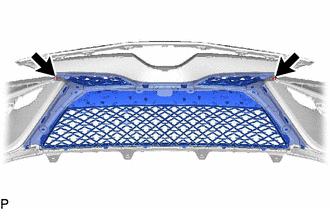 Courtesy of © TOYOTA, LICENSE AGREEMENT TMS1002 Courtesy of © TOYOTA, LICENSE AGREEMENT TMS1002
|
- Disengage the 18 claws to remove the lower radiator grille sub-assembly.
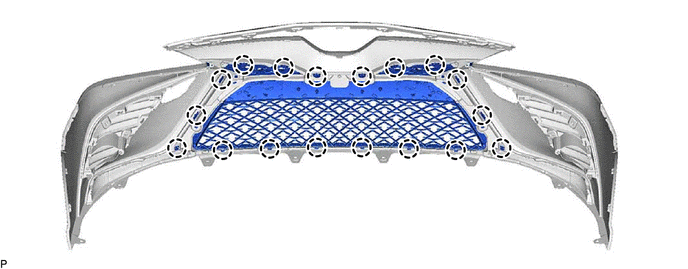 Courtesy of © TOYOTA, LICENSE AGREEMENT TMS1002 Courtesy of © TOYOTA, LICENSE AGREEMENT TMS1002
|
- REMOVE RADIATOR GRILLE SIDE MOULDING LH (for Mesh Type Radiator Grille)
- Remove the 2 clips.
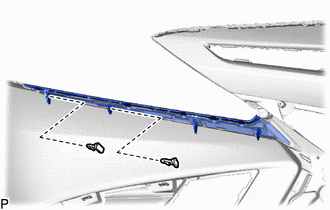 Courtesy of © TOYOTA, LICENSE AGREEMENT TMS1002 Courtesy of © TOYOTA, LICENSE AGREEMENT TMS1002
|
- Disengage the 2 claws and 2 guides to remove the radiator grille side moulding LH.
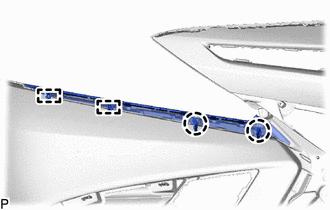 Courtesy of © TOYOTA, LICENSE AGREEMENT TMS1002 Courtesy of © TOYOTA, LICENSE AGREEMENT TMS1002
|
- REMOVE RADIATOR GRILLE SIDE MOULDING RH (for Mesh Type Radiator Grille)
HINT:
Use the same procedure as for the LH side.
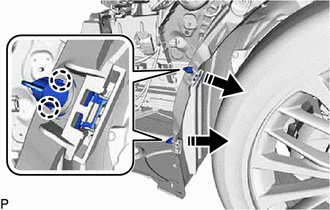
- REMOVE PIN HOLD CLIP
- Disengage the 4 claws to remove the 2 pin hold clips as shown in the illustration.
 Courtesy of © TOYOTA, LICENSE AGREEMENT TMS1002 Courtesy of © TOYOTA, LICENSE AGREEMENT TMS1002
|
|
Remove in this Direction |
HINT:
Use the same procedure for the RH side and LH side.
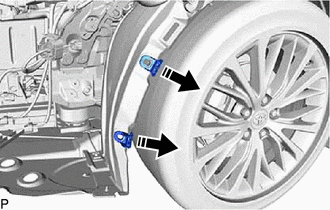
- REMOVE FRONT FENDER LINER RETAINER
- Remove the 2 front fender liner retainers as shown in the illustration.
 Courtesy of © TOYOTA, LICENSE AGREEMENT TMS1002 Courtesy of © TOYOTA, LICENSE AGREEMENT TMS1002
|
|
Remove in this Direction |
HINT:
Use the same procedure for the RH side and LH side.
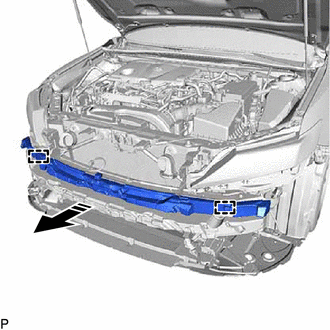
- REMOVE NO. 2 FRONT BUMPER ENERGY ABSORBER
- Disengage the 2 guides to remove the No. 2 front bumper energy absorber as shown in the illustration.
 Courtesy of © TOYOTA, LICENSE AGREEMENT TMS1002 Courtesy of © TOYOTA, LICENSE AGREEMENT TMS1002
|
|
Remove in this Direction |
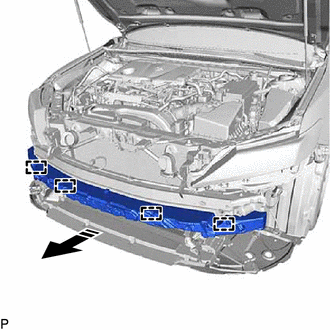
- REMOVE FRONT BUMPER ENERGY ABSORBER
- Disengage the 4 guides to remove the front bumper energy absorber as shown in the illustration.
 Courtesy of © TOYOTA, LICENSE AGREEMENT TMS1002 Courtesy of © TOYOTA, LICENSE AGREEMENT TMS1002
|
|
Remove in this Direction |
- REMOVE FRONT BUMPER REINFORCEMENT
HINT:
Perform this procedure only when replacement of the front bumper reinforcement is necessary.
- Remove the headlight assembly LH.
Refer to REMOVAL [03/2017 - 06/2017]
- Remove the headlight assembly RH.
HINT:
Use the same procedure as for the LH side.
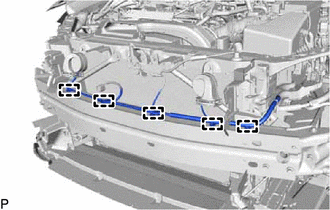
- Disengage the 5 clamps.
 Courtesy of © TOYOTA, LICENSE AGREEMENT TMS1002 Courtesy of © TOYOTA, LICENSE AGREEMENT TMS1002
|
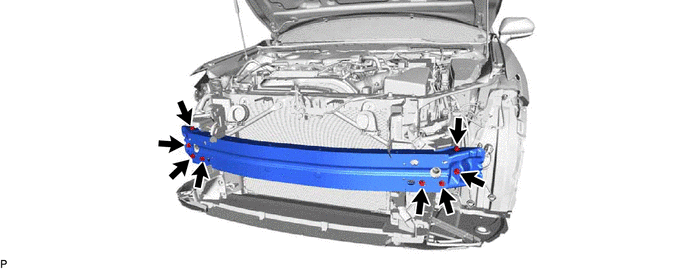
- Remove the 8 bolts and front bumper reinforcement.
 Courtesy of © TOYOTA, LICENSE AGREEMENT TMS1002 Courtesy of © TOYOTA, LICENSE AGREEMENT TMS1002
|
- REMOVE FRONT BUMPER SIDE RETAINER LH
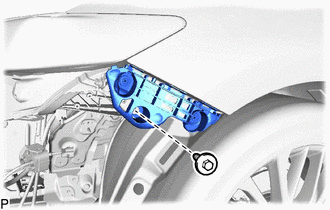
- Remove the bolt.
 Courtesy of © TOYOTA, LICENSE AGREEMENT TMS1002 Courtesy of © TOYOTA, LICENSE AGREEMENT TMS1002
|
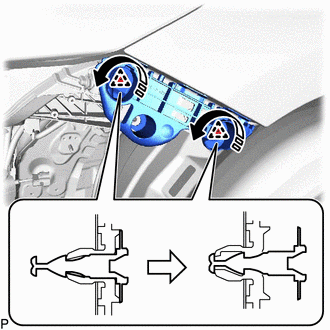
- Disengage the 2 clips to remove the front bumper side retainer LH as shown in the illustration.
 Courtesy of © TOYOTA, LICENSE AGREEMENT TMS1002 Courtesy of © TOYOTA, LICENSE AGREEMENT TMS1002
|
|
Remove in this Direction |
- REMOVE FRONT BUMPER SIDE RETAINER RH
HINT:
Use the same procedure as for the LH side.