- DISCONNECT CABLE FROM NEGATIVE BATTERY TERMINAL
- REMOVE REAR NO. 2 SEAT ASSEMBLY (w/ Rear No. 2 Seat)
(Refer to REMOVAL [08/2015 - ]
)
- REMOVE DOOR SCUFF PLATE ASSEMBLY LH
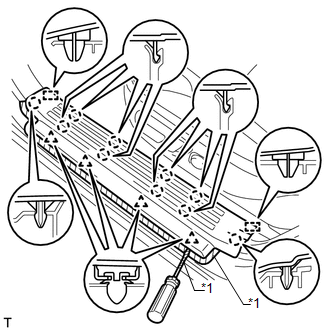
- Put protective tape around the door scuff plate assembly LH.
 Courtesy of © TOYOTA, LICENSE AGREEMENT TMS1002 Courtesy of © TOYOTA, LICENSE AGREEMENT TMS1002
|
TEXT IN ILLUSTRATION
- Using a screwdriver, detach the 4 clips, 10 claws and 2 guides to remove the door scuff plate assembly LH.
HINT:
Tape the screwdriver tip before use.
- REMOVE DOOR SCUFF PLATE ASSEMBLY RH
HINT:
Use the same procedure as for the LH side.
- REMOVE COWL SIDE TRIM BOARD LH
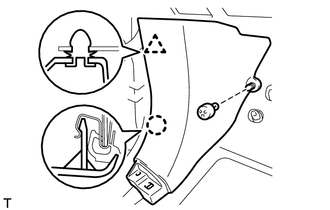
- Remove the clip.
 Courtesy of © TOYOTA, LICENSE AGREEMENT TMS1002 Courtesy of © TOYOTA, LICENSE AGREEMENT TMS1002
|
- Detach the clip and claw to remove the cowl side trim board LH.
- REMOVE COWL SIDE TRIM BOARD RH
HINT:
Use the same procedure as for the LH side.
- REMOVE FRONT DOOR OPENING TRIM WEATHERSTRIP LH
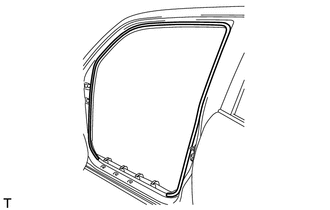
- Remove the front door opening trim weatherstrip LH.
 Courtesy of © TOYOTA, LICENSE AGREEMENT TMS1002 Courtesy of © TOYOTA, LICENSE AGREEMENT TMS1002
|
- REMOVE FRONT DOOR OPENING TRIM WEATHERSTRIP RH
HINT:
Use the same procedure as for the LH side.
- REMOVE ASSIST GRIP PLUG
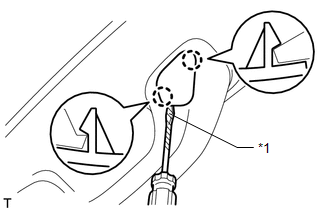
- Using a screwdriver, detach the 2 claws to remove the assist grip plug.
 Courtesy of © TOYOTA, LICENSE AGREEMENT TMS1002 Courtesy of © TOYOTA, LICENSE AGREEMENT TMS1002
|
TEXT IN ILLUSTRATION
HINT:
- Tape the screwdriver tip before use.
- Use the same procedure for the other assist grip plug.
- REMOVE NO. 1 ASSIST GRIP
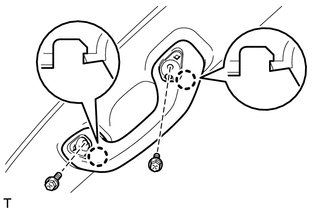
- Remove the 2 bolts.
 Courtesy of © TOYOTA, LICENSE AGREEMENT TMS1002 Courtesy of © TOYOTA, LICENSE AGREEMENT TMS1002
|
- Detach the 2 claws to remove the No. 1 assist grip.
- REMOVE FRONT PILLAR GARNISH RH
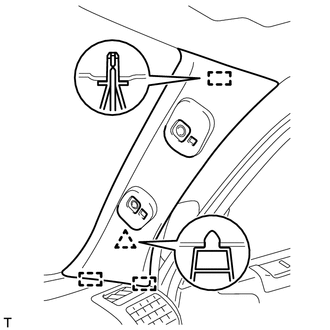
- Detach the clip and 3 guides to remove the front pillar garnish RH.
 Courtesy of © TOYOTA, LICENSE AGREEMENT TMS1002 Courtesy of © TOYOTA, LICENSE AGREEMENT TMS1002
|
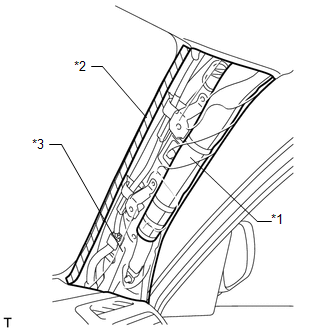
- Protect the curtain shield airbag assembly.
 Courtesy of © TOYOTA, LICENSE AGREEMENT TMS1002 Courtesy of © TOYOTA, LICENSE AGREEMENT TMS1002
|
- Completely cover the curtain shield airbag assembly with a protective cover and secure the ends of the cover with adhesive tape as shown in the illustration.
TEXT IN ILLUSTRATION
| *1 |
Curtain Shield Airbag Assembly |
| *2 |
Adhesive Tape |
| *3 |
Protective Cover |
NOTE:
Cover the curtain shield airbag assembly with a protective cover as soon as the front pillar garnish RH is removed.
- REMOVE FRONT PILLAR GARNISH LH
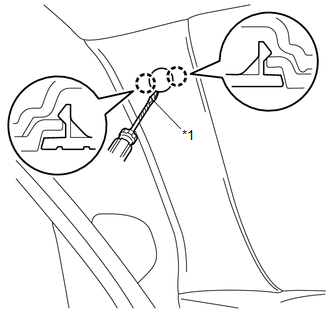
- Using a screwdriver, detach the 2 claws to remove the No. 1 front pillar garnish cover LH.
 Courtesy of © TOYOTA, LICENSE AGREEMENT TMS1002 Courtesy of © TOYOTA, LICENSE AGREEMENT TMS1002
|
TEXT IN ILLUSTRATION
HINT:
Tape the screwdriver tip before use.
- Remove the bolt.
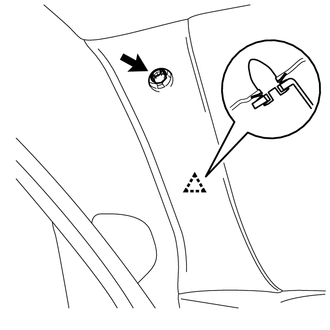 Courtesy of © TOYOTA, LICENSE AGREEMENT TMS1002 Courtesy of © TOYOTA, LICENSE AGREEMENT TMS1002
|
- Detach the clip.
- Detach the 2 guides to remove the front pillar garnish LH.
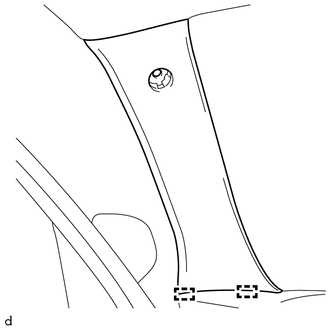 Courtesy of © TOYOTA, LICENSE AGREEMENT TMS1002 Courtesy of © TOYOTA, LICENSE AGREEMENT TMS1002
|
- Protect the curtain shield airbag assembly.
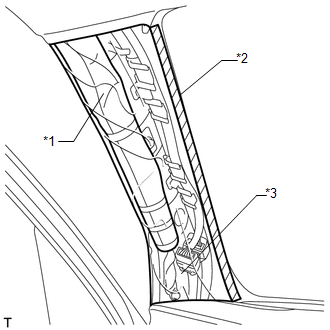 Courtesy of © TOYOTA, LICENSE AGREEMENT TMS1002 Courtesy of © TOYOTA, LICENSE AGREEMENT TMS1002
|
- Completely cover the curtain shield airbag assembly with a protective cover and secure the ends of the cover with adhesive tape as shown in the illustration.
TEXT IN ILLUSTRATION
| *1 |
Curtain Shield Airbag Assembly |
| *2 |
Adhesive Tape |
| *3 |
Protective Cover |
NOTE:
Cover the curtain shield airbag with a protective cover as soon as the front pillar garnish LH is removed.
- REMOVE REAR NO. 1 FLOOR STEP COVER (w/ Rear No. 2 Seat)
- Using a screwdriver, detach the 2 claws to remove the rear No. 1 floor step cover.
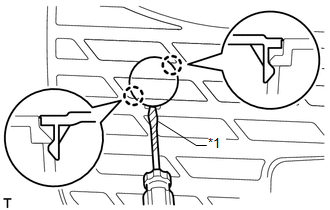 Courtesy of © TOYOTA, LICENSE AGREEMENT TMS1002 Courtesy of © TOYOTA, LICENSE AGREEMENT TMS1002
|
TEXT IN ILLUSTRATION
HINT:
- Tape the screwdriver tip before use.
- Use the same procedure for all the rear No. 1 floor step covers.
- REMOVE QUARTER SCUFF PLATE LH (w/ Rear No. 2 Seat)
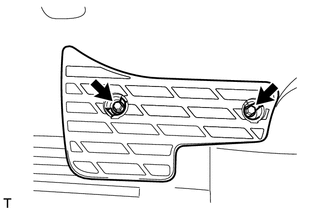
- Remove the 2 bolts and quarter scuff plate LH.
 Courtesy of © TOYOTA, LICENSE AGREEMENT TMS1002 Courtesy of © TOYOTA, LICENSE AGREEMENT TMS1002
|
- REMOVE QUARTER SCUFF PLATE RH (w/ Rear No. 2 Seat)
HINT:
Use the same procedure as for the LH side.
- REMOVE REAR DOOR SCUFF PLATE LH
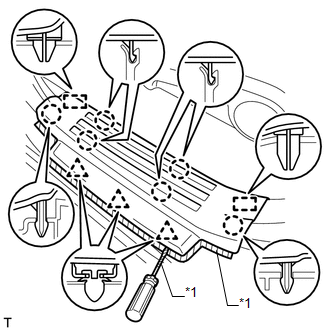
- Put protective tape around the rear door scuff plate LH.
- Using a screwdriver, detach the 3 clips, 6 claws and 2 guides to remove the rear door scuff plate LH.
 Courtesy of © TOYOTA, LICENSE AGREEMENT TMS1002 Courtesy of © TOYOTA, LICENSE AGREEMENT TMS1002
|
TEXT IN ILLUSTRATION
HINT:
Tape the screwdriver tip before use.
- REMOVE REAR DOOR SCUFF PLATE RH
HINT:
Use the same procedure as for the LH side.
- REMOVE REAR DOOR OPENING TRIM WEATHERSTRIP LH
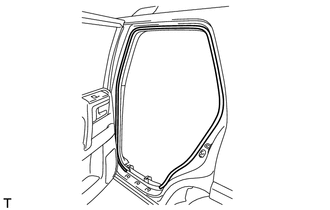
- Remove the rear door opening trim weatherstrip LH.
 Courtesy of © TOYOTA, LICENSE AGREEMENT TMS1002 Courtesy of © TOYOTA, LICENSE AGREEMENT TMS1002
|
- REMOVE REAR DOOR OPENING TRIM WEATHERSTRIP RH
HINT:
Use the same procedure as for the LH side.
- REMOVE OUTER LAP BELT ANCHOR COVER
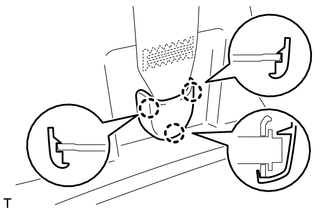
- Detach the 3 claws to remove the outer lap belt anchor cover.
 Courtesy of © TOYOTA, LICENSE AGREEMENT TMS1002 Courtesy of © TOYOTA, LICENSE AGREEMENT TMS1002
|
HINT:
Use the same procedure for the other outer lap belt anchor cover.
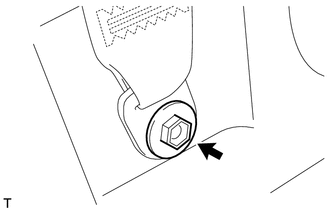
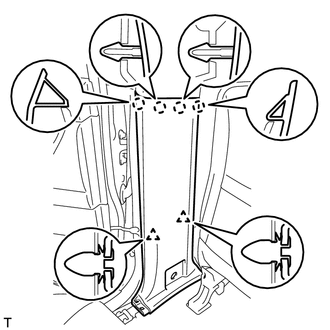
- REMOVE LOWER CENTER PILLAR GARNISH LH
- Remove the bolt to disconnect the front seat outer belt floor anchor.
 Courtesy of © TOYOTA, LICENSE AGREEMENT TMS1002 Courtesy of © TOYOTA, LICENSE AGREEMENT TMS1002
|
- Detach the 4 claws and 2 clips to remove the lower center pillar garnish LH.
 Courtesy of © TOYOTA, LICENSE AGREEMENT TMS1002 Courtesy of © TOYOTA, LICENSE AGREEMENT TMS1002
|
- REMOVE LOWER CENTER PILLAR GARNISH RH
HINT:
Use the same procedure as for the LH side.
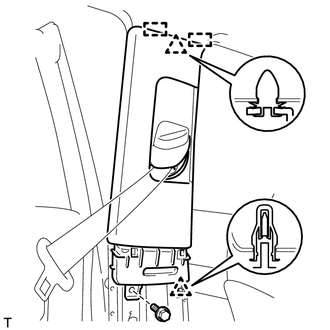
- REMOVE CENTER PILLAR GARNISH LH
- Move the front shoulder belt anchor adjuster to the lowest position.
 Courtesy of © TOYOTA, LICENSE AGREEMENT TMS1002 Courtesy of © TOYOTA, LICENSE AGREEMENT TMS1002
|
- Remove the bolt.
- Detach the 2 clips and 2 guides.
- Pass the front seat outer belt floor anchor through the center pillar garnish LH to remove the center pillar garnish LH.
- REMOVE CENTER PILLAR GARNISH RH
HINT:
Use the same procedure as for the LH side.
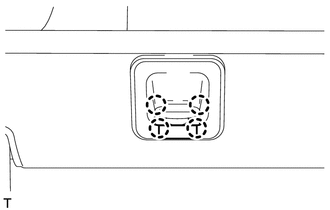
- REMOVE NO. 1 LUGGAGE COMPARTMENT TRIM COVER (w/o Deck Board)
- Detach the 4 claws to open the cover.
 Courtesy of © TOYOTA, LICENSE AGREEMENT TMS1002 Courtesy of © TOYOTA, LICENSE AGREEMENT TMS1002
|
- Remove the bolt, luggage hold belt striker and No. 1 luggage compartment trim cover.
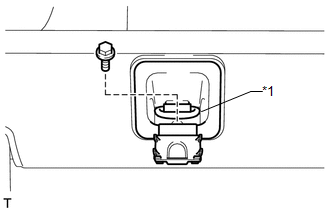 Courtesy of © TOYOTA, LICENSE AGREEMENT TMS1002 Courtesy of © TOYOTA, LICENSE AGREEMENT TMS1002
|
TEXT IN ILLUSTRATION
| *1 |
Luggage Hold Belt Striker |
HINT:
Use the same procedure for the other No. 1 luggage compartment trim cover.
- REMOVE NO. 1 DECK BOARD SUB-ASSEMBLY (w/o Deck Board)
- Detach the clip to remove the No. 1 deck board sub-assembly.
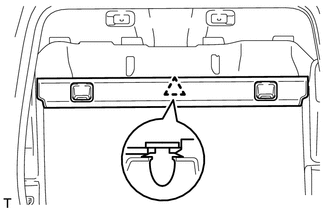 Courtesy of © TOYOTA, LICENSE AGREEMENT TMS1002 Courtesy of © TOYOTA, LICENSE AGREEMENT TMS1002
|
- REMOVE LUGGAGE COMPARTMENT SIDE COVER SUB-ASSEMBLY LH (w/ Deck Board)
- Using a screwdriver, detach the 4 clips and 2 guides to remove the luggage compartment side cover sub-assembly LH.
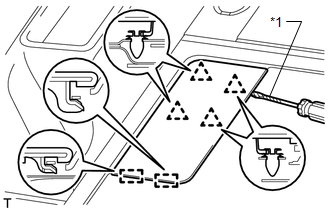 Courtesy of © TOYOTA, LICENSE AGREEMENT TMS1002 Courtesy of © TOYOTA, LICENSE AGREEMENT TMS1002
|
TEXT IN ILLUSTRATION
HINT:
Tape the screwdriver tip before use.
- REMOVE LUGGAGE COMPARTMENT SIDE COVER SUB-ASSEMBLY RH (w/ Deck Board)
HINT:
Use the same procedure as for the LH side.
- REMOVE DECK BOARD ASSEMBLY (w/ Deck Board)
- Remove the 6 bolts.
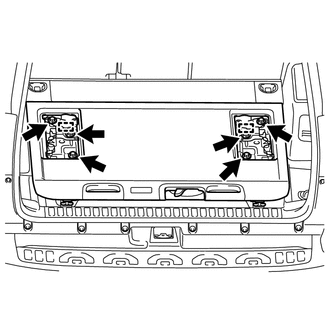 Courtesy of © TOYOTA, LICENSE AGREEMENT TMS1002 Courtesy of © TOYOTA, LICENSE AGREEMENT TMS1002
|
- Detach the 2 guides to remove the deck board assembly.
- REMOVE NO. 2 LUGGAGE COMPARTMENT TRIM COVER (w/ Deck Board)
- Detach the 2 claws to open the cover.
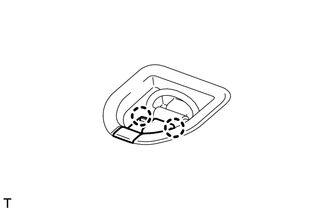 Courtesy of © TOYOTA, LICENSE AGREEMENT TMS1002 Courtesy of © TOYOTA, LICENSE AGREEMENT TMS1002
|
- Remove the bolt, luggage hold belt striker and No. 2 luggage compartment trim cover.
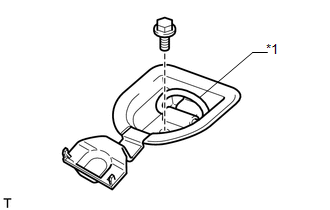 Courtesy of © TOYOTA, LICENSE AGREEMENT TMS1002 Courtesy of © TOYOTA, LICENSE AGREEMENT TMS1002
|
TEXT IN ILLUSTRATION
| *1 |
Luggage Hold Belt Striker |
HINT:
Use the same procedure for the other No. 2 luggage compartment trim cover.
- REMOVE NO. 2 DECK BOARD SUB-ASSEMBLY (w/ Deck Board)
- Detach the 2 clips and 2 guides to remove the No. 2 deck board sub-assembly.
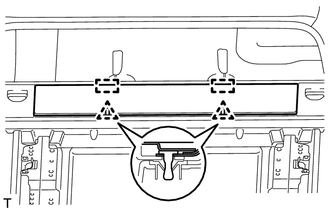 Courtesy of © TOYOTA, LICENSE AGREEMENT TMS1002 Courtesy of © TOYOTA, LICENSE AGREEMENT TMS1002
|
- REMOVE REAR NO. 2 FLOOR BOARD ASSEMBLY (w/ Deck Board)
- Detach the 3 clips to remove the rear No. 2 floor board assembly.
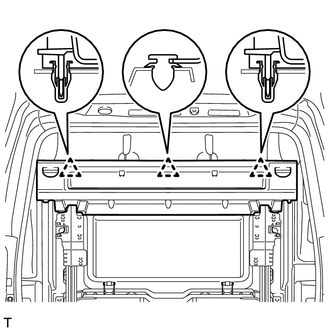 Courtesy of © TOYOTA, LICENSE AGREEMENT TMS1002 Courtesy of © TOYOTA, LICENSE AGREEMENT TMS1002
|
- REMOVE INNER FLOOR SIDE RAIL SUB-ASSEMBLY (w/ Deck Board)
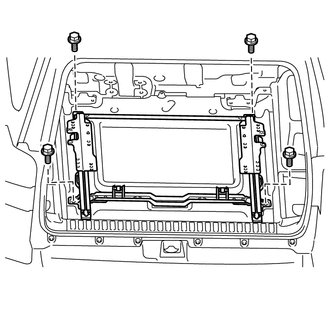
- Remove the 4 bolts and inner floor side rail sub-assembly.
 Courtesy of © TOYOTA, LICENSE AGREEMENT TMS1002 Courtesy of © TOYOTA, LICENSE AGREEMENT TMS1002
|
- REMOVE REAR FLOOR MAT REAR SUPPORT PLATE
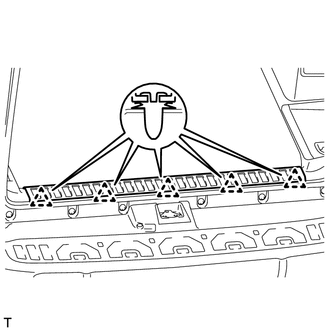
- Detach the 5 clips to remove the rear floor mat rear support plate.
 Courtesy of © TOYOTA, LICENSE AGREEMENT TMS1002 Courtesy of © TOYOTA, LICENSE AGREEMENT TMS1002
|
- REMOVE REAR FLOOR CARPET ASSEMBLY (w/o Deck Board)
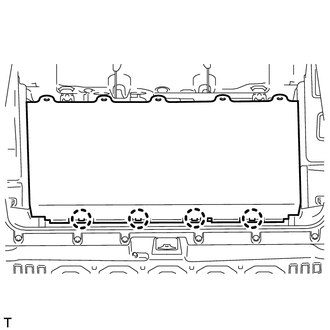
- Detach the 4 claws to remove the rear floor carpet assembly.
 Courtesy of © TOYOTA, LICENSE AGREEMENT TMS1002 Courtesy of © TOYOTA, LICENSE AGREEMENT TMS1002
|
- REMOVE REAR NO. 1 SEAT OUTER LAP BELT ANCHOR COVER
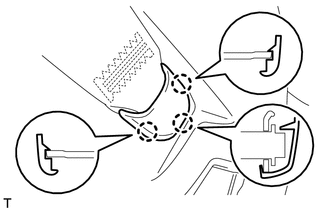
- Detach the 3 claws to remove the rear No. 1 seat outer lap belt anchor cover.
 Courtesy of © TOYOTA, LICENSE AGREEMENT TMS1002 Courtesy of © TOYOTA, LICENSE AGREEMENT TMS1002
|
HINT:
Use the same procedure for the other rear No. 1 seat outer lap belt anchor cover.
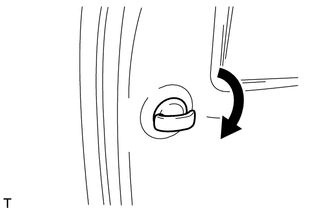
- REMOVE NO. 1 LUGGAGE COMPARTMENT TRIM HOOK
- Remove the No. 1 luggage compartment trim hook by turning it clockwise.
 Courtesy of © TOYOTA, LICENSE AGREEMENT TMS1002 Courtesy of © TOYOTA, LICENSE AGREEMENT TMS1002
|
HINT:
Use the same procedure for the other No. 1 luggage compartment trim hook.
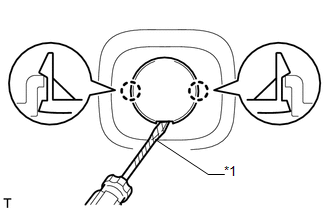
- REMOVE FRONT DECK SIDE TRIM COVER LH
- Using a screwdriver, detach the 2 claws to remove the front deck side trim cover LH.
 Courtesy of © TOYOTA, LICENSE AGREEMENT TMS1002 Courtesy of © TOYOTA, LICENSE AGREEMENT TMS1002
|
TEXT IN ILLUSTRATION
HINT:
Tape the screwdriver tip before use.
- REMOVE FRONT DECK SIDE TRIM COVER RH
HINT:
Use the same procedure as for the LH side.
- REMOVE NO. 2 LUGGAGE COMPARTMENT TRIM COVER (w/o Rear No. 2 Seat)
- Detach the 2 claws to open the cover.
Courtesy of © TOYOTA, LICENSE AGREEMENT TMS1002
|
- Remove the bolt, luggage hold belt striker and No. 2 luggage compartment trim cover.
Courtesy of © TOYOTA, LICENSE AGREEMENT TMS1002
|
TEXT IN ILLUSTRATION
| *1 |
Luggage Hold Belt Striker |
HINT:
Use the same procedure for the other No. 2 luggage compartment trim cover.
- REMOVE REAR SEATBACK LOCK CONTROL LEVER BASE LH (w/o Rear No. 2 Seat)
Refer to PROCEDURE - Step 9
- REMOVE DECK TRIM SIDE PANEL ASSEMBLY LH
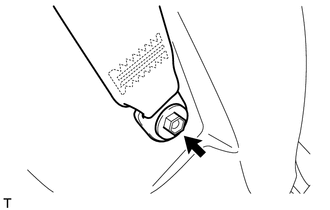
- w/o Rear No. 2 Seat:
- Remove the bolt to disconnect the rear No. 1 seat outer belt floor anchor.
 Courtesy of © TOYOTA, LICENSE AGREEMENT TMS1002 Courtesy of © TOYOTA, LICENSE AGREEMENT TMS1002
|
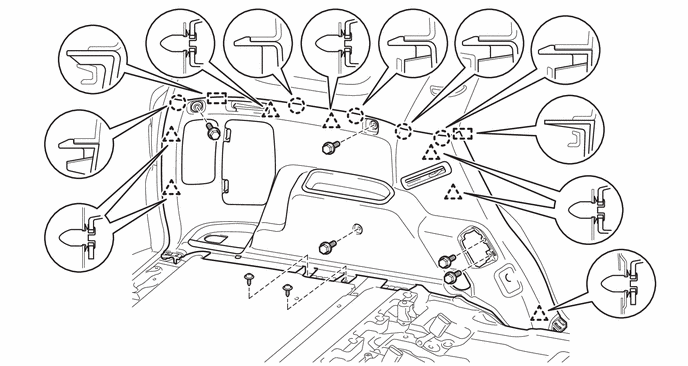
- Remove the 5 bolts and 2 screws.
- Detach the 7 clips, 5 claws and 2 guides.
 Courtesy of © TOYOTA, LICENSE AGREEMENT TMS1002 Courtesy of © TOYOTA, LICENSE AGREEMENT TMS1002
|
- w/ Rear No. 2 Seat:
- Remove the bolt and disconnect the rear No. 1 seat outer belt floor anchor.
Courtesy of © TOYOTA, LICENSE AGREEMENT TMS1002
|
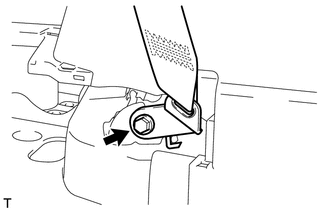
- Remove the bolt to disconnect the rear No. 2 seat outer belt floor anchor.
 Courtesy of © TOYOTA, LICENSE AGREEMENT TMS1002 Courtesy of © TOYOTA, LICENSE AGREEMENT TMS1002
|
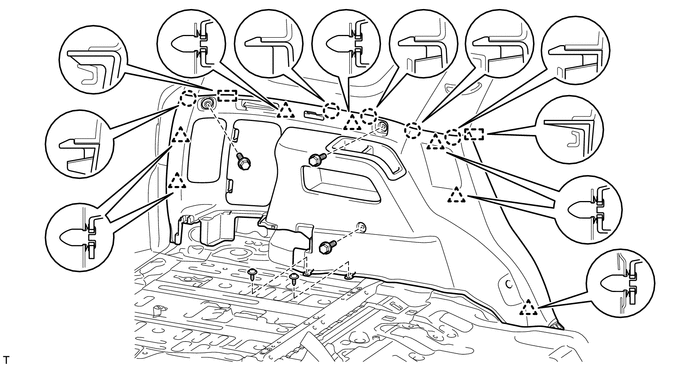
- Remove the 3 bolts and 2 screws.
- Detach the 7 clips, 5 claws and 2 guides to remove the deck trim side panel assembly LH.
 Courtesy of © TOYOTA, LICENSE AGREEMENT TMS1002 Courtesy of © TOYOTA, LICENSE AGREEMENT TMS1002
|
- REMOVE REAR SEATBACK LOCK CONTROL LEVER BASE RH (w/o Rear No. 2 Seat)
Refer to PROCEDURE - Step 9
- REMOVE DECK TRIM SIDE PANEL ASSEMBLY RH
- w/o Rear No. 2 Seat:
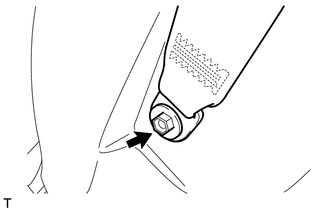
- Remove the bolt to disconnect the rear No. 1 seat outer belt floor anchor.
 Courtesy of © TOYOTA, LICENSE AGREEMENT TMS1002 Courtesy of © TOYOTA, LICENSE AGREEMENT TMS1002
|
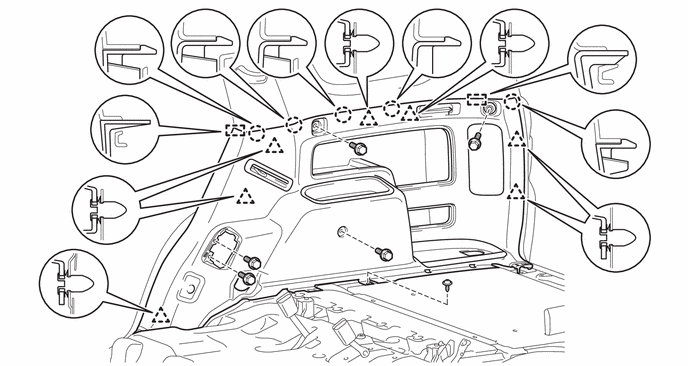
- Remove the 5 bolts and screw.
- Detach the 7 clips, 5 claws and 2 guides.
 Courtesy of © TOYOTA, LICENSE AGREEMENT TMS1002 Courtesy of © TOYOTA, LICENSE AGREEMENT TMS1002
|
- Disconnect each connector.
- w/ Rear No. 2 Seat:
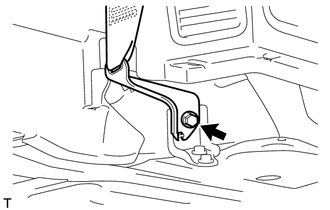
- Remove the bolt and disconnect the rear No. 1 seat outer belt floor anchor.
Courtesy of © TOYOTA, LICENSE AGREEMENT TMS1002
|
- Remove the bolt and disconnect the rear No. 2 seat outer belt floor anchor.
 Courtesy of © TOYOTA, LICENSE AGREEMENT TMS1002 Courtesy of © TOYOTA, LICENSE AGREEMENT TMS1002
|
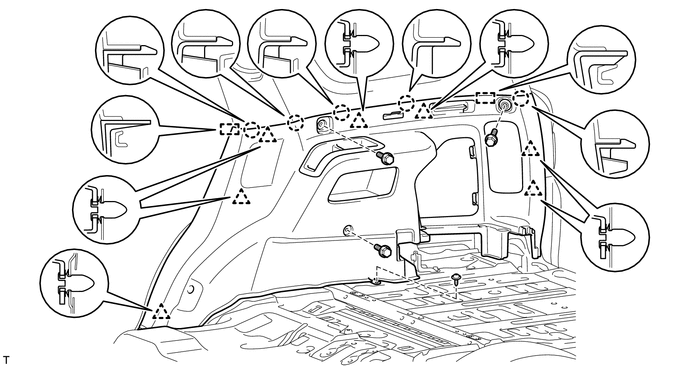
- Remove the 3 bolts and screw.
- Detach the 7 clips, 5 claws and 2 guides.
- Disconnect each connector and remove the deck trim side panel assembly RH.
 Courtesy of © TOYOTA, LICENSE AGREEMENT TMS1002 Courtesy of © TOYOTA, LICENSE AGREEMENT TMS1002
|
- REMOVE REAR NO. 2 WINDOW SIDE GARNISH ASSEMBLY LH
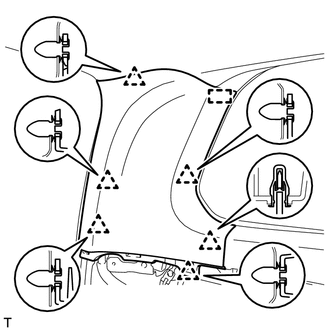
- w/o Rear No. 2 Seat:
 Courtesy of © TOYOTA, LICENSE AGREEMENT TMS1002 Courtesy of © TOYOTA, LICENSE AGREEMENT TMS1002
|
- Detach the 6 clips and guide to remove the rear No. 2 window side garnish assembly LH.
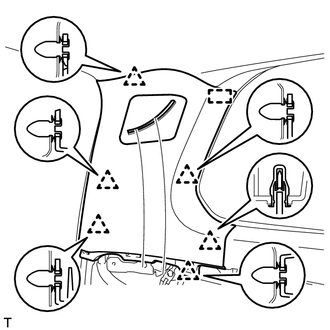
- w/ Rear No. 2 Seat:
 Courtesy of © TOYOTA, LICENSE AGREEMENT TMS1002 Courtesy of © TOYOTA, LICENSE AGREEMENT TMS1002
|
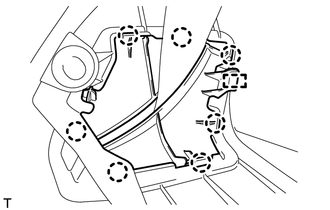
- Detach the 6 clips and guide.
- Detach the 7 claws and guide and pass the rear No. 2 seat outer belt floor anchor through the rear No. 2 window side garnish assembly LH to remove the rear No. 2 window side garnish assembly LH.
 Courtesy of © TOYOTA, LICENSE AGREEMENT TMS1002 Courtesy of © TOYOTA, LICENSE AGREEMENT TMS1002
|
- REMOVE REAR NO. 2 WINDOW SIDE GARNISH ASSEMBLY RH
HINT:
Use the same procedure as for the LH side.
- REMOVE REAR WINDOW SIDE GARNISH ASSEMBLY LH
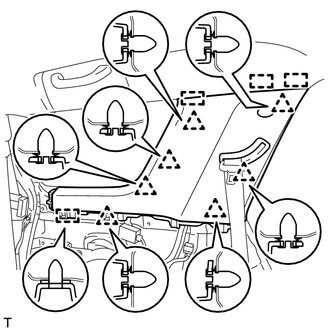
- Detach the 7 clips and 4 guides.
 Courtesy of © TOYOTA, LICENSE AGREEMENT TMS1002 Courtesy of © TOYOTA, LICENSE AGREEMENT TMS1002
|
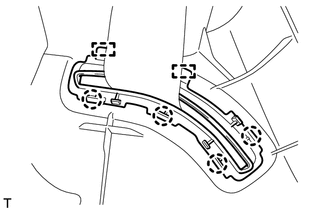
- Detach the 4 claws and 2 guides and pass the rear No. 1 seat outer belt floor anchor through the rear window side garnish assembly LH to remove the rear window side garnish assembly LH.
 Courtesy of © TOYOTA, LICENSE AGREEMENT TMS1002 Courtesy of © TOYOTA, LICENSE AGREEMENT TMS1002
|
- REMOVE REAR WINDOW SIDE GARNISH ASSEMBLY RH
HINT:
Use the same procedure as for the LH side.
- REMOVE ASSIST GRIP SUB-ASSEMBLY
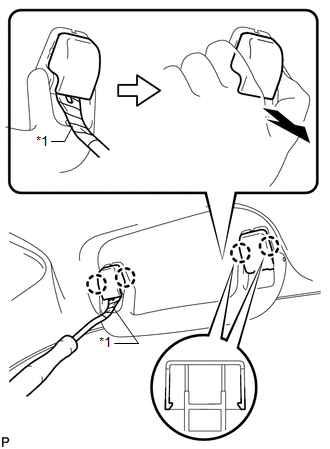
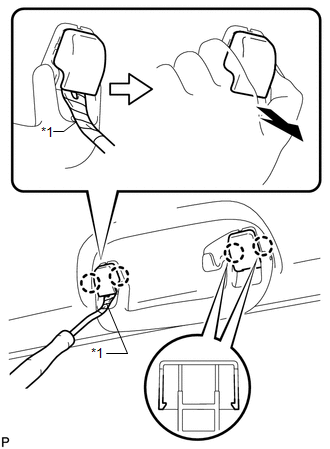
- Using a clip remover, detach the 4 claws.
 Courtesy of © TOYOTA, LICENSE AGREEMENT TMS1002 Courtesy of © TOYOTA, LICENSE AGREEMENT TMS1002
|
TEXT IN ILLUSTRATION
NOTE:
Do not forcibly pry the assist grip plugs to prevent them from being deformed.
HINT:
- Gently pry the assist grip plugs as shown in the illustration to detach the claws.
- Tape the clip remover tip before use.
- Use the same procedure for the other assist grip sub-assembly.
- Pull off the 2 assist grip plugs by hand.
- Detach the 2 clips to remove the assist grip sub-assembly.
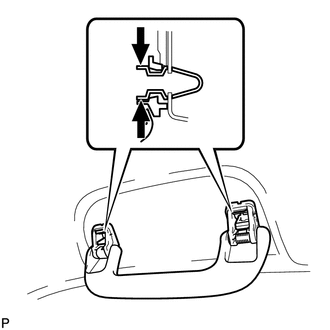 Courtesy of © TOYOTA, LICENSE AGREEMENT TMS1002 Courtesy of © TOYOTA, LICENSE AGREEMENT TMS1002
|
- Remove the 2 clips from the vehicle body.
- REMOVE REAR ASSIST GRIP ASSEMBLY
- Using a clip remover, detach the 4 claws.
 Courtesy of © TOYOTA, LICENSE AGREEMENT TMS1002 Courtesy of © TOYOTA, LICENSE AGREEMENT TMS1002
|
TEXT IN ILLUSTRATION
NOTE:
Do not forcibly pry the assist grip plugs to prevent them from being deformed.
HINT:
- Gently pry the rear assist grip plugs as shown in the illustration to detach the claws.
- Tape the clip remover tip before use.
- Use the same procedure for the other rear assist grip assembly.
- Pull off the 2 assist grip plugs by hand.
- Detach the 2 clips to remove the rear assist grip assembly.
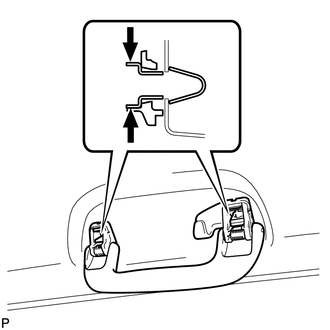 Courtesy of © TOYOTA, LICENSE AGREEMENT TMS1002 Courtesy of © TOYOTA, LICENSE AGREEMENT TMS1002
|
- Remove the 2 clips from the vehicle body.
- REMOVE COAT HOOK
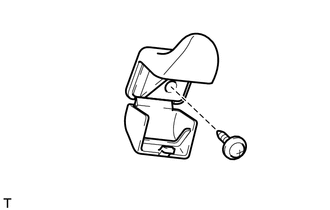
- Using a screwdriver, detach the claw to open the cover.
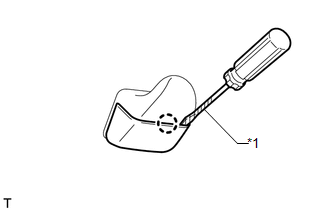 Courtesy of © TOYOTA, LICENSE AGREEMENT TMS1002 Courtesy of © TOYOTA, LICENSE AGREEMENT TMS1002
|
TEXT IN ILLUSTRATION
- Remove the screw and coat hook.
 Courtesy of © TOYOTA, LICENSE AGREEMENT TMS1002 Courtesy of © TOYOTA, LICENSE AGREEMENT TMS1002
|
HINT:
Use the same procedure for the other coat hook.
- REMOVE VISOR BRACKET COVER LH
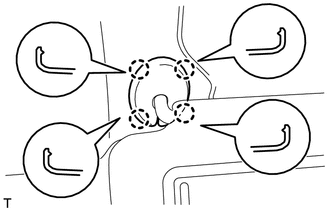
- Detach the 4 claws to remove the visor bracket cover LH.
 Courtesy of © TOYOTA, LICENSE AGREEMENT TMS1002 Courtesy of © TOYOTA, LICENSE AGREEMENT TMS1002
|
- REMOVE VISOR BRACKET COVER RH
HINT:
Use the same procedure as for the LH side.
- REMOVE VISOR ASSEMBLY LH
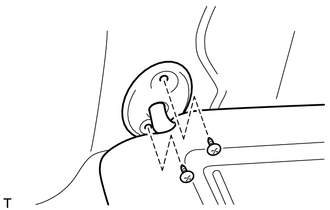
- Remove the 2 screws and visor assembly LH.
 Courtesy of © TOYOTA, LICENSE AGREEMENT TMS1002 Courtesy of © TOYOTA, LICENSE AGREEMENT TMS1002
|
- REMOVE VISOR ASSEMBLY RH
HINT:
Use the same procedure as for the LH side.
- REMOVE VISOR HOLDER
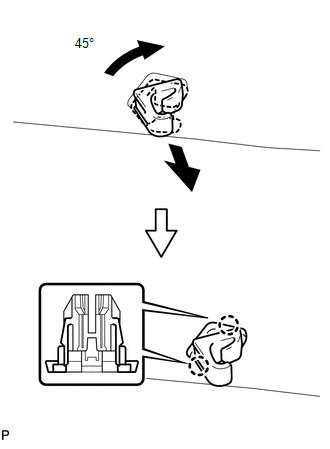
- Turn the visor holder approximately 45° to pull it out as shown in the illustration.
 Courtesy of © TOYOTA, LICENSE AGREEMENT TMS1002 Courtesy of © TOYOTA, LICENSE AGREEMENT TMS1002
|
- Detach the 2 claws to remove the visor holder.
HINT:
Use the same procedure for the other visor holder.
- REMOVE DRIVE MONITOR SWITCH (w/ Drive Monitor Switch)
Refer to PROCEDURE - Step 1
- REMOVE MAP LIGHT ASSEMBLY
Refer to PROCEDURE - Step 2
- REMOVE INNER REAR VIEW MIRROR STAY HOLDER COVER (w/ EC Mirror)
Refer to PROCEDURE - Step 2
- REMOVE NO. 1 ROOM LIGHT ASSEMBLY
Refer to PROCEDURE - Step 1
- REMOVE ROOF HEADLINING ASSEMBLY
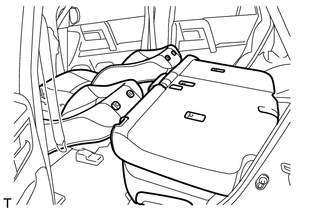
HINT:
Before removing the roof headlining assembly, move the front seats and rear No. 1 seat to the positions shown in the illustration.
 Courtesy of © TOYOTA, LICENSE AGREEMENT TMS1002 Courtesy of © TOYOTA, LICENSE AGREEMENT TMS1002
|
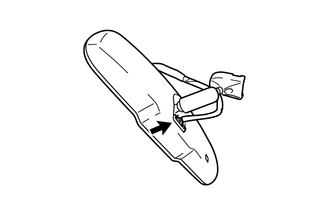
- w/ EC Mirror:
Disconnect the inner rear view mirror assembly connector.
 Courtesy of © TOYOTA, LICENSE AGREEMENT TMS1002 Courtesy of © TOYOTA, LICENSE AGREEMENT TMS1002
|
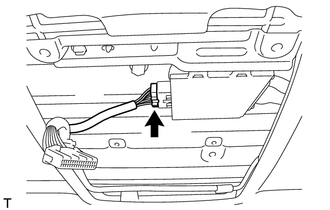
- w/ Sliding Roof:
Disconnect the sliding roof drive gear connector.
 Courtesy of © TOYOTA, LICENSE AGREEMENT TMS1002 Courtesy of © TOYOTA, LICENSE AGREEMENT TMS1002
|
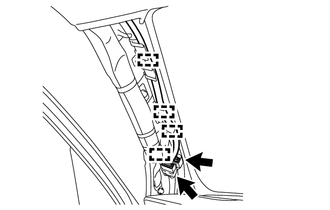
- Disconnect each connector and detach the 4 clamps from the front pillar LH.
 Courtesy of © TOYOTA, LICENSE AGREEMENT TMS1002 Courtesy of © TOYOTA, LICENSE AGREEMENT TMS1002
|
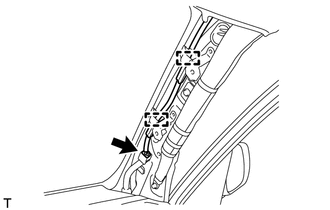
- Disconnect the connector and detach the 2 clamps from the front pillar RH.
 Courtesy of © TOYOTA, LICENSE AGREEMENT TMS1002 Courtesy of © TOYOTA, LICENSE AGREEMENT TMS1002
|
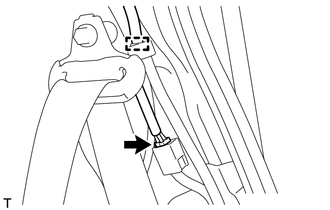
- Disconnect the connector and detach the clamp from the rear pillar RH.
 Courtesy of © TOYOTA, LICENSE AGREEMENT TMS1002 Courtesy of © TOYOTA, LICENSE AGREEMENT TMS1002
|
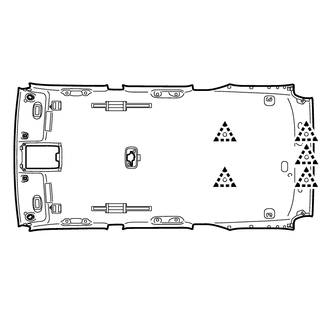
- w/o Sliding Roof:
 Courtesy of © TOYOTA, LICENSE AGREEMENT TMS1002 Courtesy of © TOYOTA, LICENSE AGREEMENT TMS1002
|
- Remove the 5 clips.
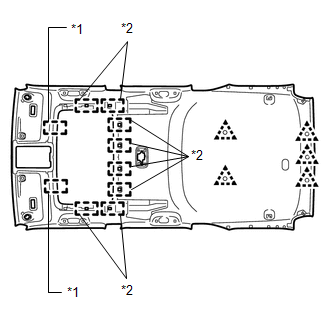
- w/ Sliding Roof:
 Courtesy of © TOYOTA, LICENSE AGREEMENT TMS1002 Courtesy of © TOYOTA, LICENSE AGREEMENT TMS1002
|
- Remove the 5 clips.
- Detach the 2 guides and 8 fasteners.
TEXT IN ILLUSTRATION
- Remove the roof headlining assembly from the back door as shown in the illustration.
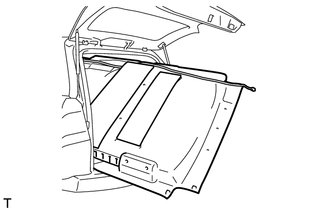 Courtesy of © TOYOTA, LICENSE AGREEMENT TMS1002 Courtesy of © TOYOTA, LICENSE AGREEMENT TMS1002
|
NOTE:
Be careful not to damage the roof headlining assembly when remove it.
- REMOVE FRONT SHOULDER BELT ANCHOR PLATE SUB-ASSEMBLY LH
- Detach the 4 claws of the front shoulder belt anchor plate sub-assembly LH to slide the front shoulder belt anchor plate sub-assembly LH to remove it.
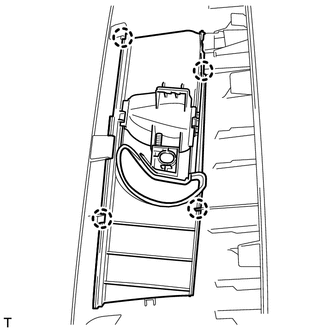 Courtesy of © TOYOTA, LICENSE AGREEMENT TMS1002 Courtesy of © TOYOTA, LICENSE AGREEMENT TMS1002
|
- REMOVE FRONT SHOULDER BELT ANCHOR PLATE SUB-ASSEMBLY RH
HINT:
Use the same procedure as for the LH side.
- REMOVE ROOF SIDE RAIL GARNISH ASSEMBLY LH
- Detach the 3 clips to remove the roof side rail garnish assembly LH.
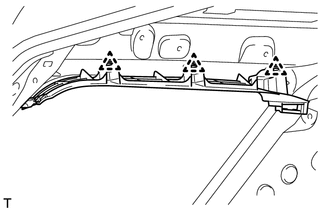 Courtesy of © TOYOTA, LICENSE AGREEMENT TMS1002 Courtesy of © TOYOTA, LICENSE AGREEMENT TMS1002
|
- REMOVE ROOF SIDE RAIL GARNISH ASSEMBLY RH
HINT:
Use the same procedure as for the LH side.
- REMOVE REAR NO. 3 SIDE RAIL SPACER LH
- Detach the 2 claws to remove the rear No. 3 side rail spacer LH.
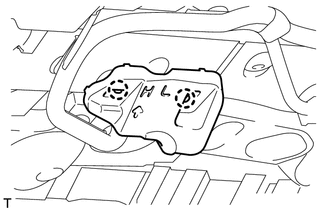 Courtesy of © TOYOTA, LICENSE AGREEMENT TMS1002 Courtesy of © TOYOTA, LICENSE AGREEMENT TMS1002
|
- REMOVE REAR NO. 3 SIDE RAIL SPACER RH
HINT:
Use the same procedure as for the LH side.
- REMOVE QUARTER TRIM COVER
- Detach the 2 claws to remove the quarter trim cover.
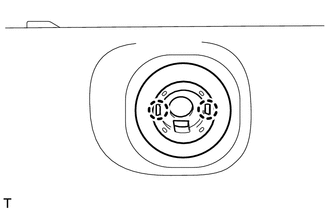 Courtesy of © TOYOTA, LICENSE AGREEMENT TMS1002 Courtesy of © TOYOTA, LICENSE AGREEMENT TMS1002
|
HINT:
Use the same procedure for the other quarter trim cover.
- REMOVE QUARTER TRIM JACK COVER SUB-ASSEMBLY
- Detach the 3 claws and 2 guides to remove the quarter trim jack cover sub-assembly.
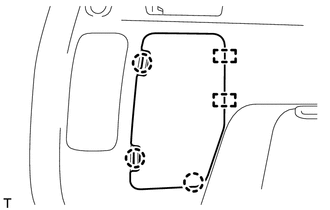 Courtesy of © TOYOTA, LICENSE AGREEMENT TMS1002 Courtesy of © TOYOTA, LICENSE AGREEMENT TMS1002
|
- REMOVE REAR COMBINATION LIGHT SERVICE COVER LH
- Detach the 2 claws and 2 guides to remove the rear combination light service cover LH.
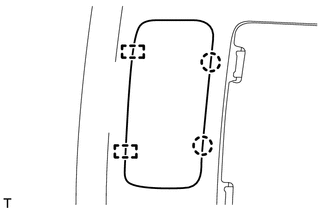 Courtesy of © TOYOTA, LICENSE AGREEMENT TMS1002 Courtesy of © TOYOTA, LICENSE AGREEMENT TMS1002
|
- REMOVE REAR COMBINATION LIGHT SERVICE COVER RH
HINT:
Use the same procedure as for the LH side.
- REMOVE SIDE TRIM BOX LH (w/o Rear No. 2 Seat)
- Remove the 2 screws.
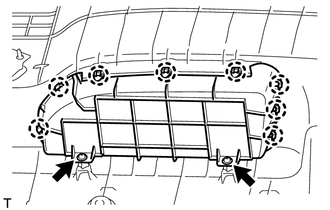 Courtesy of © TOYOTA, LICENSE AGREEMENT TMS1002 Courtesy of © TOYOTA, LICENSE AGREEMENT TMS1002
|
- Detach the 8 claws to remove the side trim box LH.
- REMOVE SIDE TRIM BOX RH (w/o Rear No. 2 Seat)
HINT:
Use the same procedure as for the LH side.
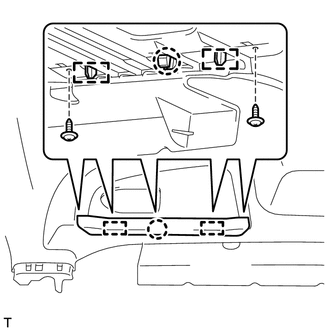
- REMOVE REAR FLOOR FINISH SIDE PLATE LH (w/o Rear No. 2 Seat)
- Remove the 2 screws.
 Courtesy of © TOYOTA, LICENSE AGREEMENT TMS1002 Courtesy of © TOYOTA, LICENSE AGREEMENT TMS1002
|
- Detach the claw and 2 guides to remove the rear floor finish side plate LH.
- REMOVE REAR FLOOR FINISH SIDE PLATE RH (w/o Rear No. 2 Seat)
HINT:
Use the same procedure as for the LH side.
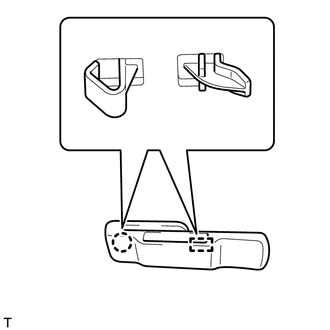
- REMOVE REAR SEAT SHOULDER BELT HANGER LH (w/ Rear No. 2 Seat)
 Courtesy of © TOYOTA, LICENSE AGREEMENT TMS1002 Courtesy of © TOYOTA, LICENSE AGREEMENT TMS1002
|
- Detach the claw and guide to remove the rear seat shoulder belt hanger LH.
- REMOVE REAR SEAT SHOULDER BELT HANGER RH (w/ Rear No. 2 Seat)
HINT:
Use the same procedure as for the LH side.
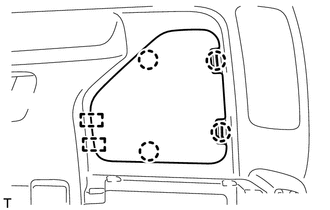
- REMOVE QUARTER TRIM LID SUB-ASSEMBLY RH (w/ Rear No. 2 Seat)
 Courtesy of © TOYOTA, LICENSE AGREEMENT TMS1002 Courtesy of © TOYOTA, LICENSE AGREEMENT TMS1002
|
- Detach the 4 claws and 2 guides to remove the quarter trim lid sub-assembly RH.
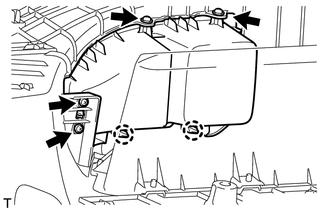
- REMOVE DECK SIDE TRIM CUP HOLDER LH (w/ Rear No. 2 Seat)
- Remove the 4 screws.
 Courtesy of © TOYOTA, LICENSE AGREEMENT TMS1002 Courtesy of © TOYOTA, LICENSE AGREEMENT TMS1002
|
- Detach the 2 claws to remove the deck side trim cup holder LH.
- REMOVE DECK SIDE TRIM CUP HOLDER RH (w/ Rear No. 2 Seat)
HINT:
Use the same procedure as for the LH side.