Disassembly [12/2019 - 10/2022]: Procedure
WARNING: This page is about a different variant/trim than selected.
- REMOVE CLUTCH CONTROL SOLENOID WIRE
- Disconnect the 4 clamps and 2 connectors.
 Courtesy of © TOYOTA, LICENSE AGREEMENT TMS1002 Courtesy of © TOYOTA, LICENSE AGREEMENT TMS1002
|
- Remove the 2 bolts, 2 wiring harness clamp brackets and clutch control solenoid wire from the transfer assembly.
 Courtesy of © TOYOTA, LICENSE AGREEMENT TMS1002 Courtesy of © TOYOTA, LICENSE AGREEMENT TMS1002
|
- REMOVE TRANSFER AND TRANSAXLE SETTING STUD BOLT
- Using 2 nuts, remove the 4 transfer and transaxle setting stud bolts from the transfer assembly.
 Courtesy of © TOYOTA, LICENSE AGREEMENT TMS1002 Courtesy of © TOYOTA, LICENSE AGREEMENT TMS1002
|
- SECURE TRANSFER ASSEMBLY
- Secure the transfer assembly to the overhaul attachment.
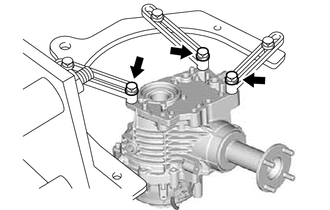 Courtesy of © TOYOTA, LICENSE AGREEMENT TMS1002 Courtesy of © TOYOTA, LICENSE AGREEMENT TMS1002
|
- REMOVE TRANSFER CASE STRAIGHT PIN
- Remove the 2 transfer case straight pins from the transfer assembly.
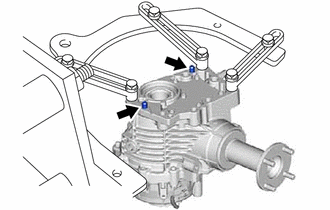 Courtesy of © TOYOTA, LICENSE AGREEMENT TMS1002 Courtesy of © TOYOTA, LICENSE AGREEMENT TMS1002
|
- REMOVE NO. 1 TRANSFER CASE PLUG
- Remove the No. 1 transfer case plug and gasket from the transfer assembly.
 Courtesy of © TOYOTA, LICENSE AGREEMENT TMS1002 Courtesy of © TOYOTA, LICENSE AGREEMENT TMS1002
|
- REMOVE NO. 2 TRANSFER CASE PLUG
- Using a 10 mm socket hexagon wrench, remove the No. 2 transfer case plug and gasket from the transfer assembly.
 Courtesy of © TOYOTA, LICENSE AGREEMENT TMS1002 Courtesy of © TOYOTA, LICENSE AGREEMENT TMS1002
|
- REMOVE TRANSFER DRAIN PLUG
- Using a 10 mm socket hexagon wrench, remove the transfer drain plug and gasket from the transfer assembly.
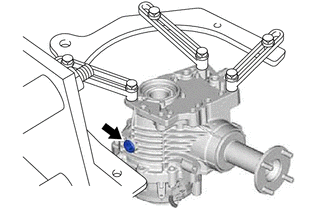 Courtesy of © TOYOTA, LICENSE AGREEMENT TMS1002 Courtesy of © TOYOTA, LICENSE AGREEMENT TMS1002
|
- REMOVE TRANSFER FILLER PLUG
- Using a 10 mm socket hexagon wrench, remove the transfer filler plug and gasket from the transfer assembly.
 Courtesy of © TOYOTA, LICENSE AGREEMENT TMS1002 Courtesy of © TOYOTA, LICENSE AGREEMENT TMS1002
|
- REMOVE NO. 1 4 WHEEL DRIVE POSITION SWITCH
- Remove the No. 1 4 wheel drive position switch from the transfer assembly.
 Courtesy of © TOYOTA, LICENSE AGREEMENT TMS1002 Courtesy of © TOYOTA, LICENSE AGREEMENT TMS1002
|
- REMOVE TRANSFER CASE BREATHER PLUG
- Remove the transfer case breather plug from the transfer assembly.
 Courtesy of © TOYOTA, LICENSE AGREEMENT TMS1002 Courtesy of © TOYOTA, LICENSE AGREEMENT TMS1002
|
- REMOVE TRANSFER CASE OIL SEAL
See step 4
- REMOVE TRANSFER CASE OIL SEAL RH
- Using SST, remove the transfer case oil seal RH from the transfer assembly.
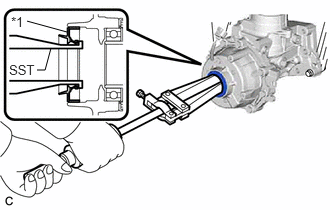 Courtesy of © TOYOTA, LICENSE AGREEMENT TMS1002 Courtesy of © TOYOTA, LICENSE AGREEMENT TMS1002
|
| *1 |
Transfer Case Oil Seal RH |
NOTE:
Do not scratch the press-fitting surface of the transfer case oil seal RH.
- INSPECT TOTAL PRELOAD
NOTE:
- When replacing the transfer output shaft companion flange sub-assembly and transfer case oil seal, be sure to check the preload.
- If the transfer output shaft companion flange sub-assembly and transfer case oil seal were replaced without checking the preload, replace the transfer assembly.
- Using a torque wrench, check the total preload (starting torque) with the teeth of the transfer driven pinion and transfer ring gear in contact.
 Courtesy of © TOYOTA, LICENSE AGREEMENT TMS1002 Courtesy of © TOYOTA, LICENSE AGREEMENT TMS1002
|
HINT:
- The torque wrench should be installed as shown in the illustration.
- Record the measured value as it is used during assembly.
- REMOVE OUTPUT SHAFT COMPANION FLANGE NUT
- Place a matchmark on the transfer output shaft companion flange sub-assembly as shown in the illustration.
 Courtesy of © TOYOTA, LICENSE AGREEMENT TMS1002 Courtesy of © TOYOTA, LICENSE AGREEMENT TMS1002
|
| *a |
Matchmark |
| *b |
Transfer Driven Pinion |
HINT:
Place a matchmark aligned with the groove on the transfer driven pinion.
- Using a screwdriver and hammer, unstake the output shaft companion flange nut.
 Courtesy of © TOYOTA, LICENSE AGREEMENT TMS1002 Courtesy of © TOYOTA, LICENSE AGREEMENT TMS1002
|
| *a |
Transfer Driven Pinion |
NOTE:
- Completely unstake the output shaft companion flange nut.
- Do not damage the threads of the transfer driven pinion.
- Remove the output shaft companion flange nut from the transfer assembly.
- REMOVE TRANSFER OUTPUT SHAFT COMPANION FLANGE SUB-ASSEMBLY
- Using SST, remove the transfer output shaft companion flange sub-assembly from the transfer assembly.
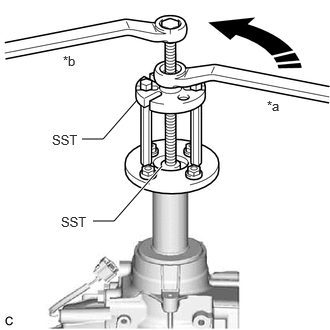 Courtesy of © TOYOTA, LICENSE AGREEMENT TMS1002 Courtesy of © TOYOTA, LICENSE AGREEMENT TMS1002
|
- SST: 09950-30012
- 09951-03010
- 09953-03010
- 09954-03010
- 09955-03030
- SST: 09956-03090
- REMOVE TRANSFER CASE OIL SEAL
See step 7