- REMOVE FRONT WHEEL OPENING EXTENSION PAD LH
- Remove the 4 screws and the front wheel opening extension pad LH.
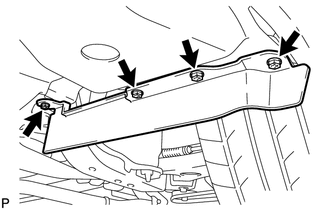 Courtesy of © TOYOTA, LICENSE AGREEMENT TMS1002 Courtesy of © TOYOTA, LICENSE AGREEMENT TMS1002
|
- SEPARATE FRONT FENDER LINER LH
- Using a screwdriver, turn the pin 90 degrees and remove the pin hold clip.
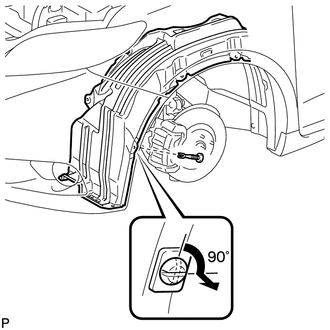 Courtesy of © TOYOTA, LICENSE AGREEMENT TMS1002 Courtesy of © TOYOTA, LICENSE AGREEMENT TMS1002
|
- Remove the 2 clips.
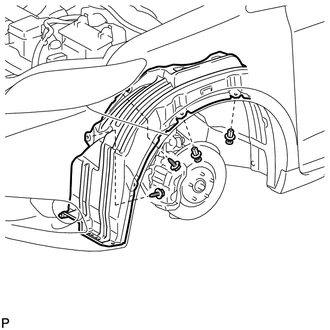 Courtesy of © TOYOTA, LICENSE AGREEMENT TMS1002 Courtesy of © TOYOTA, LICENSE AGREEMENT TMS1002
|
- Remove the 2 screws.
- REMOVE RADIATOR GRILLE SUB-ASSEMBLY
Refer to PROCEDURE - Step 1
- REMOVE HOOD LOCK NUT CAP
- Using a screwdriver with its tip wrapped in protective tape, remove the hood lock nut cap.
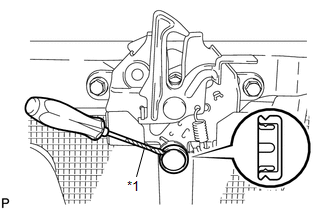 Courtesy of © TOYOTA, LICENSE AGREEMENT TMS1002 Courtesy of © TOYOTA, LICENSE AGREEMENT TMS1002
|
TEXT IN ILLUSTRATION
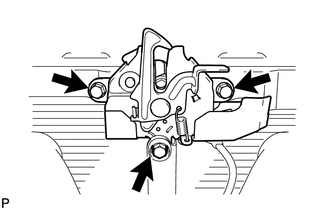
- REMOVE HOOD LOCK ASSEMBLY
- Disconnect the connector.
 Courtesy of © TOYOTA, LICENSE AGREEMENT TMS1002 Courtesy of © TOYOTA, LICENSE AGREEMENT TMS1002
|
- Remove the 3 bolts and hood lock.
- Disconnect the hood lock control cable.
- REMOVE FRONT DOOR SCUFF PLATE LH
HINT:
Use the same procedure as for the RH side.
Refer to PROCEDURE - Step 9
- REMOVE FRONT DOOR OPENING TRIM WEATHERSTRIP LH
- REMOVE COWL SIDE TRIM BOARD LH
HINT:
Use the same procedure as for the RH side.
Refer to PROCEDURE - Step 11
- REMOVE NO. 1 INSTRUMENT PANEL LOWER FINISH PANEL
Refer to PROCEDURE - Step 23
- REMOVE HOOD LOCK CONTROL CABLE ASSEMBLY
- Disconnect the hood lock control cable from hood lock control lever.
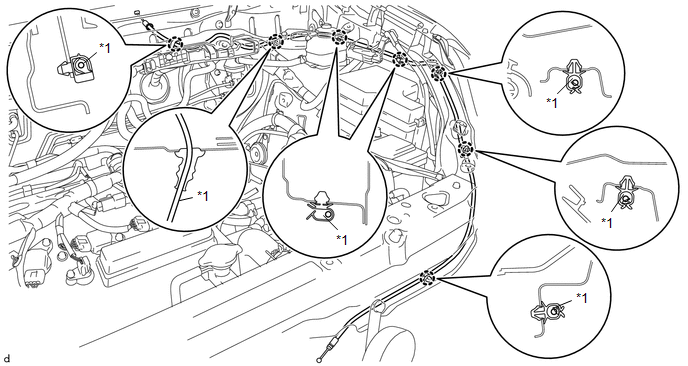
- Using a screwdriver with its tip wrapped in protective tape, disconnect the clamps shown in the illustration.
 Courtesy of © TOYOTA, LICENSE AGREEMENT TMS1002 Courtesy of © TOYOTA, LICENSE AGREEMENT TMS1002
|
TEXT IN ILLUSTRATION
| *1 |
Hood Lock Control Cable |
- |
- |
- Pull the cable from the engine room and remove it.