Disassembly [08/2015 - ]: Procedure
WARNING: This page is about a different variant/trim than selected.
- REMOVE INDICATOR LIGHT WIRE SUB-ASSEMBLY
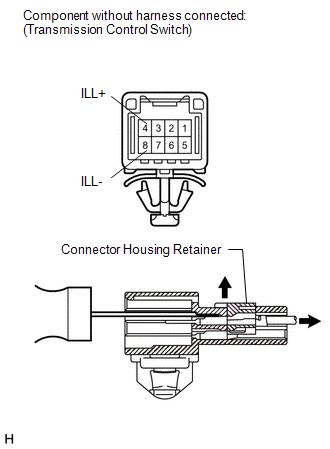
- Using a thin-bladed screwdriver, release the connector housing retainer.
 Courtesy of © TOYOTA, LICENSE AGREEMENT TMS1002 Courtesy of © TOYOTA, LICENSE AGREEMENT TMS1002
|
- Using a thin-bladed screwdriver, pull out the 4 (ILL+) and 8 (ILL-) terminals from the rear as shown in the illustration.
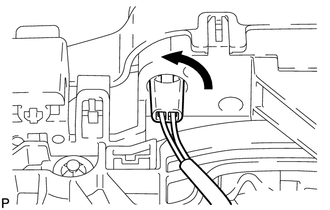
- Rotate the indicator light wire counterclockwise to align the key part and remove the wire.
 Courtesy of © TOYOTA, LICENSE AGREEMENT TMS1002 Courtesy of © TOYOTA, LICENSE AGREEMENT TMS1002
|
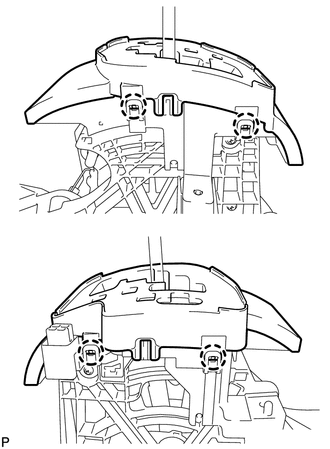
- REMOVE POSITION INDICATOR HOUSING ASSEMBLY
- Disengage the 4 claws and remove the position indicator housing.
 Courtesy of © TOYOTA, LICENSE AGREEMENT TMS1002 Courtesy of © TOYOTA, LICENSE AGREEMENT TMS1002
|
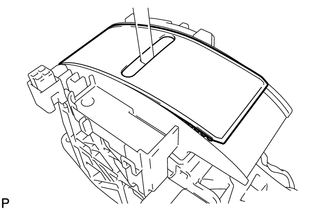
- REMOVE POSITION INDICATOR SLIDE COVER
- Remove the position indicator slide cover with No. 2 position indicator slide cover.
 Courtesy of © TOYOTA, LICENSE AGREEMENT TMS1002 Courtesy of © TOYOTA, LICENSE AGREEMENT TMS1002
|
- REMOVE NO. 2 POSITION INDICATOR SLIDE COVER
- Remove the No. 2 position indicator slide cover from the position indicator slide cover.
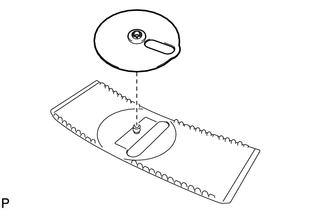 Courtesy of © TOYOTA, LICENSE AGREEMENT TMS1002 Courtesy of © TOYOTA, LICENSE AGREEMENT TMS1002
|
- REMOVE SHIFT LOCK RELEASE BUTTON
- Disengage the 2 claws and remove the shift lock release button and shift lock release spring.
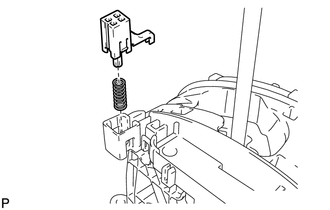 Courtesy of © TOYOTA, LICENSE AGREEMENT TMS1002 Courtesy of © TOYOTA, LICENSE AGREEMENT TMS1002
|
- REMOVE LOWER POSITION INDICATOR HOUSING
- Using a small screwdriver, disengage the 6 claws and remove the lower position indicator housing.
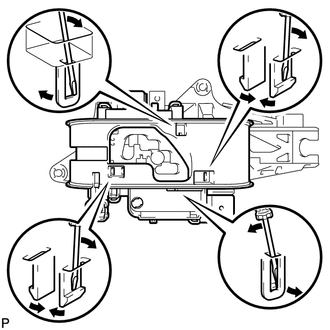 Courtesy of © TOYOTA, LICENSE AGREEMENT TMS1002 Courtesy of © TOYOTA, LICENSE AGREEMENT TMS1002
|
- REMOVE SHIFT LOCK CONTROL ECU
- Disconnect the shift lock solenoid connector.
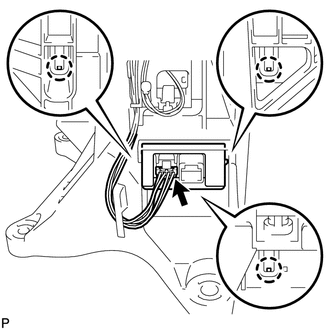 Courtesy of © TOYOTA, LICENSE AGREEMENT TMS1002 Courtesy of © TOYOTA, LICENSE AGREEMENT TMS1002
|
- Disengage the 3 claws and remove the shift lock control ECU.