Disassembly [08/2015 - ]: Procedure
WARNING: This page is about a different variant/trim than selected.
- REMOVE TRANSMISSION CONTROL SHAFT LEVER RH
- Remove the nut, spring washer and control shaft lever.
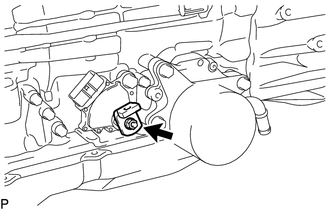 Courtesy of © TOYOTA, LICENSE AGREEMENT TMS1002 Courtesy of © TOYOTA, LICENSE AGREEMENT TMS1002
|
- REMOVE PARK/NEUTRAL POSITION SWITCH ASSEMBLY
- Using a screwdriver, bend the tabs of the lock washer.
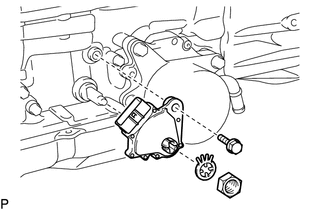 Courtesy of © TOYOTA, LICENSE AGREEMENT TMS1002 Courtesy of © TOYOTA, LICENSE AGREEMENT TMS1002
|
- Remove the nut, lock washer and bolt.
- Remove the park/neutral position switch.
HINT:
Make sure that the manual valve lever shaft has not been rotated prior to installing the park/neutral position switch as the detent spring may become detached from the manual valve lever shaft.
- REMOVE SPEED SENSOR
- Remove the 2 bolts and 2 speed sensors.
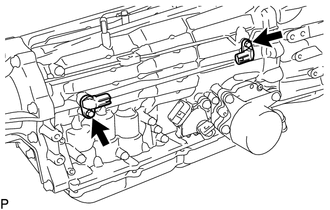 Courtesy of © TOYOTA, LICENSE AGREEMENT TMS1002 Courtesy of © TOYOTA, LICENSE AGREEMENT TMS1002
|
- Remove the 2 O-rings from the sensors.
- REMOVE TRANSMISSION OIL COOLER ASSEMBLY
- Remove the 3 bolts and transmission oil cooler with transmission oil cooler spacer.
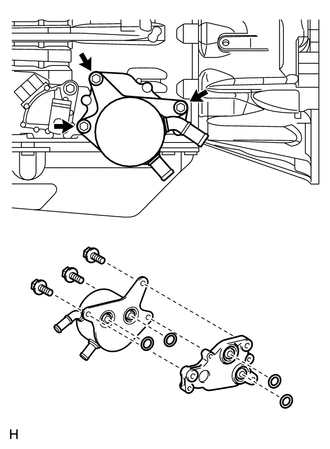 Courtesy of © TOYOTA, LICENSE AGREEMENT TMS1002 Courtesy of © TOYOTA, LICENSE AGREEMENT TMS1002
|
- Separate the transmission oil cooler from the transmission oil cooler spacer.
- Remove the 4 O-rings.
- REMOVE AUTOMATIC TRANSMISSION BREATHER TUBE
- Remove the 2 bolts.
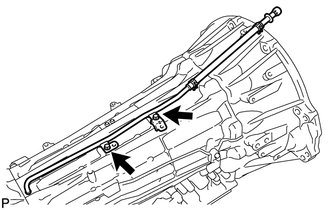 Courtesy of © TOYOTA, LICENSE AGREEMENT TMS1002 Courtesy of © TOYOTA, LICENSE AGREEMENT TMS1002
|
- Remove the breather tube.
- Remove the O-ring from the tube.
- REMOVE AUTOMATIC TRANSMISSION HOUSING
- Remove the 14 bolts.
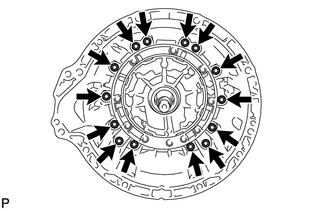 Courtesy of © TOYOTA, LICENSE AGREEMENT TMS1002 Courtesy of © TOYOTA, LICENSE AGREEMENT TMS1002
|
- Remove the transmission housing.
- REMOVE EXTENSION HOUSING SUB-ASSEMBLY
- Remove the 10 bolts.
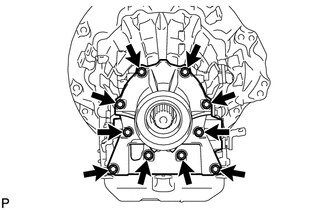 Courtesy of © TOYOTA, LICENSE AGREEMENT TMS1002 Courtesy of © TOYOTA, LICENSE AGREEMENT TMS1002
|
- Remove the extension housing.
HINT:
Tap on the circumference of the extension housing with a plastic-faced hammer to remove the extension housing.
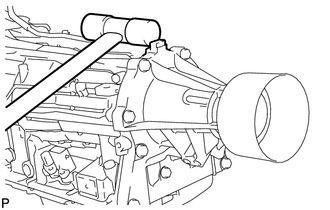 Courtesy of © TOYOTA, LICENSE AGREEMENT TMS1002 Courtesy of © TOYOTA, LICENSE AGREEMENT TMS1002
|
- REMOVE EXTENSION HOUSING REAR OIL SEAL
- Using SST, tap out the oil seal.
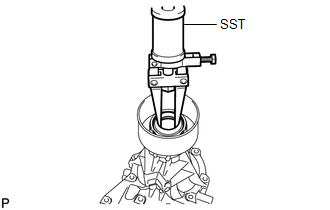 Courtesy of © TOYOTA, LICENSE AGREEMENT TMS1002 Courtesy of © TOYOTA, LICENSE AGREEMENT TMS1002
|
- FIX AUTOMATIC TRANSMISSION CASE SUB-ASSEMBLY
- Install the transmission case on the overhaul attachment.
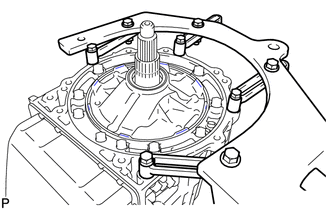 Courtesy of © TOYOTA, LICENSE AGREEMENT TMS1002 Courtesy of © TOYOTA, LICENSE AGREEMENT TMS1002
|
- REMOVE AUTOMATIC TRANSMISSION OIL PAN SUB-ASSEMBLY
- Remove the drain plug, 12 bolts, oil pan and gasket.
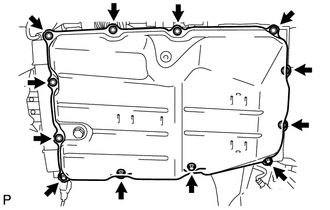 Courtesy of © TOYOTA, LICENSE AGREEMENT TMS1002 Courtesy of © TOYOTA, LICENSE AGREEMENT TMS1002
|
NOTE:
Do not turn the transmission over as this will contaminate the valve body with foreign matter on the bottom of the pan.
- INSPECT AUTOMATIC TRANSMISSION OIL PAN SUB-ASSEMBLY
See step 1
- REMOVE VALVE BODY OIL STRAINER ASSEMBLY
- Turn over the transmission.
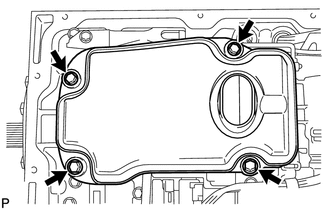 Courtesy of © TOYOTA, LICENSE AGREEMENT TMS1002 Courtesy of © TOYOTA, LICENSE AGREEMENT TMS1002
|
- Remove the 4 bolts and oil strainer from the valve body.
- Remove the O-ring from the oil strainer.
- REMOVE TRANSMISSION WIRE
- Remove the 2 bolts and 2 temperature sensor clamps.
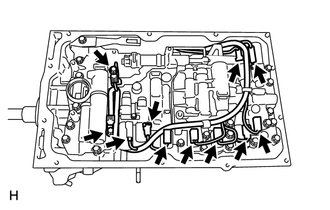 Courtesy of © TOYOTA, LICENSE AGREEMENT TMS1002 Courtesy of © TOYOTA, LICENSE AGREEMENT TMS1002
|
- Disconnect the 2 ATF temperature sensors.
- Remove the 2 O-rings from the 2 ATF temperature sensors.
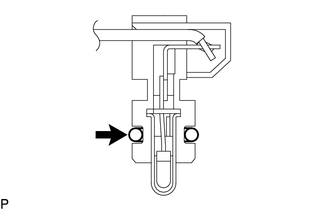 Courtesy of © TOYOTA, LICENSE AGREEMENT TMS1002 Courtesy of © TOYOTA, LICENSE AGREEMENT TMS1002
|
- Disconnect the 9 connectors from the solenoid valves.
- Remove the 2 bolts and pull out the No. 1 and No. 2 transmission wires.
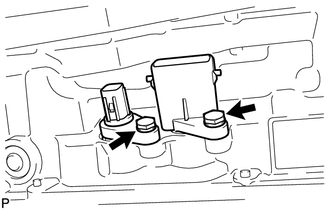 Courtesy of © TOYOTA, LICENSE AGREEMENT TMS1002 Courtesy of © TOYOTA, LICENSE AGREEMENT TMS1002
|
- Pull the transmission wires out of the transmission case.
- Remove the 2 O-rings from the transmission wires.
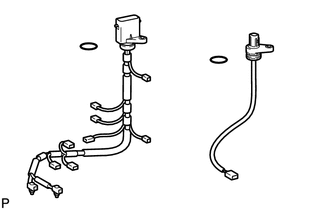 Courtesy of © TOYOTA, LICENSE AGREEMENT TMS1002 Courtesy of © TOYOTA, LICENSE AGREEMENT TMS1002
|
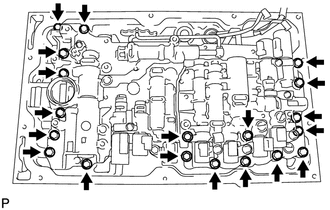
- REMOVE TRANSMISSION VALVE BODY ASSEMBLY
- Remove the bolt, detent spring cover and detent spring.
 Courtesy of © TOYOTA, LICENSE AGREEMENT TMS1002 Courtesy of © TOYOTA, LICENSE AGREEMENT TMS1002
|
- Remove the 19 bolts.
- Remove the valve body assembly.
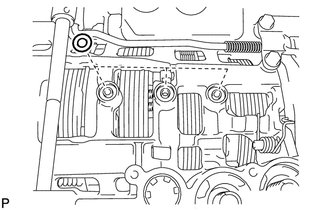
- REMOVE TRANSMISSION CASE GASKET
- Remove the 3 gaskets.
 Courtesy of © TOYOTA, LICENSE AGREEMENT TMS1002 Courtesy of © TOYOTA, LICENSE AGREEMENT TMS1002
|
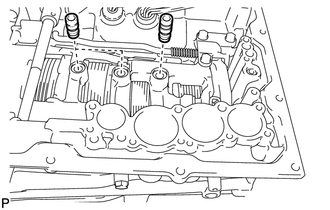
- REMOVE BRAKE DRUM GASKET
- Remove the 3 gaskets.
 Courtesy of © TOYOTA, LICENSE AGREEMENT TMS1002 Courtesy of © TOYOTA, LICENSE AGREEMENT TMS1002
|
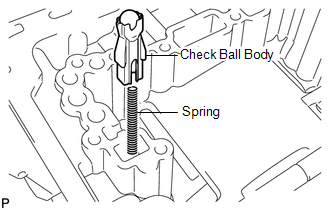
- REMOVE CHECK BALL BODY
- Remove the check ball body and spring.
 Courtesy of © TOYOTA, LICENSE AGREEMENT TMS1002 Courtesy of © TOYOTA, LICENSE AGREEMENT TMS1002
|
- REMOVE C-2 ACCUMULATOR PISTON
- While applying compressed air to the oil hole, remove the C-2 accumulator piston and spring.
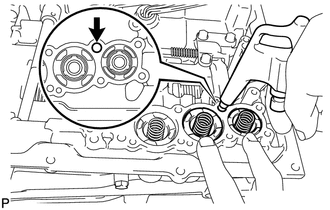 Courtesy of © TOYOTA, LICENSE AGREEMENT TMS1002 Courtesy of © TOYOTA, LICENSE AGREEMENT TMS1002
|
- Remove the 2 O-rings from the piston.
NOTE:
Be careful as the C-3 and B-3 accumulator pistons may jump out.
- REMOVE B-3 ACCUMULATOR PISTON
- While applying compressed air to the oil hole, remove the B-3 accumulator piston and spring.
Courtesy of © TOYOTA, LICENSE AGREEMENT TMS1002
|
- Remove the 2 O-rings from the piston.
NOTE:
Be careful as the C-3 accumulator piston may jump out.
- REMOVE C-3 ACCUMULATOR PISTON
- While applying compressed air to the oil hole, remove the C-3 accumulator piston and spring.
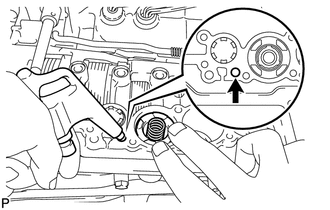 Courtesy of © TOYOTA, LICENSE AGREEMENT TMS1002 Courtesy of © TOYOTA, LICENSE AGREEMENT TMS1002
|
- Remove the 2 O-rings from the piston.
- REMOVE B-1 ACCUMULATOR VALVE
- Remove the B-1 accumulator valve and 2 springs.
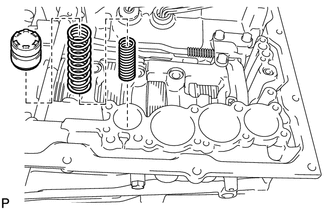 Courtesy of © TOYOTA, LICENSE AGREEMENT TMS1002 Courtesy of © TOYOTA, LICENSE AGREEMENT TMS1002
|
- REMOVE PARKING LOCK PAWL BRACKET
- Remove the 3 bolts and bracket.
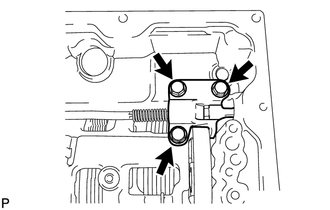 Courtesy of © TOYOTA, LICENSE AGREEMENT TMS1002 Courtesy of © TOYOTA, LICENSE AGREEMENT TMS1002
|
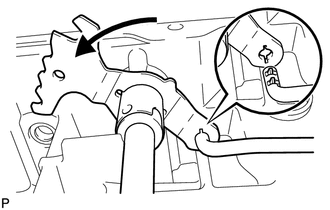
- REMOVE PARKING LOCK ROD SUB-ASSEMBLY
- Disconnect the parking lock rod from the manual valve lever.
 Courtesy of © TOYOTA, LICENSE AGREEMENT TMS1002 Courtesy of © TOYOTA, LICENSE AGREEMENT TMS1002
|
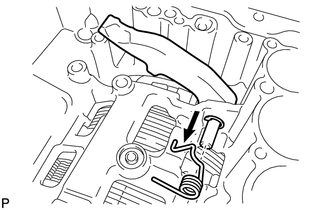
- REMOVE PARKING LOCK PAWL
- Pull out the parking lock pawl shaft from the front side, and then remove the lock pawl and spring.
 Courtesy of © TOYOTA, LICENSE AGREEMENT TMS1002 Courtesy of © TOYOTA, LICENSE AGREEMENT TMS1002
|
- Remove the E-ring from the shaft.
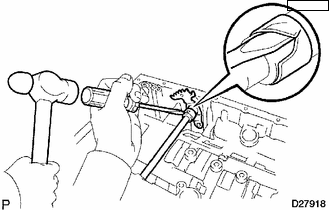
- REMOVE MANUAL VALVE LEVER SUB-ASSEMBLY
- Using a screwdriver and hammer, cut off the spacer and remove it from the shaft.
 Courtesy of © TOYOTA, LICENSE AGREEMENT TMS1002 Courtesy of © TOYOTA, LICENSE AGREEMENT TMS1002
|
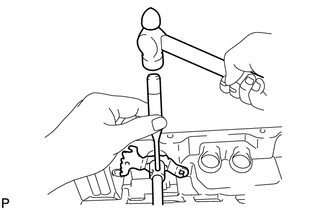
- Using a pin punch and hammer, tap out the spring pin.
 Courtesy of © TOYOTA, LICENSE AGREEMENT TMS1002 Courtesy of © TOYOTA, LICENSE AGREEMENT TMS1002
|
HINT:
Slowly tap out the spring pin so that it does not fall into the transmission case.
- Pull the manual valve lever shaft out through the transmission case, and remove the manual valve lever.
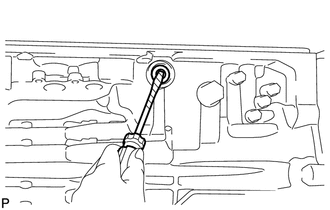
- REMOVE MANUAL VALVE LEVER SHAFT OIL SEAL
- Using a screwdriver, pry out the 2 oil seals.
 Courtesy of © TOYOTA, LICENSE AGREEMENT TMS1002 Courtesy of © TOYOTA, LICENSE AGREEMENT TMS1002
|
NOTE:
Be careful not to damage the transmission case.
HINT:
Wrap the tip of the screwdriver with tape before use.
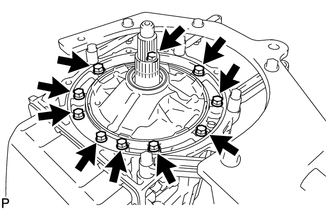
- REMOVE OIL PUMP ASSEMBLY
- Remove the 10 bolts.
 Courtesy of © TOYOTA, LICENSE AGREEMENT TMS1002 Courtesy of © TOYOTA, LICENSE AGREEMENT TMS1002
|
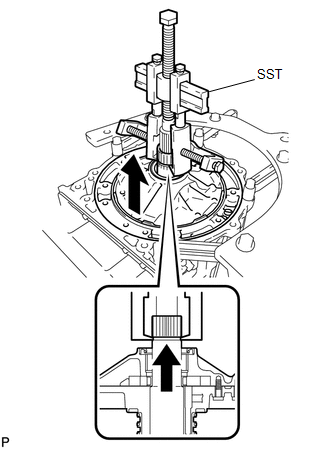
- Using SST, pull out the oil pump.
- SST: 09950-40011
- 09951-04010
- 09953-04020
- 09958-04011
- 09952-04010
- 09954-04010
- 09955-04031
- 09955-04031
 Courtesy of © TOYOTA, LICENSE AGREEMENT TMS1002 Courtesy of © TOYOTA, LICENSE AGREEMENT TMS1002
|
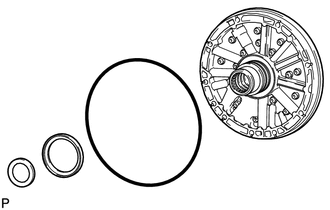
- Remove the 2 thrust bearing races and O-ring from the oil pump.
 Courtesy of © TOYOTA, LICENSE AGREEMENT TMS1002 Courtesy of © TOYOTA, LICENSE AGREEMENT TMS1002
|
- REMOVE CLUTCH DRUM AND INPUT SHAFT ASSEMBLY
- Remove the clutch drum and input shaft drum assembly from the transmission case.
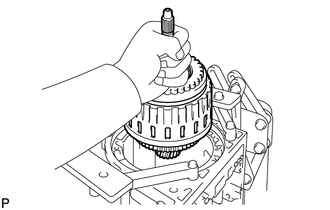 Courtesy of © TOYOTA, LICENSE AGREEMENT TMS1002 Courtesy of © TOYOTA, LICENSE AGREEMENT TMS1002
|
- Remove the clutch drum thrust washer and 2 thrust needle roller bearings.
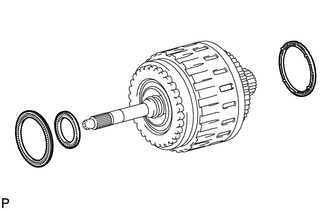 Courtesy of © TOYOTA, LICENSE AGREEMENT TMS1002 Courtesy of © TOYOTA, LICENSE AGREEMENT TMS1002
|
- INSPECT NO. 2 1-WAY CLUTCH ASSEMBLY
See step 2
- REMOVE NO. 2 1-WAY CLUTCH ASSEMBLY
- Remove the No. 2 1-way clutch and clutch drum thrust washer from the clutch drum and input shaft assembly.
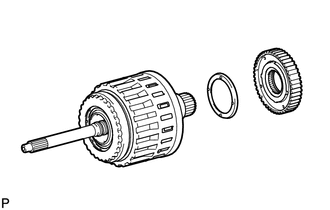 Courtesy of © TOYOTA, LICENSE AGREEMENT TMS1002 Courtesy of © TOYOTA, LICENSE AGREEMENT TMS1002
|
- FIX CLUTCH DRUM AND INPUT SHAFT ASSEMBLY
- Place the oil pump onto the torque converter clutch, and then place the clutch drum and input shaft assembly onto the oil pump.
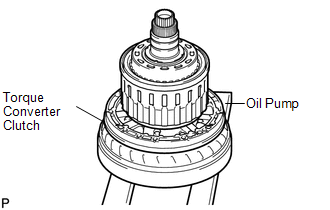 Courtesy of © TOYOTA, LICENSE AGREEMENT TMS1002 Courtesy of © TOYOTA, LICENSE AGREEMENT TMS1002
|
- REMOVE REVERSE CLUTCH HUB SUB-ASSEMBLY
- Using a screwdriver, remove the snap ring.
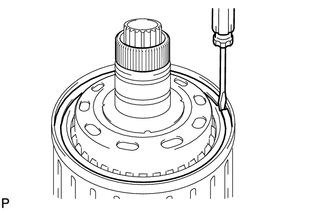 Courtesy of © TOYOTA, LICENSE AGREEMENT TMS1002 Courtesy of © TOYOTA, LICENSE AGREEMENT TMS1002
|
- Remove the reverse clutch reaction sleeve and reverse clutch hub sub-assembly with the rear clutch disc set from the clutch drum.
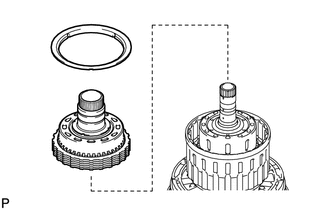 Courtesy of © TOYOTA, LICENSE AGREEMENT TMS1002 Courtesy of © TOYOTA, LICENSE AGREEMENT TMS1002
|
- REMOVE REAR CLUTCH DISC SET
- Remove the selective reverse clutch flange, 5 discs and 4 plates from the reverse clutch hub.
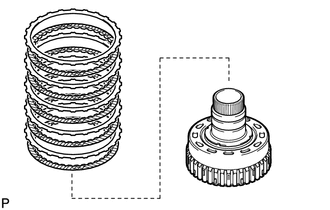 Courtesy of © TOYOTA, LICENSE AGREEMENT TMS1002 Courtesy of © TOYOTA, LICENSE AGREEMENT TMS1002
|
- Remove the reverse clutch flange from the clutch drum.
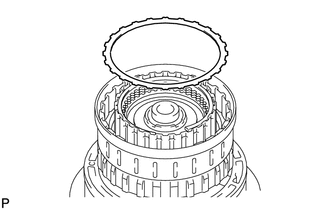 Courtesy of © TOYOTA, LICENSE AGREEMENT TMS1002 Courtesy of © TOYOTA, LICENSE AGREEMENT TMS1002
|
- INSPECT REAR CLUTCH DISC
See step 3
- INSPECT REVERSE CLUTCH HUB SUB-ASSEMBLY
See step 4
- REMOVE FORWARD CLUTCH HUB SUB-ASSEMBLY
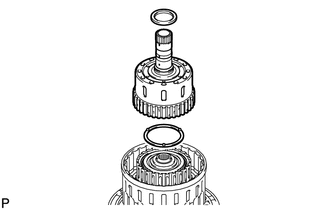
- Remove the thrust needle roller bearing, forward clutch hub and No. 3 clutch hub thrust washer from the clutch drum.
 Courtesy of © TOYOTA, LICENSE AGREEMENT TMS1002 Courtesy of © TOYOTA, LICENSE AGREEMENT TMS1002
|
- INSPECT FORWARD CLUTCH HUB SUB-ASSEMBLY
See step 5
- REMOVE COAST CLUTCH HUB SUB-ASSEMBLY WITH NO. 4 1-WAY CLUTCH ASSEMBLY
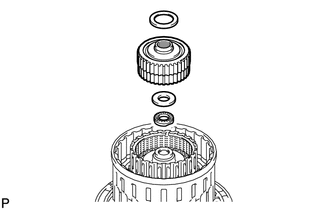
- Remove the 2 thrust needle roller bearings, coast clutch hub with the No. 4 1-way clutch and thrust bearing race from the clutch drum.
 Courtesy of © TOYOTA, LICENSE AGREEMENT TMS1002 Courtesy of © TOYOTA, LICENSE AGREEMENT TMS1002
|
- INSPECT NO. 4 1-WAY CLUTCH ASSEMBLY
See step 6
- REMOVE NO. 4 1-WAY CLUTCH ASSEMBLY
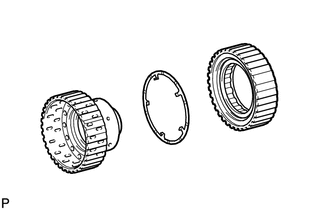
- Separate the No. 4 1-way clutch from the coast clutch hub.
 Courtesy of © TOYOTA, LICENSE AGREEMENT TMS1002 Courtesy of © TOYOTA, LICENSE AGREEMENT TMS1002
|
- Remove the No. 2 clutch hub thrust washer from the coast clutch hub.
- REMOVE FORWARD MULTIPLE DISC CLUTCH DISC SET
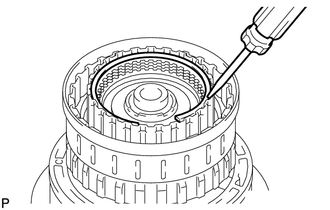
- Using a screwdriver, remove the hole snap ring.
 Courtesy of © TOYOTA, LICENSE AGREEMENT TMS1002 Courtesy of © TOYOTA, LICENSE AGREEMENT TMS1002
|
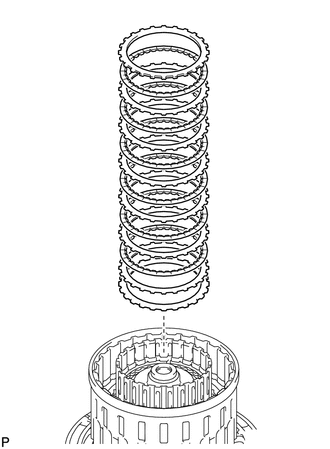
- Remove the flange, 6 discs, 6 plates and cushion plate from the input shaft.
 Courtesy of © TOYOTA, LICENSE AGREEMENT TMS1002 Courtesy of © TOYOTA, LICENSE AGREEMENT TMS1002
|
- INSPECT FORWARD MULTIPLE DISC CLUTCH DISC
See step 7
- REMOVE COAST CLUTCH DISC SET
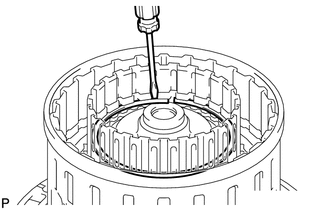
- Using a screwdriver, remove the hole snap ring.
 Courtesy of © TOYOTA, LICENSE AGREEMENT TMS1002 Courtesy of © TOYOTA, LICENSE AGREEMENT TMS1002
|
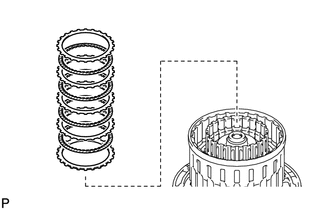
- Remove the flange, 4 discs and 4 plates from the input shaft.
 Courtesy of © TOYOTA, LICENSE AGREEMENT TMS1002 Courtesy of © TOYOTA, LICENSE AGREEMENT TMS1002
|
- INSPECT COAST CLUTCH DISC
See step 8
- REMOVE INPUT SHAFT SUB-ASSEMBLY
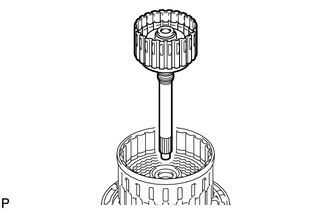
- Remove the input shaft from the clutch drum.
 Courtesy of © TOYOTA, LICENSE AGREEMENT TMS1002 Courtesy of © TOYOTA, LICENSE AGREEMENT TMS1002
|
- REMOVE INPUT SHAFT OIL SEAL RING
- Remove the 4 oil seal rings from the input shaft.
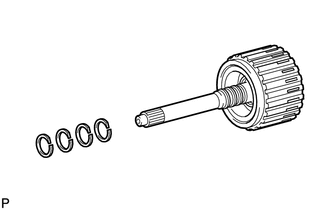 Courtesy of © TOYOTA, LICENSE AGREEMENT TMS1002 Courtesy of © TOYOTA, LICENSE AGREEMENT TMS1002
|
- REMOVE COAST CLUTCH PISTON
- Place SST on the No. 1 clutch balancer, and compress the return spring with a press.
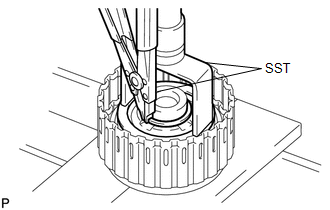 Courtesy of © TOYOTA, LICENSE AGREEMENT TMS1002 Courtesy of © TOYOTA, LICENSE AGREEMENT TMS1002
|
- SST: 09350-30020
- 09350-07040
- Using SST, remove the snap ring.
- SST: 09350-30020
- 09350-07070
- Remove the No. 1 clutch balancer and forward clutch return spring from the input shaft.
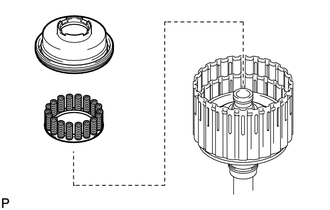 Courtesy of © TOYOTA, LICENSE AGREEMENT TMS1002 Courtesy of © TOYOTA, LICENSE AGREEMENT TMS1002
|
- Remove the O-ring from the No. 1 clutch balancer.
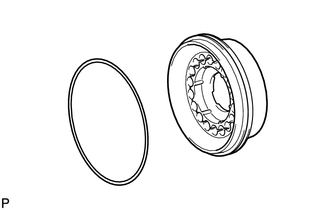 Courtesy of © TOYOTA, LICENSE AGREEMENT TMS1002 Courtesy of © TOYOTA, LICENSE AGREEMENT TMS1002
|
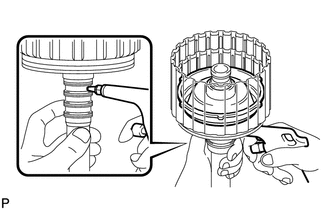
- Hold the coast clutch piston by hand and apply compressed air to the input shaft to remove the coast clutch piston.
 Courtesy of © TOYOTA, LICENSE AGREEMENT TMS1002 Courtesy of © TOYOTA, LICENSE AGREEMENT TMS1002
|
- REMOVE FORWARD CLUTCH PISTON SUB-ASSEMBLY
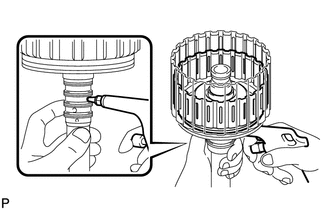
- Hold the forward clutch piston by hand and apply compressed air to the input shaft to remove the forward clutch piston.
 Courtesy of © TOYOTA, LICENSE AGREEMENT TMS1002 Courtesy of © TOYOTA, LICENSE AGREEMENT TMS1002
|
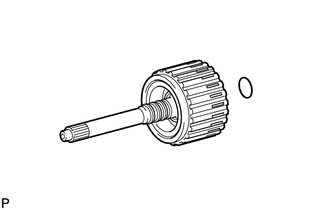
- Remove the O-ring from the input shaft.
 Courtesy of © TOYOTA, LICENSE AGREEMENT TMS1002 Courtesy of © TOYOTA, LICENSE AGREEMENT TMS1002
|
- INSPECT FORWARD CLUTCH RETURN SPRING SUB-ASSEMBLY
See step 9
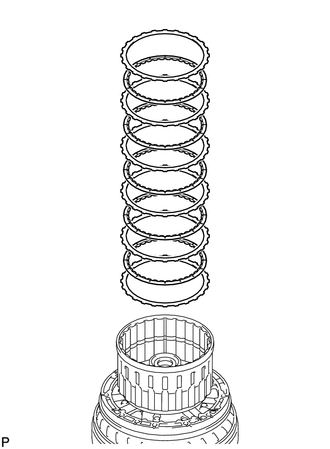
- REMOVE DIRECT CLUTCH DISC SET
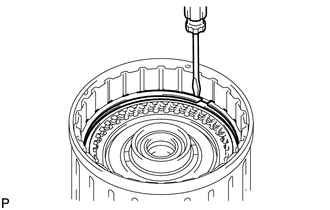
- Using a screwdriver, remove the 2 hole snap rings from the clutch drum.
 Courtesy of © TOYOTA, LICENSE AGREEMENT TMS1002 Courtesy of © TOYOTA, LICENSE AGREEMENT TMS1002
|
- Remove the direct clutch flange, 5 discs and 5 plates from the clutch drum.
 Courtesy of © TOYOTA, LICENSE AGREEMENT TMS1002 Courtesy of © TOYOTA, LICENSE AGREEMENT TMS1002
|
- INSPECT DIRECT CLUTCH DISC
See step 10
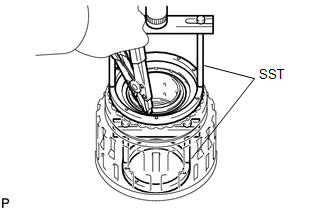
- REMOVE NO. 3 CLUTCH BALANCER
- Place SST on the No. 3 clutch balancer, and compress the return spring with a press.
 Courtesy of © TOYOTA, LICENSE AGREEMENT TMS1002 Courtesy of © TOYOTA, LICENSE AGREEMENT TMS1002
|
- SST: 09380-60010
- 09381-06020
- 09381-06030
- 09381-06040
- 09381-06050
- 09381-06080
- 09381-06070
- Using SST, remove the snap ring.
- SST: 09350-30020
- 09350-07070
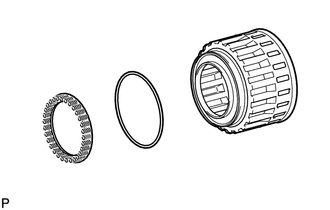
- Remove the No. 3 clutch balancer.
- Remove the reverse clutch return spring and O-ring from the reverse clutch piston sub-assembly.
 Courtesy of © TOYOTA, LICENSE AGREEMENT TMS1002 Courtesy of © TOYOTA, LICENSE AGREEMENT TMS1002
|
- INSPECT REVERSE CLUTCH RETURN SPRING SUB-ASSEMBLY
See step 11
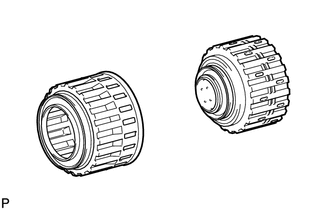
- REMOVE REVERSE CLUTCH PISTON SUB-ASSEMBLY
- Remove the reverse clutch piston from the clutch drum.
 Courtesy of © TOYOTA, LICENSE AGREEMENT TMS1002 Courtesy of © TOYOTA, LICENSE AGREEMENT TMS1002
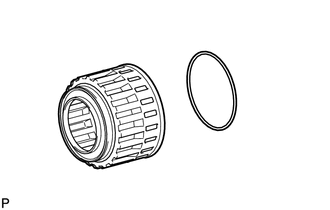
|
- Remove the O-ring from the reverse clutch piston.
 Courtesy of © TOYOTA, LICENSE AGREEMENT TMS1002 Courtesy of © TOYOTA, LICENSE AGREEMENT TMS1002
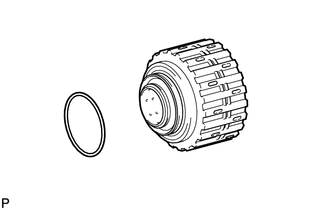
|
- Remove the O-ring from the clutch drum.
 Courtesy of © TOYOTA, LICENSE AGREEMENT TMS1002 Courtesy of © TOYOTA, LICENSE AGREEMENT TMS1002
|
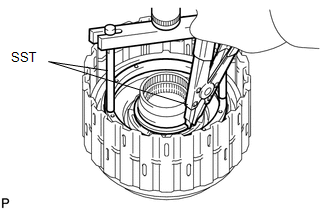
- REMOVE DIRECT CLUTCH PISTON SUB-ASSEMBLY
- Place SST on the direct clutch piston, and compress the return spring with a press.
 Courtesy of © TOYOTA, LICENSE AGREEMENT TMS1002 Courtesy of © TOYOTA, LICENSE AGREEMENT TMS1002
|
- SST: 09380-60010
- 09381-06030
- 09381-06040
- 09381-06080
- Using SST, remove the snap ring.
- SST: 09350-30020
- 09350-07070
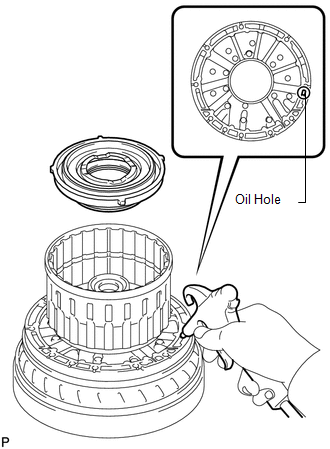
- Place the oil pump onto the torque converter clutch, and then place the clutch drum onto the oil pump.
- Hold the direct clutch piston by hand and apply compressed air to the oil hole of the oil pump as shown in the illustration to remove the direct clutch piston with the No. 2 clutch balancer and direct clutch return spring sub-assembly.
 Courtesy of © TOYOTA, LICENSE AGREEMENT TMS1002 Courtesy of © TOYOTA, LICENSE AGREEMENT TMS1002
|
- Remove the No. 2 clutch balancer and direct clutch return spring sub-assembly from the direct clutch piston.
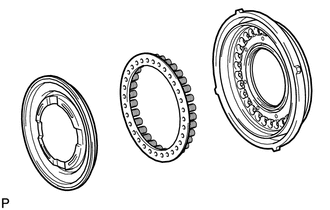 Courtesy of © TOYOTA, LICENSE AGREEMENT TMS1002 Courtesy of © TOYOTA, LICENSE AGREEMENT TMS1002
|
- Remove the 2 O-rings from the direct clutch piston.
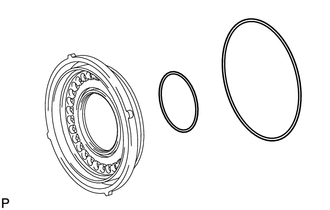 Courtesy of © TOYOTA, LICENSE AGREEMENT TMS1002 Courtesy of © TOYOTA, LICENSE AGREEMENT TMS1002
|
- INSPECT DIRECT CLUTCH RETURN SPRING SUB-ASSEMBLY
See step 12
- REMOVE NO. 3 BRAKE SNAP RING
- Using a screwdriver, remove the No. 3 brake snap ring from the transmission case.
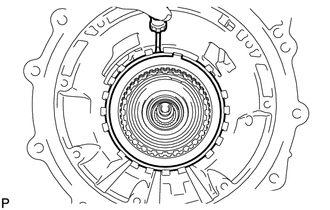 Courtesy of © TOYOTA, LICENSE AGREEMENT TMS1002 Courtesy of © TOYOTA, LICENSE AGREEMENT TMS1002
|
- REMOVE NO. 3 BRAKE DISC SET
- Remove the 2 flanges, 4 discs and 3 plates from the transmission case.
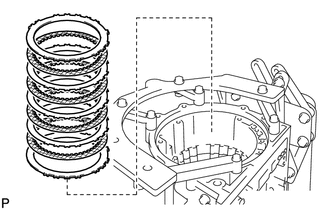 Courtesy of © TOYOTA, LICENSE AGREEMENT TMS1002 Courtesy of © TOYOTA, LICENSE AGREEMENT TMS1002
|
- INSPECT NO. 3 BRAKE DISC
See step 13
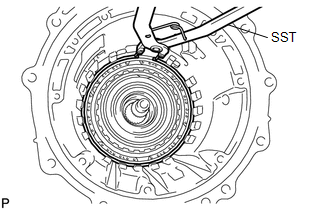
- REMOVE NO. 3 BRAKE PISTON HOLE SNAP RING
- Using SST, remove the snap ring.
 Courtesy of © TOYOTA, LICENSE AGREEMENT TMS1002 Courtesy of © TOYOTA, LICENSE AGREEMENT TMS1002
|
- SST: 09350-30020
- 09350-07060
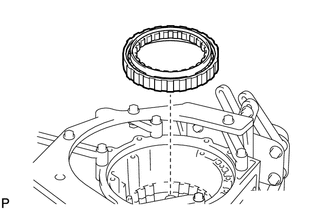
- REMOVE NO. 3 BRAKE CYLINDER WITH NO. 3 BRAKE PISTON AND NO. 3 BRAKE PISTON RETURN SPRING SUB-ASSEMBLY
- Remove the No. 3 brake cylinder with the No. 3 brake piston and No. 3 brake piston return spring from the transmission case.
 Courtesy of © TOYOTA, LICENSE AGREEMENT TMS1002 Courtesy of © TOYOTA, LICENSE AGREEMENT TMS1002
|
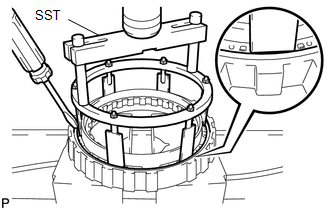
- REMOVE NO. 3 BRAKE PISTON
- Using SST and a press, compress the return spring and remove the snap ring and No. 3 brake piston return spring with a screwdriver.
 Courtesy of © TOYOTA, LICENSE AGREEMENT TMS1002 Courtesy of © TOYOTA, LICENSE AGREEMENT TMS1002
|
- SST: 09380-60010
- 09381-06020
- 09381-06040
- 09381-06060
- 09381-06100
- 09381-06110
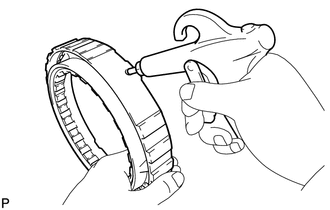
- Hold the No. 3 brake piston and apply compressed air (392 kPa, 4.0 kgf/cm2
, 57 psi) to the No. 3 brake cylinder to remove the No. 3 brake piston.
 Courtesy of © TOYOTA, LICENSE AGREEMENT TMS1002 Courtesy of © TOYOTA, LICENSE AGREEMENT TMS1002
|
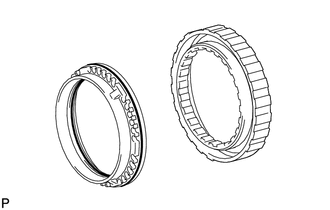
- Remove the 2 O-rings from the No. 3 brake piston.
 Courtesy of © TOYOTA, LICENSE AGREEMENT TMS1002 Courtesy of © TOYOTA, LICENSE AGREEMENT TMS1002
|
- INSPECT NO. 3 BRAKE PISTON RETURN SPRING SUB-ASSEMBLY
See step 14
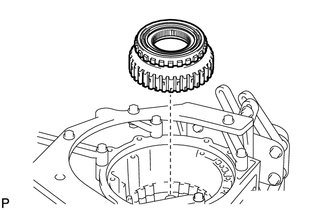
- REMOVE 1-WAY CLUTCH ASSEMBLY WITH 1-WAY CLUTCH INNER RACE SUB-ASSEMBLY
- Remove the 1-way clutch with 1-way clutch inner race from the transmission case.
 Courtesy of © TOYOTA, LICENSE AGREEMENT TMS1002 Courtesy of © TOYOTA, LICENSE AGREEMENT TMS1002
|
- INSPECT 1-WAY CLUTCH ASSEMBLY
See step 16
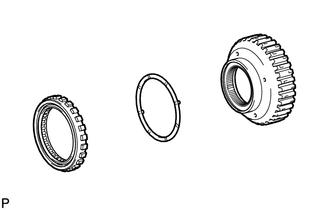
- REMOVE 1-WAY CLUTCH INNER RACE SUB-ASSEMBLY
- Separate the 1-way clutch inner race from the 1-way clutch and remove the No. 1 planetary carrier thrust washer.
 Courtesy of © TOYOTA, LICENSE AGREEMENT TMS1002 Courtesy of © TOYOTA, LICENSE AGREEMENT TMS1002
|
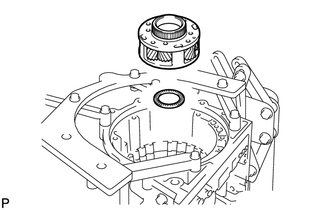
- REMOVE FRONT PLANETARY GEAR ASSEMBLY
- Remove the front planetary gear and thrust needle roller bearing from the transmission case.
 Courtesy of © TOYOTA, LICENSE AGREEMENT TMS1002 Courtesy of © TOYOTA, LICENSE AGREEMENT TMS1002
|
- Remove the No. 2 planetary carrier thrust washer, thrust bearing race and front planetary sun gear from the front planetary gear.
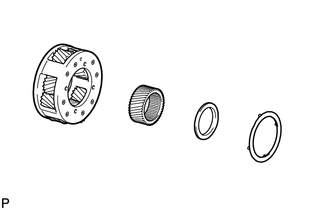 Courtesy of © TOYOTA, LICENSE AGREEMENT TMS1002 Courtesy of © TOYOTA, LICENSE AGREEMENT TMS1002
|
- INSPECT FRONT PLANETARY GEAR ASSEMBLY
See step 15
- REMOVE FRONT PLANETARY RING GEAR WITH FRONT PLANETARY RING GEAR FLANGE SUB-ASSEMBLY AND CENTER PLANETARY RING GEAR
- Remove the front planetary ring gear with the front planetary ring gear flange and center planetary ring gear from the transmission case.
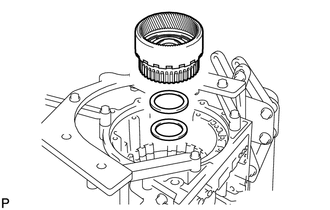 Courtesy of © TOYOTA, LICENSE AGREEMENT TMS1002 Courtesy of © TOYOTA, LICENSE AGREEMENT TMS1002
|
- Remove the thrust needle roller bearing and thrust bearing race.
- REMOVE FRONT PLANETARY RING GEAR
- Using a screwdriver, remove the snap ring.
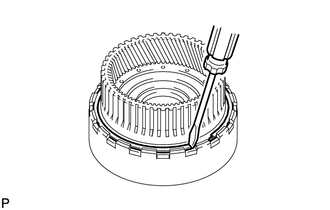 Courtesy of © TOYOTA, LICENSE AGREEMENT TMS1002 Courtesy of © TOYOTA, LICENSE AGREEMENT TMS1002
|
- Remove the front planetary ring gear from the center planetary ring gear.
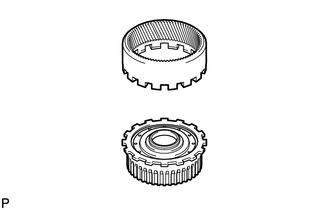 Courtesy of © TOYOTA, LICENSE AGREEMENT TMS1002 Courtesy of © TOYOTA, LICENSE AGREEMENT TMS1002
|
- REMOVE CENTER PLANETARY RING GEAR
- Using a screwdriver, remove the snap ring.
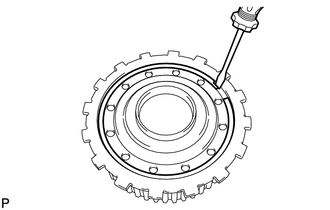 Courtesy of © TOYOTA, LICENSE AGREEMENT TMS1002 Courtesy of © TOYOTA, LICENSE AGREEMENT TMS1002
|
- Remove the center planetary ring gear from the front planetary ring gear flange.
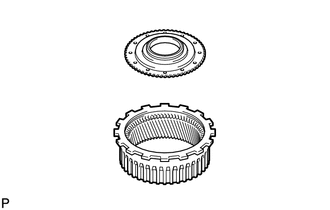 Courtesy of © TOYOTA, LICENSE AGREEMENT TMS1002 Courtesy of © TOYOTA, LICENSE AGREEMENT TMS1002
|
- REMOVE NO. 1 BRAKE DISC SET
- Remove the flange, 4 discs and 4 plates from the transmission case.
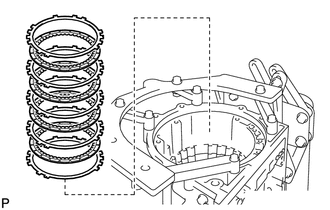 Courtesy of © TOYOTA, LICENSE AGREEMENT TMS1002 Courtesy of © TOYOTA, LICENSE AGREEMENT TMS1002
|
- INSPECT NO. 1 BRAKE DISC
See step 17
- REMOVE NO. 1 BRAKE CYLINDER WITH NO. 1 BRAKE PISTON
- Place SST on the No. 1 brake piston return spring, and compress the return spring.
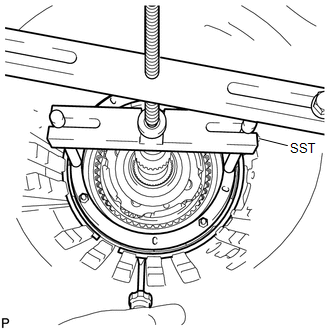 Courtesy of © TOYOTA, LICENSE AGREEMENT TMS1002 Courtesy of © TOYOTA, LICENSE AGREEMENT TMS1002
|
- SST: 09380-60010
- 09381-06010
- 09381-06020
- 09381-06050
- 09381-06060
- 09381-06090
- 09381-06100
- 09381-06110
- 09381-06120
- Using a screwdriver, remove the snap ring from the transmission case.
- Remove the brake piston return spring and No. 1 brake piston with No. 1 brake cylinder from the transmission case.
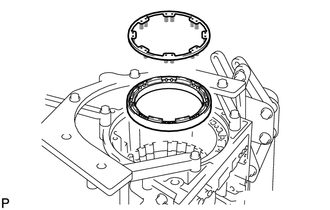 Courtesy of © TOYOTA, LICENSE AGREEMENT TMS1002 Courtesy of © TOYOTA, LICENSE AGREEMENT TMS1002
|
- INSPECT BRAKE PISTON RETURN SPRING SUB-ASSEMBLY
See step 18
- REMOVE NO. 1 BRAKE PISTON
- Hold the No. 1 brake piston and apply compressed air to the No. 1 brake cylinder to remove the No. 1 brake piston.
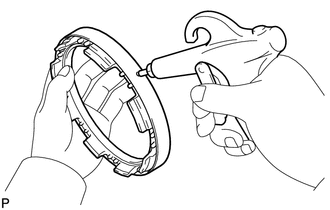 Courtesy of © TOYOTA, LICENSE AGREEMENT TMS1002 Courtesy of © TOYOTA, LICENSE AGREEMENT TMS1002
|
HINT:
If the piston does not pop out with compressed air, lift the piston out with needle-nose pliers.
- Remove the 2 O-rings from the No. 1 brake piston.
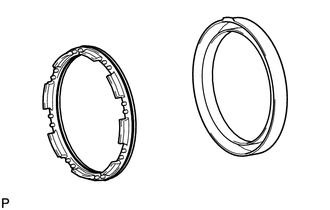 Courtesy of © TOYOTA, LICENSE AGREEMENT TMS1002 Courtesy of © TOYOTA, LICENSE AGREEMENT TMS1002
|
- REMOVE NO. 2 BRAKE DISC SET
- Place SST on the No. 2 brake flange, and compress the return spring.
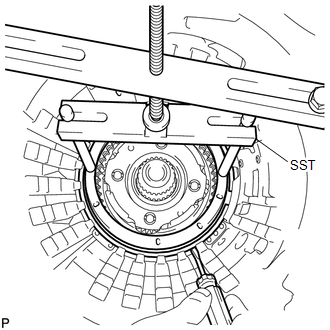 Courtesy of © TOYOTA, LICENSE AGREEMENT TMS1002 Courtesy of © TOYOTA, LICENSE AGREEMENT TMS1002
|
- SST: 09380-60010
- 09381-06010
- 09381-06020
- 09381-06050
- 09381-06070
- 09381-06090
- 09381-06120
- Using a screwdriver, remove the snap ring from the transmission case.
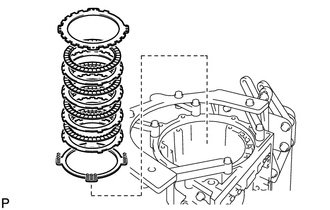
- Remove the 2 flanges, 4 discs, 3 plates and brake piston return spring from the transmission case.
 Courtesy of © TOYOTA, LICENSE AGREEMENT TMS1002 Courtesy of © TOYOTA, LICENSE AGREEMENT TMS1002
|
- INSPECT NO. 2 BRAKE DISC
See step 19
- INSPECT NO. 2 BRAKE PISTON RETURN SPRING SUB-ASSEMBLY
See step 20
- REMOVE CENTER PLANETARY GEAR ASSEMBLY
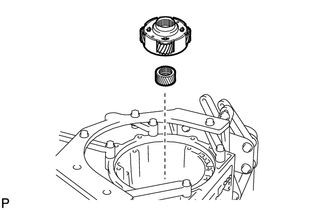
- Remove the center planetary gear and planetary sun gear from the transmission case.
 Courtesy of © TOYOTA, LICENSE AGREEMENT TMS1002 Courtesy of © TOYOTA, LICENSE AGREEMENT TMS1002
|
- INSPECT CENTER PLANETARY GEAR ASSEMBLY
See step 21
- REMOVE NO. 2 BRAKE CYLINDER WITH NO. 2 BRAKE PISTON
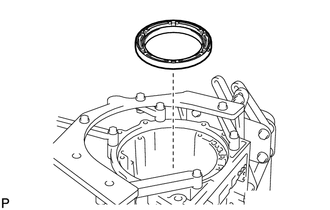
- Remove the No. 2 brake cylinder with the No. 2 brake piston from the transmission case.
 Courtesy of © TOYOTA, LICENSE AGREEMENT TMS1002 Courtesy of © TOYOTA, LICENSE AGREEMENT TMS1002
|
- REMOVE NO. 2 BRAKE PISTON
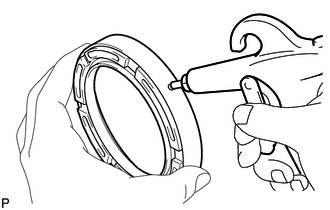
- Hold the No. 2 brake piston and apply compressed air to the No. 2 brake cylinder to remove the No. 2 brake piston.
 Courtesy of © TOYOTA, LICENSE AGREEMENT TMS1002 Courtesy of © TOYOTA, LICENSE AGREEMENT TMS1002
|
HINT:
If the piston does not pop out with compressed air, lift the piston out with needle-nose pliers.
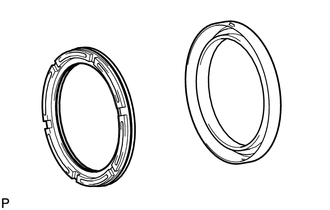
- Remove the 2 O-rings from the No. 2 brake piston.
 Courtesy of © TOYOTA, LICENSE AGREEMENT TMS1002 Courtesy of © TOYOTA, LICENSE AGREEMENT TMS1002
|
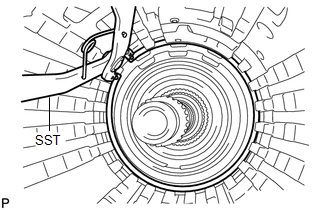
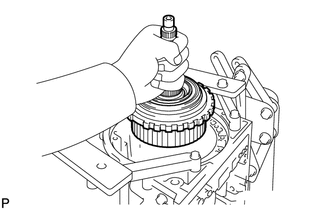
- REMOVE INTERMEDIATE SHAFT WITH NO. 3 1-WAY CLUTCH ASSEMBLY, REAR PLANETARY RING GEAR FLANGE AND REAR PLANETARY RING GEAR
- Using SST, remove the snap ring from the transmission case.
 Courtesy of © TOYOTA, LICENSE AGREEMENT TMS1002 Courtesy of © TOYOTA, LICENSE AGREEMENT TMS1002
|
- SST: 09350-30020
- 09350-07060
- Remove the intermediate shaft with No. 3 1-way clutch, rear planetary ring gear flange and rear planetary ring gear from the transmission case.
 Courtesy of © TOYOTA, LICENSE AGREEMENT TMS1002 Courtesy of © TOYOTA, LICENSE AGREEMENT TMS1002
|
- INSPECT NO. 3 1-WAY CLUTCH ASSEMBLY
See step 22
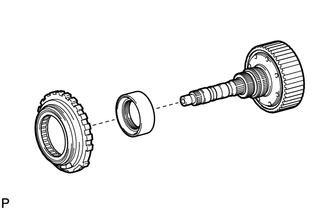
- REMOVE NO. 3 1-WAY CLUTCH ASSEMBLY
- Remove the No. 3 1-way clutch and 1-way clutch inner race from the intermediate shaft.
 Courtesy of © TOYOTA, LICENSE AGREEMENT TMS1002 Courtesy of © TOYOTA, LICENSE AGREEMENT TMS1002
|
- REMOVE REAR PLANETARY RING GEAR
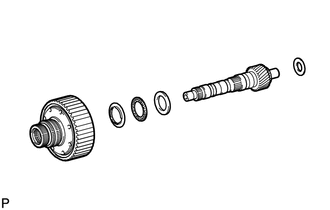
- Remove the rear planetary ring gear with rear planetary ring gear flange, 3 thrust bearing races and thrust needle roller bearing from the intermediate shaft.
 Courtesy of © TOYOTA, LICENSE AGREEMENT TMS1002 Courtesy of © TOYOTA, LICENSE AGREEMENT TMS1002
|
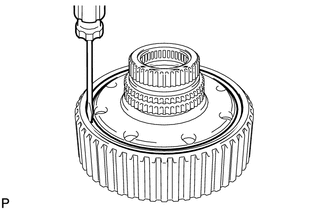
- Using a screwdriver, remove the snap ring.
 Courtesy of © TOYOTA, LICENSE AGREEMENT TMS1002 Courtesy of © TOYOTA, LICENSE AGREEMENT TMS1002
|
- Remove the rear planetary ring gear flange from the rear planetary ring gear.
- INSPECT INTERMEDIATE SHAFT
See step 23
- REMOVE NO. 4 BRAKE DISC SET
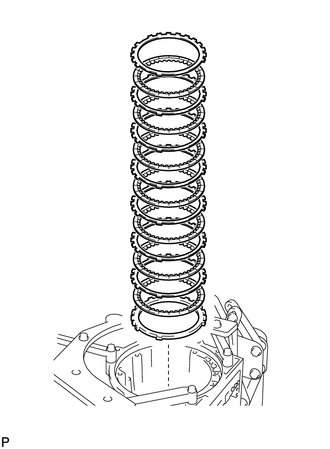
- Remove the 2 flanges, 7 discs and 6 plates from the transmission case.
 Courtesy of © TOYOTA, LICENSE AGREEMENT TMS1002 Courtesy of © TOYOTA, LICENSE AGREEMENT TMS1002
|
- INSPECT NO. 4 BRAKE DISC
See step 24
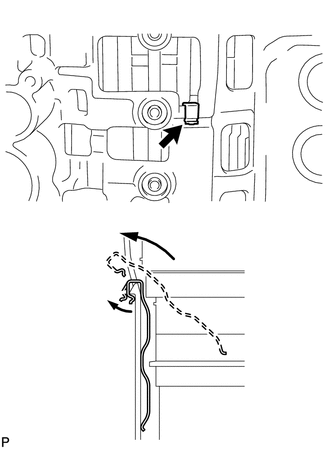
- REMOVE BRAKE PLATE STOPPER SPRING
 Courtesy of © TOYOTA, LICENSE AGREEMENT TMS1002 Courtesy of © TOYOTA, LICENSE AGREEMENT TMS1002
|
NOTE:
When removing the stopper spring, do not apply excessive force and do not deform it.
- REMOVE REAR PLANETARY GEAR ASSEMBLY
- Using snap ring expander, remove the snap ring.
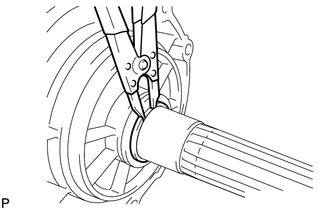 Courtesy of © TOYOTA, LICENSE AGREEMENT TMS1002 Courtesy of © TOYOTA, LICENSE AGREEMENT TMS1002
|
- Remove the rear planetary flange thrust bearing race, thrust needle roller bearing and thrust bearing race.
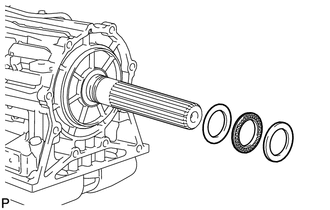 Courtesy of © TOYOTA, LICENSE AGREEMENT TMS1002 Courtesy of © TOYOTA, LICENSE AGREEMENT TMS1002
|
- Remove the rear planetary gear from the transmission case.
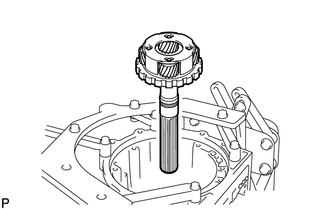 Courtesy of © TOYOTA, LICENSE AGREEMENT TMS1002 Courtesy of © TOYOTA, LICENSE AGREEMENT TMS1002
|
- Remove the 2 thrust needle roller bearings from the rear planetary gear.
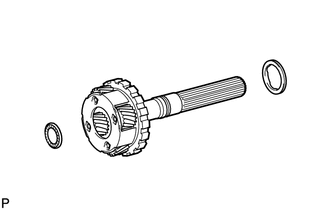 Courtesy of © TOYOTA, LICENSE AGREEMENT TMS1002 Courtesy of © TOYOTA, LICENSE AGREEMENT TMS1002
|
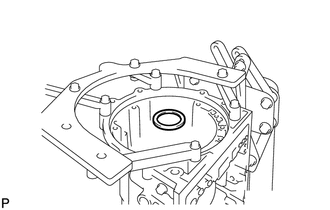
- Remove the thrust bearing race from the transmission case.
 Courtesy of © TOYOTA, LICENSE AGREEMENT TMS1002 Courtesy of © TOYOTA, LICENSE AGREEMENT TMS1002
|
- INSPECT REAR PLANETARY GEAR ASSEMBLY
See step 25
- REMOVE 1ST AND REVERSE BRAKE PISTON
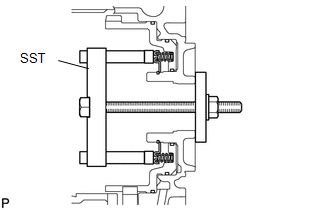
- Place SST on the spring retainer and compress the brake return spring.
 Courtesy of © TOYOTA, LICENSE AGREEMENT TMS1002 Courtesy of © TOYOTA, LICENSE AGREEMENT TMS1002
|
- SST: 09380-60010
- 09381-06030
- 09381-06040
- 09381-06080
- 09381-06120
- 09381-06130
- 09381-05040
- 09381-05050
- Using SST, remove the snap ring and brake return spring.
- SST: 09350-30020
- 09350-07070
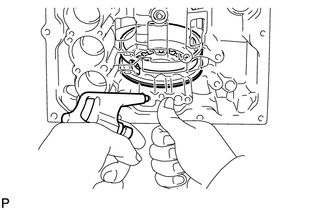
- Hold the 1st and reverse brake piston and apply compressed air (392 kPa, 4.0 kgf/cm2
, 57 psi) to the transmission case to remove the 1st and reverse brake piston.
 Courtesy of © TOYOTA, LICENSE AGREEMENT TMS1002 Courtesy of © TOYOTA, LICENSE AGREEMENT TMS1002
|
HINT:
If the piston does not pop out with compressed air, lift the piston out with needle-nose pliers.
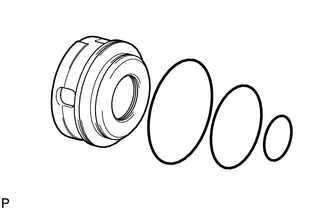
- Remove the 3 O-rings from the 1st and reverse brake piston.
 Courtesy of © TOYOTA, LICENSE AGREEMENT TMS1002 Courtesy of © TOYOTA, LICENSE AGREEMENT TMS1002
|
- INSPECT 1ST AND REVERSE BRAKE RETURN SPRING SUB-ASSEMBLY
See step 26