- INSTALL LOWER FRONT BUMPER ABSORBER
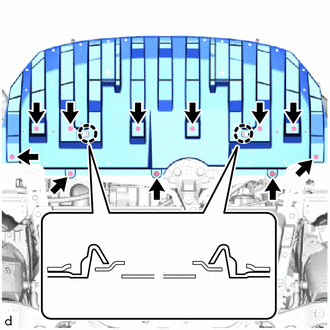
- Engage the claws and install the lower front bumper absorber with the 3 clips and 8 bolts.
 Courtesy of © TOYOTA, LICENSE AGREEMENT TMS1002 Courtesy of © TOYOTA, LICENSE AGREEMENT TMS1002
|
- INSTALL FRONT BUMPER BRACKET LH
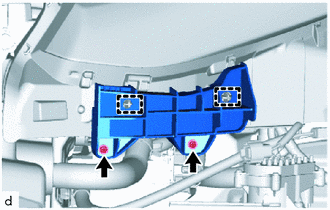
- Engage the guides.
 Courtesy of © TOYOTA, LICENSE AGREEMENT TMS1002 Courtesy of © TOYOTA, LICENSE AGREEMENT TMS1002
|
- Install the front bumper bracket LH with the 2 screws.
- INSTALL FRONT BUMPER BRACKET RH
HINT:
Use the same procedure as for the LH side.
- INSTALL FRONT BUMPER SIDE SUPPORT LH
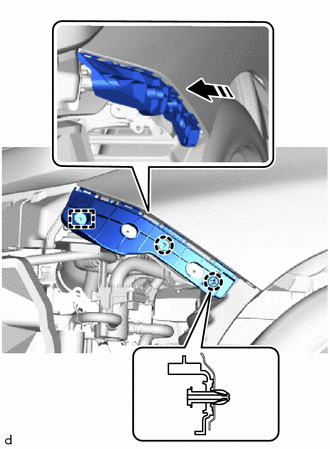
- Engage the guide and claws to install the front bumper side support LH as shown in the illustration.
HINT:
Do not forcibly engage the clip.
 Courtesy of © TOYOTA, LICENSE AGREEMENT TMS1002 Courtesy of © TOYOTA, LICENSE AGREEMENT TMS1002
|
 |
Install in this Direction |
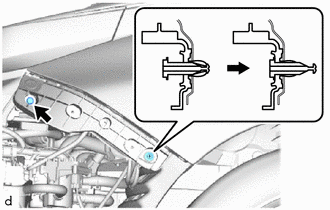
- Engage the clip as shown in the illustration.
 Courtesy of © TOYOTA, LICENSE AGREEMENT TMS1002 Courtesy of © TOYOTA, LICENSE AGREEMENT TMS1002
|
- Install the bolt.
Torque: 5.4 N*m (55 kgf*cm, 48 in.*lbf)
- INSTALL FRONT BUMPER SIDE SUPPORT RH
HINT:
Use the same procedure as for the LH side.
- INSTALL FRONT SIDE MEMBER BRACKET SUB-ASSEMBLY LH
- Engage the hook to install the front side member bracket sub-assembly LH.
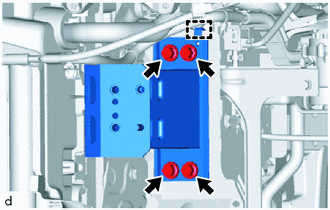 Courtesy of © TOYOTA, LICENSE AGREEMENT TMS1002 Courtesy of © TOYOTA, LICENSE AGREEMENT TMS1002
|
- Install the 4 bolts.
Torque: 50 N*m (510 kgf*cm, 37 ft.*lbf)
- INSTALL FRONT SIDE MEMBER BRACKET SUB-ASSEMBLY RH
HINT:
Use the same procedure as for the LH side.
- INSTALL FRONT BUMPER REINFORCEMENT SUB-ASSEMBLY
- Install the front bumper reinforcement sub-assembly with the 6 bolts.
Torque: 34 N*m (347 kgf*cm, 25 ft.*lbf)
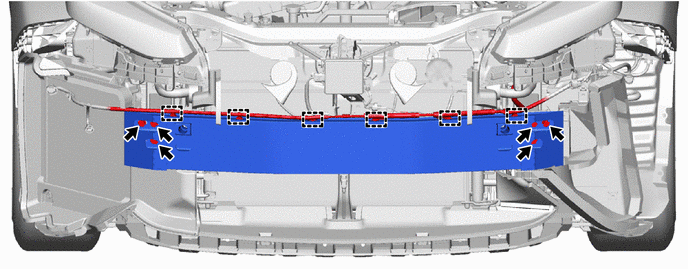 Courtesy of © TOYOTA, LICENSE AGREEMENT TMS1002 Courtesy of © TOYOTA, LICENSE AGREEMENT TMS1002
|
- Engage the clamps to install the motor compartment main wire.
- INSTALL FRONT BUMPER ENERGY ABSORBER
- Engage the guides to install the front bumper energy absorber as shown in the illustration.
 Courtesy of © TOYOTA, LICENSE AGREEMENT TMS1002 Courtesy of © TOYOTA, LICENSE AGREEMENT TMS1002
|
|
Install in this Direction |
- |
- |
- INSTALL RADIATOR GRILLE BRACKET
- Install the radiator grille bracket with the 3 bolts.
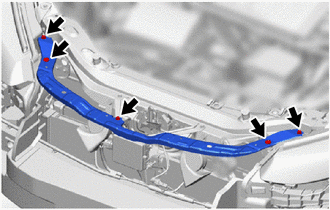 Courtesy of © TOYOTA, LICENSE AGREEMENT TMS1002 Courtesy of © TOYOTA, LICENSE AGREEMENT TMS1002
|
- Install the 2 clips.
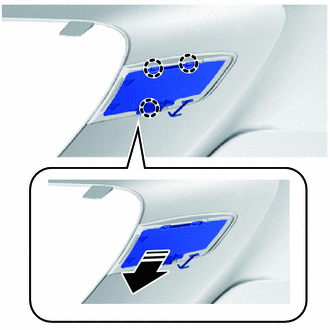
- INSTALL FRONT BUMPER HOLE COVER LH
- Engage the hook.
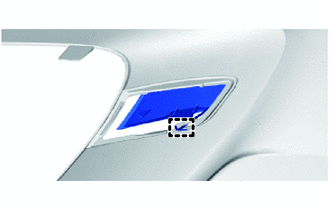 Courtesy of © TOYOTA, LICENSE AGREEMENT TMS1002 Courtesy of © TOYOTA, LICENSE AGREEMENT TMS1002
|
- Engage the claws to install the front bumper hole cover LH as shown in the illustration.
 Courtesy of © TOYOTA, LICENSE AGREEMENT TMS1002 Courtesy of © TOYOTA, LICENSE AGREEMENT TMS1002
|
|
Install in this Direction |
- INSTALL FRONT BUMPER HOLE COVER RH
HINT:
Use the same procedure as for the LH side.
- INSTALL FRONT FENDER LINER RETAINER
- Engage the claws to install the 2 front fender liner retainers.
 Courtesy of © TOYOTA, LICENSE AGREEMENT TMS1002 Courtesy of © TOYOTA, LICENSE AGREEMENT TMS1002
|
HINT:
Use the same procedure for the RH and LH sides.
- INSTALL FRONT BUMPER EXTENSION MOUNTING BRACKET
- Engage the claws to install the front bumper extension mounting bracket as shown in the illustration.
 Courtesy of © TOYOTA, LICENSE AGREEMENT TMS1002 Courtesy of © TOYOTA, LICENSE AGREEMENT TMS1002
|
|
Install in this Direction |
- Install the 2 screws.
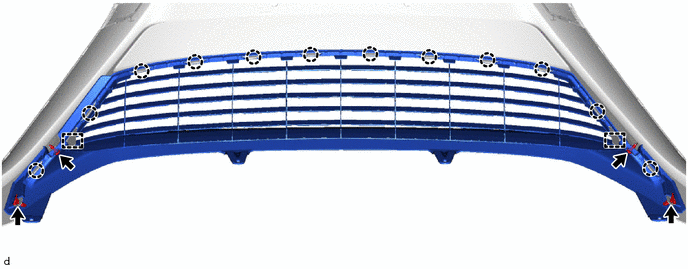
- INSTALL LOWER RADIATOR GRILLE SUB-ASSEMBLY
- Engage the guides and claws to install the lower radiator grille sub-assembly.
 Courtesy of © TOYOTA, LICENSE AGREEMENT TMS1002 Courtesy of © TOYOTA, LICENSE AGREEMENT TMS1002
|
- Install the 2 outside moulding retainers.
- Install the 2 screws.
- INSTALL FRONT BUMPER SIDE MOULDING LH
- Engage the guides and claws to install the front bumper side moulding LH as shown in the illustration.
 Courtesy of © TOYOTA, LICENSE AGREEMENT TMS1002 Courtesy of © TOYOTA, LICENSE AGREEMENT TMS1002
|
|
Install in this Direction |
- Install the 2 screws.
- INSTALL FRONT BUMPER SIDE MOULDING RH
HINT:
Use the same procedure as for the LH side.
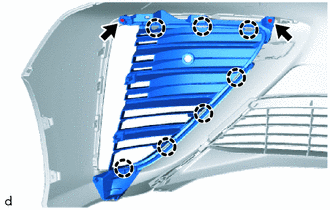
- INSTALL LOWER RADIATOR SIDE GRILLE LH
- Engage the claws to install the lower radiator side grille LH.
 Courtesy of © TOYOTA, LICENSE AGREEMENT TMS1002 Courtesy of © TOYOTA, LICENSE AGREEMENT TMS1002
|
- Install the 2 screws.
- INSTALL LOWER RADIATOR SIDE GRILLE RH
HINT:
Use the same procedure as for the LH side.
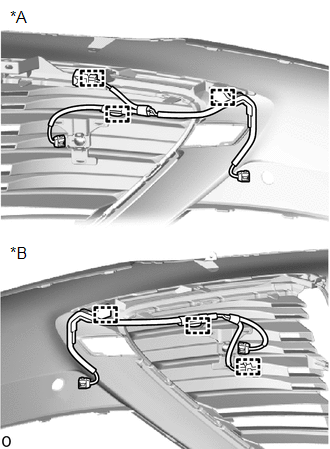
- INSTALL NO. 3 MOTOR COMPONENT WIRE
- Engage the clamps to install the 2 No. 3 motor compartment wires.
 Courtesy of © TOYOTA, LICENSE AGREEMENT TMS1002 Courtesy of © TOYOTA, LICENSE AGREEMENT TMS1002
|
| *A |
for LH Side |
| *B |
for RH Side |
- INSTALL FRONT CENTER ULTRASONIC SENSOR RETAINER
Refer to PROCEDURE - Step 1
- INSTALL FRONT CORNER ULTRASONIC SENSOR
Refer to PROCEDURE - Step 2
- INSTALL FRONT CENTER ULTRASONIC SENSOR
Refer to PROCEDURE - Step 3
- INSTALL CLEARANCE LIGHT ASSEMBLY LH
Refer to PROCEDURE - Step 1
- INSTALL CLEARANCE LIGHT ASSEMBLY RH
HINT:
Use the same procedure as for the LH side.
- INSTALL RADIATOR GRILLE EMBLEM ASSEMBLY
- Engage the guide and claws to install the radiator grille emblem assembly.
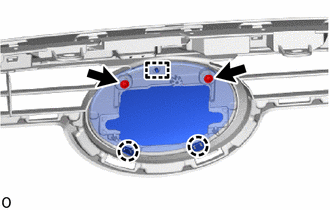 Courtesy of © TOYOTA, LICENSE AGREEMENT TMS1002 Courtesy of © TOYOTA, LICENSE AGREEMENT TMS1002
|
- Install the 2 screws.
- INSTALL RADIATOR GRILLE SUB-ASSEMBLY
- Engage the claws to install the radiator grille sub-assembly.
 Courtesy of © TOYOTA, LICENSE AGREEMENT TMS1002 Courtesy of © TOYOTA, LICENSE AGREEMENT TMS1002
|
- INSTALL HOOD TO RADIATOR GRILLE SEAL
- Using a piece of cloth, rub off any double-side tape that remains on the radiator grille seal sub-assembly.
NOTE:
- Installing the hood to radiator grille seal while old double-sided tape remains can cause adhesion failure.
- Using a screwdriver or similar tool to remove the old tape can damage the surface and cause adhesion failure.
- Using a non-residue solvent, clean the attachment surface.
- Engage the clips in order starting with the center clip to install the hood to radiator grille seal.
- Remove the peeling paper on a new hood to radiator grille seal.
- Apply double-sided tape to both ends of the hood to radiator grille seal.
NOTE:
Make sure to apply sufficient pressure to the portions with double-sided tape at both ends of the hood to radiator grille seal to ensure the tape is securely adhered.
 Courtesy of © TOYOTA, LICENSE AGREEMENT TMS1002 Courtesy of © TOYOTA, LICENSE AGREEMENT TMS1002
|
- INSTALL MILLIMETER WAVE RADAR SENSOR ASSEMBLY
Refer to PROCEDURE - Step 1